Jhokalups – Field Operation Action Report – 38

Jhokalups – Field Operation Action Report – 38

Jurisdictional Command of Bakunin vs Shasvasti Expeditionary Force

300/Asteroid Blues – Looting and Sabotaging

Once again we set up for our local game night. This week DoodleKing and I agreed to play Looting and Sabotaging from the Asteroid Blues phase 2 packet. After we arrived for the night and selected our table, rolled some WIP and got started.

Wip Roll
Jurisdictional Command of Bakunin – 11
Shasvasti Expeditionary Force – 2

Decision: Jhokalups
Deployment: DoodleKing
Initiative: Jhokalups
1st Turn: Jhokalups
1st Deploy: Jhokalups

Shasvasti Expeditionary Force List:

 DoodleKing L+S
──────────────────────────────────────────────────
GROUP 1  10
 MENTOR Lieutenant Shock Marksman Rifle / Pistol, Knife. (0 | 27)
 GWAILO (Multispectral Visor L2) Heavy Rocket Launcher / Breaker Pistol, Knife. (2 | 43)
 R-DRONE Flash Pulse, Sniffer / Electric Pulse. (0 | 8)
 SPECULO KILLER (Minelayer) Combi Rifle, Smoke Grenades, Antipersonnel Mines / Pistol, Monofilament CCW, Knife. (1.5 | 39)
 SPECULO KILLER (Minelayer) Combi Rifle, Smoke Grenades, Antipersonnel Mines / Pistol, Monofilament CCW, Knife. (1.5 | 39)
 CALIBAN (Chain of Command) Submachine Gun, Pulzar, D-Charges / Pistol, Knife, CC Weapon. (0 | 29)
 CALIBAN (Chain of Command) Submachine Gun, Pulzar, D-Charges / Pistol, Knife, CC Weapon. (0 | 29)
 SHROUDED (Minelayer) Boarding Shotgun, Dazer / Pistol, Knife. (0 | 24)
 NOX Combi Rifle, Zapper / Pistol, Knife. (0 | 14)
 NOX Hacker (EI Hacking Device) Submachine Gun, Zapper / Pistol, Knife. (0.5 | 17)
GROUP 2  2  2  2
 TAIGHA Chain-colt / DA CC Weapon. (0 | 6)
 TAIGHA Chain-colt / DA CC Weapon. (0 | 6)
 IKADRON (Baggage, Repeater) 2 Light Flamethrowers, Flash Pulse / Pistol, Electric Pulse. (0 | 9)
 IKADRON (Baggage, Repeater) 2 Light Flamethrowers, Flash Pulse / Pistol, Electric Pulse. (0 | 9)
5.5 SWC | 299 Points


Jurisdictional Command of Bakunin List:
 L+S v2
──────────────────────────────────────────────────
GROUP 1  9  1  1
 REVEREND CUSTODIER Hacker (Hacking Device Plus) Lieutenant Combi Rifle + Pitcher / Pistol, Knife. (0.5 | 34)
 REVEREND HEALER Boarding Shotgun, Nanopulser / Pistol, EXP CCW. (0 | 32)
 KUSANAGI Spitfire / Pistol, Shock CCW. (2 | 43)
 TASKMASTER Heavy Rocket Launcher, Light Shotgun, CrazyKoalas / Heavy Pistol, DA CCW. (2 | 47)
 BRAN DO CASTRO Boarding Shotgun / Pistol, DA CCW. (0 | 33)
 ZERO (Minelayer) Combi Rifle, Antipersonnel Mines / Pistol, Knife. (0.5 | 19)
 ZERO (Minelayer) Combi Rifle, Antipersonnel Mines / Pistol, Knife. (0.5 | 19)
 ZERO Hacker (Killer Hacking Device) Combi Rifle, Antipersonnel Mines / Pistol, Knife. (0 | 21)
 LUNOKHOD Heavy Shotgun, Akrylat-Kanone, D-Charges, CrazyKoalas (2) / Electric Pulse. (0 | 24)
 MORLOCK Chain Rifle, Smoke Grenades / Pistol, DA CCW. (0 | 6)

GROUP 2  1  2  2
 MORLOCK Chain Rifle, Smoke Grenades / Pistol, DA CCW. (0 | 6)
 MORLOCK Chain Rifle, Smoke Grenades / Pistol, DA CCW. (0 | 6)
 MODERATOR Combi Rifle + Pitcher / Pistol, Electric Pulse. (0.5 | 10)
6 SWC | 300 Points


I’ve really enjoyed some of the terrain our store has for it’s games. The mix of rocks and catwalks gives a nice feel that this could be the inside of an asteroid. The three level set up we had provided some nice tactical layering to think about. Unfortunately I didn’t have any hollow men to make the most of mobility between levels. I chose to go first and was assigned the side at the bottom of this picture.

Deployment:

The first thing I did was over infiltrate Bran to threaten the AC2. My Reverend Haris was on the middle level with the Custodier prime behind cover. Kusanagi was set up to start attacking right away. My Morlocks were on the left right and middle. My zero minelayers were set up to cover the AC2 approach. The lunokhod was up high with the koalas covering the AC2 as well. My moderator was up on level 3 prone. Finally, my taskmaster was my reserve and covered my left flank.

DoodleKing set up his deployment to try and deal with a over-infiltrated camo marker. The Speculos set up nearby with their mines covering the AC2. The Gwailo set up on the second level centrally. On the left and right a Nox covered a Taigha. The R-Drone was far right on the second level, watching where Kusanagi would stand up. The Calibans were forward on the left and right. With a Shrouded further up on the right. The Ikadrons were right and central. With the central one looking towards my Bran in Camo. Finally the Mentor Lt and its ambush camo marker went on the central back.

Top of 1: Jhokalups Bakunin

To start this party off the Morlocks all run forward. I can then use their irregular orders to run them all forward again. Then I activate Kusanagi and the Haris to take out the R-Drone and the Ikadron up high. Next Kusanagi discovers and takes out one of the mines covering the AC2. I have my Taskmaster put his Koalas into Stand-by before walking around the corner to shoot the other Ikadron. I spend a couple orders on Bran to try and get him by the AC2, but I forgot about a mine and so he is forced to dodge. Out of orders I end my turn.

Bottom of 1: DoodleKing Shasvasti

The Taighas run forward and safely dodge the AROs. The Gwailo then peaks out to start taking shots at Kusanagi. After a couple shots Kusanagi goes down. Running the odds on this exchange, it looks like this was not a favorable exchange for the Gwailo. Fortunately for DoodleKing the Gwailo makes it out unscathed.

After taking down Kusanagi the Taigha on the right comes around and Chain Colts down Bran. Then the Gwailos takes a shot at the Lunokhod and destroys it, taking out two of my Koalas and the Reverend healer with it. That done, DoodleKing ends his turn.

Top of 2: Jhokalups Bakunin

With Plan “A” (Bran) out the window. We are on to Plans “B”, “C”, and “D” (the morlocks). In running my Morlocks up I took out the Taigha on my right and performed a coup de gras do get my classified done. I then pull something out of the panoply before hunkering down. I lose one morlock to a shooting fight as I try to walk it forward more to try and set up a smoke screen to cover getting to the AC2. My last Morlock baits out a shrouded before going down to that same shrouded. I bring up my task master, taking out the Nox trooper on my left, clearing a mine and refilling Koalas from the second Panoply. After moving him a bit more forward to bring the Koalas way up, I end my turn.

Bottom of 2: DoodleKing Shasvasti

The main focus of DoodleKing’s turn was on advancing up a Camo marker that turned out to be a Chain of Command Caliban. After making it all the way up to my AC2, avoiding mines and fire from my Zeros the Caliban finally goes down. The shrouded then completes it’s classified against my unconscious Morlock. The Mentor lt reveals itself to fire at the Taskmaster, does a wound but fails to kill. After all this he ends his turn.

Top of 3: Jhokalups Bakunin

I start by attempting to have the last Morlock make it forward to the AC2, but it goes down to a combination of a mine and shock marksman rifle. The shock was unfortunate as this Morlock rolled V: Dogged for its metachemistry. The Taskmaster didn’t have enough orders to make it to the AC2, so I had my Zero come out to surprise shot down the Mentor Lt.

Bottom of 3: DoodleKing Shasvasti

Here we had a bit rules fumble, one of the remaining Camo markers was a Caliban with Chain of Command, so we played this turn as loss of lieutenant. So, in loss of lieutenant DoodleKing didn’t have enough points to get to the AC2, so he focused on maximizing points. He managed to take out my Taskmaster before ending his turn. With both AC2s undamaged and a classified each it came down to who had more things from the panoplies. With the two things I got them I got that point, making it a:

Final Score: 5 – 4 Bakunin Minor Victory

Lessons Learned:

Like what the Warcors and some of the more experienced players say, a game of Infinity has four turns, with deployment being turn one. I definitely messed up portions of my deployment here and that influenced how close this game was. It has been a while since I have used Bran, and I forgot how reliably he can over infiltrate. Bran should have been my reserve piece as an extra punch, instead of having him down first and shaping all of DoodleKing’s deployment.

I got too caught up in protecting Bran’s approach that I didn’t leave enough orders to actually do anything with him. I could have kept Bran where he was and used those two orders to better develop my board position. I am unhappy with some of my late turn plays, I basically wasted orders not accomplishing anything, relying instead on all my first and second turn actions to win the game.

It was fun to come back to Bakunin for a game after so long on other factions. I think I will go back to Tunguska for a while longer. I need to figure out how to make them tick.

Until next time.

Jhokalups – Field Operation Action Report – 37

Jhokalups – Field Operation Action Report – 37
Jurisdictional Command of Tunguska vs Invincible Army
300/Asteroid Blues – Transmission Matrix

This week we tried another campaign night. Our local group has been all playing on the same scenario lately, so that we can all compare experiences and lessons when the game is over. We tried out the Asteroid Blues version of Transmission Matrix. This week I was paired up with RomanLegion who said “I want to play against someone with heavy hacking.” So that’s what we did. After we got our table set up we rolled our wip roll.

Wip Roll
Jurisdictional Command of Tunguska – 11
Invincible Army – 9

Decision: Jhokalups
Deployment: Jhokalups
Initiative: RomanLegion
1st Turn: RomanLegion
1st Deploy: RomanLegion

Invincible Army List:

 AB RomanLegion

──────────────────────────────────────────────────
10
 SON-BAE Yaókòng Missile Launcher / Electric Pulse. (1.5 | 17)
 HÙSÒNG Yaókòng HMG / Electric Pulse. (1 | 25)
 ZÚYŎNG (Fireteam: Haris, Tactical Awareness) Combi Rifle + 1 TinBot B (Deflector L2) / 2 Breaker Pistols, Knife. (0.5 | 34)
 ZHĒNCHÁ Hacker (Assault Hacking Device) Boarding Shotgun / Pistol, Knife. (0.5 | 41)
 KOKRAM FTO (Fireteam: Duo) Feuerbach, Chain-colt, D-Charges / 2 Heavy Pistols, Knife. (2 | 48)
 HǍIDÀO Hacker (Killer Hacking Device) Boarding Shotgun / Breaker Pistol, Knife. (0 | 26)
 HAC TAO Hacker (Killer Hacking Device) MULTI Rifle, Nanopulser / Pistol, DA CCW. (0 | 67)
 ZHANSHI (Forward Observer) Combi Rifle / Pistol, Knife. (0 | 12)
 ZHANSHI Lieutenant Combi Rifle / Pistol, Knife. (0 | 11)
 Zhanshi YĪSHĒNG Combi Rifle / Pistol, Knife. (0 | 15)
 YÁOZĂO Electric Pulse. (0 | 3)
5.5 SWC | 299 Points
Jurisdictional Command of Tunguska List:

 AB Transmission
──────────────────────────────────────────────────
GROUP 1  10  1
 SECURITATE Paramedic (MediKit) Combi Rifle / Pistol, Knife. (0 | 15)
 SECURITATE Combi Rifle / Pistol, Knife. (0 | 13)
 SECURITATE Combi Rifle / Pistol, Knife. (0 | 13)
 GRENZER Combi Rifle + Light Flamethrower / Pistol, Breaker Pistol, Knife. (0 | 25)
 PERSEUS FTO (Fireteam: Haris) Breaker Combi Rifle, Nanopulser, Smoke Grenades / 2 Pistols, DA CC Weapon. (0 | 33)
 KRIZA BORAC Lieutenant HMG / Heavy Pistol, CC Weapon. (2 | 54)
 MARY PROBLEMS Hacker (Forward Deployment L1) Submachine Gun + Zapper, Pitcher / Pistol, Knife. (0.5 | 30)
 HECKLER Combi Rifle, Jammer, 1 FastPanda / Pistol, Knife. (0 | 23)
 ZONDNAUT Hacker (Assault Hacking Device) Combi Rifle / Pistol, Knife. (0.5 | 31)
   ZONDMATE Chain Rifle, Smoke Light Grenade Launcher / Electric Pulse. (5)
 INTERVENTOR Hacker (Hacking Device Plus) Combi Rifle / Pistol, Knife. (0.5 | 25)

GROUP 2  2  
 TRANSDUCTOR ZOND Flash Pulse, Sniffer / Electric Pulse. (0 | 8)
 SPEKTR Boarding Shotgun, Antipersonnel Mines / Pistol, Knife. (0 | 30)
3.5 SWC | 300 Points

Our table used some terrain that our locals, (TheDiceAbide and White_Lang) have designed and made. We played with the sections in a small donut configuration, with the antenna in the middle only accessible by two ladders and going over the roof. There were some nice rocks on both sides. I chose deployment and having RomanLegion deploy first so that I would likely be able to go second, which has some nice advantages on this scenario.

I chose the side that is at the bottom of the picture below. In hindsight, I think that I probably chose the wrong side.

Deployment:

A missle bot in a Zhanshi core was deployed on top of the donut, in the center. The rest of the fire team was to the left on the ground level. Further left was the Zhanshi Yisheng. There was a Zuyong haris with Krit and a Haido in the tunnels on the left. On the right the Yishen’s helper Yaozao was hanging with the Husong TR bot. A Hac-Tao was in hidden deploy on the far right. The Zencha was a reserve camo marker that was dropped into the central transmission matrix area. The designated target was on the left behind some purple rocks.

I set up my securitate link with Perseus and the Grenze on my left, guarding that Transmission area and the nearby Designated Target. I over infiltrated my Spektr to contest the far left Transmission Zone. I had Mary and the Interventor on my back edge and outside of the repeater network. My Heckler was inside the rings, ready to cover and approach. I had the Zondnautica and my Transductor Zond on the right side, behind the purple stones. Finally, I brought the Kriza in centrally, able to threaten some approaches from inside the ring.

Top of 1: RomanLegion IA

At the start of the game, I forgot to limit the use of Command Tokens on RomanLegion. I remembered after he talked about breaking Krit out of the link and then reforming it again. After breaking the Zuyong and Haidao out, the Haidao attempted a split Redrum at Mary and the Interventor. I responded with Lightning form Mary, Sucker Punch from the Interventor and Oblivion from the Zondnautica. The Haido makes it through all of these and takes out the Interventor. Another two orders and the Zondnautica and Mary go down to the Haido’s hacking. A TO marker reveals and slowly walks all the way across the map to be within a few inches of Persues. It reveals to be a Hac Tao and tries to take out my Persues, who successfully smokes. The Hac Tao then takes out my DT in close combat before reverting to a TO Camo marker. That done he passes the turn.

Bottom of 1: Jhokalups Tunguska

My first priority is to deal with the Hac Tao that is right by my link team. I spend a few orders to try and have the Grenzer discover, when that fails I have Perseus smoke out and attempt an intuitive attack on the Hac Tao. After the Hac Tao is revealed I walk Perseus in with the Grenzer moving nearby to attack with Martial Arts 3 against a change face, and take the Hac Tao off the table. After taking down the Hac Tao, I run my Transductor into the control zone on my right. I then use my remaining order to reveal my Spektr to surprise shot down the TR bot before ending my turn. WIth three zones to his two, I score this turn.

Score at the End of 1: 2 – 1 Tunguska Favor

Top of 2: RomanLegion IA

In order to deal with my Spektr, the Krit link team walks across the board. Krit on the rooftops and the others inside. On the way over Krit exchanges fire with Perseus. On their first exchange, Perseus deals a wound to Krit. After exchanging fire twice more, Krit manages to hit with both shots and Perseus goes down.

The odds seem to be in favor of Perseus winning that fight, alas, it was not meant to be. After taking out my myrmidon, the Haidao takes out my Spektr. Krit uses these orders to retreat down the side of the wall and pick up the TR bot. All done, RomanLegion passes his turn.

Bottom of 2: Jhokalups Tunguska

I start off with moving my Kriza over to a ladder, hoping to take out the missile bot and clear/capture the middle antenna. Unfortunately I fail a reset and BTS against the Zencha’s Oblivion. I then spend a few orders to bring my Grenzer, the Paramedic and another Securitate forward in another attempt to take out the missile bot, this goes awry and my Grenzer dies. Out of orders I end my turn. With three zones to my two, RomanLegion scores.

Score at the End of 2: 3 – 2 Invincible Army Favor

Top of 3: RomanLegion IA

The Haidao comes around and takes out my two forward securitate before Coup De Gras’ing my Spektr for the classified. With that done RomanLegion ended his turn.

Bottom of 3: Jhokalups Tunguska

I currently don’t have a lot of hope for the mission. Maybe if I get lucky I can take out the designated target and the Zencha with my Heckler. I spend orders to advance him forward and onto the roof, taking a shot at the Zencha, and losing my Heckler. With his classified done and another more zones scored, the final score is:

Final Score: 6 – 2 Invincible Army Minor Victory

Lessons Learned:

I think that this game was lost in deployment. The side I chose did not have any easy access to the roof. Additionally, I didn’t have a plan for the middle zone. It would have been better to put my Spektr in the middle zone, and focused on controlling that zone.

I am pleased with the usage I got out of Perseus. His ODD and fireteam link bonus can really push firefights in his favor. Even at bad ranes. Additionally, the mixed fire team and Stealth rules help Perseus push melee engagements into his favor as well. He is quickly becoming one of my favorite models.

Until next time.

Jhokalups – Field Operation Action Report – 36

Jhokalups – Field Operation Action Report – 36
Jurisdictional Command of Tunguska vs Military Orders
300/Asteroid Blues – Decapitation

This last week our game store had a little Asteroid Blues game night. As a group we were competing in Harry’s Bar. This would be my first game against Nico and against the Military Orders section of PanOceania. After a quick confirmation of what we were playing we headed to our table and rolled for lieutenant.

Wip Roll
Jurisdictional Command of Tunguska – 15
Military Orders – 7

Decision: Nico
Deployment: Jhokalups
Initiative: Nico
1st Turn: Nico
1st Deploy: Nico

Military Orders List:

 Military Orders
──────────────────────────────────────────────────
9
 JOAN OF ARC Lieutenant MULTI Rifle, Nanopulser / Pistol, DA CCW. (+1 | 50)
 DE FERSEN Spitfire / Pistol, Templar CCW (AP + Shock). (2 | 56)
 KNIGHT HOSPITALLER HMG / Pistol, DA CCW. (2 | 39)
 KNIGHT HOSPITALLER Doctor (MediKit) MULTI Rifle / Pistol, DA CCW. (0 | 39)
 KNIGHT OF SANTIAGO Hacker (Killer Hacking Device) Combi Rifle, Nanopulser, D-Charges + 1 TinBot A (Deflector L1) / Pistol, DA CCW. (0 | 38)
 BULLETEER Spitfire / Electric Pulse. (1 | 23)
 FUGAZI DRONBOT Flash Pulse, Sniffer / Electric Pulse. (0 | 8)
 PALBOT Electric Pulse. (0 | 3)
 PALBOT Electric Pulse. (0 | 3)
 MACHINIST (Father-Engineer) Combi Rifle, D-Charges / Pistol, Knife. (0 | 15)
 SPEC. SERGEANT Hacker (Hacking Device) Combi Rifle / Pistol, Knife. (0.5 | 21)
5.5 SWC | 295 Points

Jurisdictional Command of Tunguska List:

 AB Decap
──────────────────────────────────────────────────
GROUP 1  8
 KRIZA BORAC Lieutenant HMG / Heavy Pistol, CC Weapon. (2 | 54)
 PUPPET MASTERS Submachine Gun / Pistol, Knife. (0 | 12)
 PUPPETBOT (Forward Observer) Boarding Shotgun / Electric Pulse. (0 | 11)
 PUPPETBOT (Forward Observer) Boarding Shotgun / Electric Pulse. (0 | 11)
 PUPPETBOT (Forward Observer) Boarding Shotgun / Electric Pulse. (0 | 11)
 GRENZER Combi Rifle + Light Flamethrower / Pistol, Breaker Pistol, Knife. (0 | 25)
 SECURITATE Paramedic (MediKit) Combi Rifle / Pistol, Knife. (0 | 15)
 PERSEUS FTO (Fireteam: Haris) Breaker Combi Rifle, Nanopulser, Smoke Grenades / 2 Pistols, DA CC Weapon. (0 | 33)
 SECURITATE Feuerbach / Pistol, Knife. (1 | 22)
 SECURITATE Feuerbach / Pistol, Knife. (1 | 22)
 HOLLOW MEN Missile Launcher, Chain-colt / Breaker Pistol, Knife. (2 | 35)

GROUP 2  2  1  
 WARCOR (360º Visor) Flash Pulse / Stun Pistol, Knife. (0 | 3)
 HECKLER Combi Rifle, Jammer, 1 FastPanda / Pistol, Knife. (0 | 23)
 HECKLER Combi Rifle, Jammer, 1 FastPanda / Pistol, Knife. (0 | 23)
6 SWC | 300 Points

Our section of Novyy Bangkok seemed to have some active mining operations near the bar. With ramps up to the exposed rocks we would have some nice high places to shoot down from. Nico choose to go first, and I chose a side with what felt like a good set of sniping nests.

Deployment:

Nice set his support specialists up high on his left, guarded by a Fugazi. The Machinist had Palbots on the left and right. The Crusader fireteam on the right had a Hospitaller HMG up top of a building. The Wild Bill bot was set up centrally, ready to walk up and guard the Designated Target that was located centrally. A Bulleteer came in on the left side as the reserve piece.

I set my Kriza and Bill bot on top of a building to my left, the Kriza had a nice short walk to be able to gun down the enemy HVT. I set my Designated target to be inside a little nook in one of the rock pillars. I set up a Warcor to be near the HVT and hopefully drag it back to a safer area. The Puppet bots guarded my back center, and I had a securitate link set up on the right. I had the Hollow Man Missile Launcher in reserve and set it up in the middle section on overwatch. I had two Hecklers up front ready to Isolate anything that walked by.

Top of 1: Nico – Military Orders

To start things off, Nico has the Spec Sergeant put up Assisted Fire on the Bulleteer. The Bulleteer then comes around the corner to take a couple shots at the Hollow Man, driving the Hollow Man down into cover. Then the Bulleteer came around the corner to take out my Securitate Feuerbachs one after the other. As the Bulleteer started to advance up after the rest of the link, the Heckler on the right attempts to jam it but fails. The Hospitaller HMG takes out the Heckler on my right before the Bulleteer continues to move up. As it’s moving the Puppet Bots attempt to Flash Pulse it, landing a crit success while the Bulleteer attempts to gun down it and Perseus. After retreating the Bulleteer with a coordinated order that also maneuvered De Fersen into a firing position, Nico passed turn.

Bottom of 1: Jhokalups – Tunguska

My first priority was to take out the Bulleteer. I used Persues and a smoke cloud to take out the Bulleteer in close combat. I then have my Kriza stand up and attempt to fight the HMG and De Fersen. I wind up taking a wound while forcing De Fersen down into cover. I attempt to have my Warcor snag the HVT and retreat out. But the HMG takes out the poor reporter. I move my Camo marker up to cover the HVT better, reposition the remaining members of the link team, and then passed turn.

Top of 2: Nico – Military Orders

Nico has the Hospitaller HMG takes out the Designated target. It then walks up to attack the Hollow Man. After knocking out the Hollow Man the HMG retreats. I miss a couple opportunities here to attempt to jam the Hospitaller. Nico then spends quite a few orders having De Fersen walk up to take out my Heckler camo marker, before retreating behind a building.

Bottom of 2: Jhokalups – Tunguska

I activate my Kriza and have him gun down the HMG. The Kriza then walks around the corner and takes out the Fugazi. After driving De Fersen into hiding the Kriza takes out the Designated Target. I spend a few orders advancing the Puppet Bots up to mid field and pass turn.

Top of 3: Nico – Military Orders

Nico has De Fersen come forward and take out the Kriza at a closer range. Then the Wild Bill bot comes up to guard the middle. Nico passes turn.

Bottom of 3: Jhokalups – Tunguska

In a foolish plan I spend all my orders to try and bring the paramedic over to heal the Kriza. When the paramedic cannot get far enough, I pass turn. Having taken out my Designated Target, my lieutenant and more army points, the game ends in a:

Final Score: 10 – 3 Military Orders Total Victory

Lessons Learned:

I feel like I had two big mistakes this game. At the end of my second turn, I had no reason to leave my Kriza standing. I got distracted from the mission and left my lieutenant exposed and in danger, when there was no reason to do so. I also wasted my second turn on a long shot, when I could have had the Puppet Bots go on a small rampage with my remaining orders. It was an interesting experience, and I look forward to playing Nico again.

Jhokalups – Field Operation Action Report – 35

Jhokalups – Field Operation Action Report – 35
Jurisdictional Command of Tunguska vs O-12
300/ITS XI – Firefight

This game is a special one. While it is only my 42 game, it represents one year of playing infinity and writing up my battle reports. For a game on a day of such import that went unremarked on during the game. It wasn’t until I sat down and looked at it that I noticed.

So, happy 1 year of infinity. Let’s get to the battle report.

Wip Roll
Jurisdictional Command of Tunguska – 3
O-12 – 20

Decision: Jhokalups
Deployment: Xammy
Initiative: Jhokalups
1st Turn: Jhokalups
1st Deploy: Jhokalups

O-12 List:

 O-12
──────────────────────────────────────────────────
GROUP 1  10  1
 ALPHA Lieutenant (Strategos L2) 2 Light Shotguns, 2 Nanopulsers / Pistol, DA CC Weapon. (0 | 26)
 CUERVO GOLDSTEIN Submachine Gun, Akrylat-Kanone, D-Charges / Pistol, Monofilament CC Weapon, Knife. (0 | 39)
 DELTA Boarding Shotgun, Panzerfaust / Pistol, Knife. (0 | 23)
 EPSILON MULTI Sniper, Nanopulser / Pistol, Knife. (1.5 | 30)
 OMEGA HMG / Pistol, Knife. (2 | 48)
 GANGBUSTER Combi Rifle + Light Riotstopper, MadTrap / Pistol, Knife. (0 | 23)
 GANGBUSTER Combi Rifle + Light Riotstopper, MadTrap / Pistol, Knife. (0 | 23)
 RAZOR (Minelayer) Boarding Shotgun, Antipersonnel Mines / Pistol, Knife. (0.5 | 31)
 RAZOR (Minelayer) Boarding Shotgun, Antipersonnel Mines / Pistol, Knife. (0.5 | 31)
 VARANGIAN Submachine Gun, 2 Chain-colt, Smoke Grenades / Pistol, AP CC Weapon. (0 | 13)
GROUP 2  1  1
 VARANGIAN Light Shotgun, Chain Rifle, Smoke Grenades / Pistol, AP CC Weapon. (0 | 12)
4.5 SWC | 299 Points

Open in Infinity Army

Jurisdictional Command of Tunguska List:

 Jurisdictional Command of Tunguska
──────────────────────────────────────────────────

9  1  1
 INTERVENTOR Hacker Lieutenant (Hacking Device Plus) Combi Rifle / Pistol, Knife. (0.5 | 25)
 KRIZA BORAC (360º Visor) Mk12, Submachine Gun / Heavy Pistol, CC Weapon. (0 | 63)
 HOLLOW MEN Missile Launcher, Chain-colt / Breaker Pistol, Knife. (2 | 35)
 HOLLOW MEN Spitfire, Chain-colt / Breaker Pistol, Knife. (2 | 36)
 HOLLOW MEN Combi Rifle, Chain-colt + 1 TinBot A (Deflector L1) / Breaker Pistol, Knife. (0 | 31)
 HOLLOW MEN Combi Rifle, Chain-colt / Breaker Pistol, Knife. (0 | 30)
 HOLLOW MEN Combi Rifle, Chain-colt / Breaker Pistol, Knife. (0 | 30)
 ZONDNAUT Boarding Shotgun / Pistol, Knife. (0 | 24)
  ZONDMATE Chain Rifle, Smoke Light Grenade Launcher / Electric Pulse. (5)
 HECKLER Combi Rifle, Jammer, 1 FastPanda / Pistol, Knife. (0 | 23)
 WARCOR (360º Visor) Flash Pulse / Stun Pistol, Knife. (0 | 3)
4.5 SWC | 300 Points

Open in Infinity Army

We had a more open table than I am used to, so this was going to be an interesting game. Picking sides, Xammy gave me the far side below. I had some nice height, but some other places where a bit harder to hide things in. After having picked sides, Xammy informed me that Strategos level 2 was in play. So I would have no reserve.

Deployment:

I put my Hollow Men link over by my two high towers. Three up top, including my heavy weapons, and two down low. I put my Heckler centrally up on a can. My Zondnautica is in the back left. I have my Warcor up on top of the building on my right. My Interventor is one level down behind the Warcors tower, and I have my Kriza on the right ready to run forward.

Xammy has his Epsilon up on a building to the left, watching two firelanes. Two Razers attempt to over infiltrate and fail, winding up on the backline left and right thirds. There are two Varangians guarding the mid and right deployment zone. There is an Alpha hiding in the back right. Two Gangbusters were set up on the right side, with their Mad traps, probably to guard against my Hollow Men.

Top of 1: Jhokalups Tunguska

To start things off I have my Zondnautica zip out carefully to blast away a madtrap. Another order and I bring it around to take a shot at the Gangbuster, catching the Mad-Trap behind it. Unfortunately I misjudged the distance, and while I did take out the Gangbuster, my Zondnautica got immobilized. Next up I start moving my Hollow Men up and have the missile launcher take some shots at the Epsilon. I figure that we will be about on the same modifiers and with my two dice to his one, and two wounds I should be able to win this fight and dominate the high ground. The math seems to back this up:

Unfortunately over the course of several orders math goes to Xammy and I lose my Hollow Man Missile launcher. With the missile launcher down I decide that the Kriza will solve my problems, and I walk him up and paste the Epsilon. I then walk the Kriza up more to the Panoplies on my left and pick up a Multi-Rifle. I reform my Hollow Men link and bring the Spitfire forward. That done I pass turn.

Bottom of 1: Xammy O-12

Xammy spends a couple orders to bring the Omega forward to be an obnoxious threat. It also takes out my HollowMan spitfire, breaking the link again. With the link broken, Xammy drops in Cuervo Goldstien and takes out another Hollow Man. After a bit more set up Xammy passes turn.

Top of 2: Jhokalups Tunguska

First thing I do is take out Goldstein with the Hollow Man up top. I can then bring my Hollow Man on the ground forward, pick up some extra ARM from the Panoplies and then take out the Omega. I bring the Hollowman far forward to threaten the deployment zone. I then have my Interventor crawl down with the vague idea of bringing her forward to take out a classified. Orders spent I pass turn.

Bottom of 2: Xammy O-12

Xammy drops in a Delta and takes out my Interventor. Then the Razers attempt to come forward as part of a coordinated order while in the TO marker state. I have my Warcor and Zondnautica attempt discover. Before my Hollow Man discovers a Razer on my right. The remaining Gangbuster comes up and puts a wound on the Hollowman up top, then retreats back. I have the Hollow Man fail guts out of the line of fire. After some repositioning and re-shuffling he passes turn.

Top of 3: Jhokalups Tunguska

In loss of lieutenant I don’t have a lot of orders to do much. I have my Kriza set up to see down it’s fire lane and take out a Razer. That done I pass turn.

Bottom of 3: Xammy O-12

Xammy has his Varangians walk forward to try and throw some smoke. My Hollowman up top puts one into Dogged and my Warcor Stuns the other. The Varangian in dogged walks forward through smoke. Eating several shots from my Kriza’s double action multi-rifle on the way. The Varangian assaults into my Kriza and manages to take him out. Xammy passes turn. With my Kriza dead, the points fall out to a:

Final Score: 7 – 2 O-12 Total Victory

Lessons Learned:

This game came down to the last set of orders. Had the Kriza lived I would have had more army points and the game would have been a 6-3 minor victory for me (the Kriza was also securing the HVT). An obvious failure was that I didn’t reveal my Heckler to shoot the Varangian when I had the chance to. An extra shot or two would have maybe been able to bring it down, saving the Kriza.

I think I messed up the positioning of my Heckler. He didn’t contribute during the game other than an order. A suggestion that Xammy had was deploying it near my Lieutenant in order to add a layer of protection. I miss-played the Zondnautica a bit, I was playing tight to the edges of what I thought 8 inches was, and wound up just inside of boost range instead of just out. If it was back that extra inch, the Zondnautica would have been able to continue it’s little rampage across the back field of Xammy’s forces. Another trick I missed would have been splitting the Zondnautica up into rider and Zondmate, to let the Zondmate eat a madtrap while Chain Rifling down more Gangbusters.

A place where I feel frustrated with myself is my commitment to trying to take down the Epsilon with my Hollow Man Missile Launcher. Looking back at the math, it looks like the right choice. The Missile Launcher vs Epsilong was:

And what wound up taking out the Epsilon was a Kriza out of cover:

Looking at what I had available and where it was, I think I made the right choice, but it’s frustrating when what seems like the right choice doesn’t work out. Neither option is bulletproof. Something to think about, ways to clear out a sniper watching multiple lanes like that.

While I like both the Kriza and the Hollow Men Core, I don’t think they belong together in one list. It’s fun, but it also feels like there are not enough orders to go around and get everything I want done. I do look forward to continuing to improve with the Zondnautica and Hecklers. And am excited for the start of another year of Infinity!

Until next time.

Jhokalups – Field Operation Action Report – 34

Jhokalups – Field Operation Action Report – 34
Jurisdictional Command of Tunguska vs Combined Army
200/ITS X – Annihilation

This was my last make up game for the escalation league, and my brother was kind enough to play me again.

Wip Roll
Jurisdictional Command of Tunguska – 13
Combined Army – 15

Decision: Jhokalups
Deployment: DoodleKing
Initiative: Jhokalups
1st Turn: Jhokalups
1st Deploy: Jhokalups

Combined Army List:

 Combined Army
──────────────────────────────────────────────────
1
 AVATAR Lieutenant (Strategos L3) MULTI HMG, Sepsitor Plus / DA CCW. (3.5 | 137)
  STALDRON Flash Pulse / Knife. (0 | 0)
 KURGAT Boarding Shotgun, D-Charges, Antipersonnel Mines / Pistol, Knife. (0 | 17)
 R-DRONE Flash Pulse, Sniffer / Electric Pulse. (0 | 8)
 R-DRONE Flash Pulse, Sniffer / Electric Pulse. (0 | 8)
 IKADRON (Baggage, Repeater) 2 Light Flamethrowers, Flash Pulse / Pistol, Electric Pulse. (0 | 9)
 IKADRON (Baggage, Repeater) 2 Light Flamethrowers, Flash Pulse / Pistol, Electric Pulse. (0 | 9)
 TAIGHA Chain-colt / DA CC Weapon. (0 | 6)
 ÍMETRON . (0 | 4)

3.5 SWC | 198 Points

Open in Infinity Army

Jurisdictional Command of Tunguska List:

 GEL Wk4 Annihilation v3
──────────────────────────────────────────────────
1
 KRIZA BORAC Lieutenant HMG / Heavy Pistol, CC Weapon. (2 | 54)
 INTERVENTOR Hacker (Killer Device Plus UPGRADE: Lightning) Boarding Shotgun, 1 FastPanda / Pistol, Knife. (0 | 20)
 TRANSDUCTOR ZOND Flash Pulse, Sniffer / Electric Pulse. (0 | 8)
 HOLLOW MEN Combi Rifle, Chain-colt + 1 TinBot A (Deflector L1) / Breaker Pistol, Knife. (0 | 31)
 STEMPLER ZOND FTO (Super-Jump) Combi Rifle, Sniffer / Electric Pulse. (0 | 18)
 GRENZER (Forward Observer, Sensor) Combi Rifle + Light Flamethrower / Pistol, Breaker Pistol, Knife. (0 | 27)
 HOLLOW MEN Combi Rifle, Chain-colt / Breaker Pistol, Knife. (0 | 30)
 SALYUT (Minesweeper, Repeater) Electric Pulse. (0 | 8)
 WARCOR (360º Visor) Flash Pulse / Stun Pistol, Knife. (0 | 3)

2 SWC | 199 Points

Open in Infinity Army

For the sake of time we played on the same table that I used for my game against Markob. After tweaking some objectives we rolled our dice and got underway.

Deployment:

Winning the roll and choosing to go first I deployed my Kriza on the left with a Hollow man Core to the right of a central building. I dropped my Warcor in the overwatch spot. I had the Grenzer deployed centrally, ready to cover either side of the board. I had a Salyut and Transductor in the wings with and Interventor KHD up high on the building in the back of the zone.

The Avatar was deployed on the back left, flanked by Ikadrons. There was a Kurgat engineer in the mid behind a building, and a pair of R-drones watched the two approaches. An Imetron landed up on top of a building.

Top of 1: Jhokalups Tunguska

To start things off, I knew I wanted to be aggressive with the Kriza. I spend a few orders to walk the Kriza up, taking out the R-Drones, the Kurgat and the Imetron. After that spree I sent my Kriza back into hiding on my left.

Bottom of 1: DoodleKing Combined

Down to two Ikadrons, the Taigha and the Avatar, DoodleKing starts by walking the Avatar around a corner. My Grenzer FO attempts a flash pulse, and Crits the Avatar. With the Avatar unable to attack, the Ikadrons advance up to try and interfere with the Hollow Men. The Taigha comes up as well. After retreating the Avatar, he passes turn.

Top of 2: Jhokalups Tunguska

After having my Kriza end the Ikadron and Taigha threat, I start walking my Grenzer to where the Avatar is hiding. After a few orders I slip the Grenzer around and light up the Avatar with the Grenzer’s light flamethrower. The Avatar attempts to spread the virtue of the EI, but the Grenzer’s high BTS saves him from a brain washing. I then had the Grenzer retreat back from the Avatar and pass the turn.

Bottom of 2: DoodleKing Combined

With just an Avatar left, Doodle sends him forward and takes revenge on the Grenzer for burning off his ODD. The Avatar then retreats back a bit.

Top of 3: Jhokalups Tunguska

The Avatar is the only thing left to deal with. I send forward my Hollow Men link team and manage to put a wound on the Avatar. After it slides around a corner, I send the Kriza in, and do another wound. I spend an order to retreat the Kriza and then pass the turn.

Bottom of 3: DoodleKing Combined

Looking for a possible opportunity to score, DoodleKing has the Avatar take a last shot at the Hollow Man. When nothing happens, he ends turn. With the Avatar still alive and a lot of points on my side, the final score is:

Final Score: 5 – 3 Tunguska Minor Victory

Lessons Learned:

I really enjoyed the Kriza’s performance in this mission. He was able to take out a very large percentage of the CA orders in the first turn.

The surprising MVP of the game was the Grenzer FO. Stunning the Avatar and eliminating any aggressive actions it could take. That same Grenzer was also the one that burned off the Avatar’s ODD and survived a Sepsitor attack. I would have had a much harder time without a Crit stun basically taking the Avatar out of the game for turn one.

The Avatar is surprisingly difficult to kill. The high ARM and BTS seem to bounce most of the shots that got through. And ODD in cover giving a -9 before rangebands is tough. Thankfully the Grenzer has the tools to help mitigate this. All in all a fun game and a nice end to the escalation league.

Until next time.

Jhokalups – Field Operation Action Report – 33

Jhokalups – Field Operation Action Report – 33
Jurisdictional Command of Tunguska vs StarCo
300/ITS X – Seize the Antennas

The final game of the league. Since I was ill for the last week, I had to make up some games. My opponent was also making up a missed game from last week. So we got the table set up and rolled some WIP.

Wip Roll
Jurisdictional Command of Tunguska – 8
StarCo – 9

Decision: Markob
Deployment: Markob
Initiative: Jhokalups
1st Turn: Jhokalups
1st Deploy: Jhokalups

StarCo List:

 Markob Seize the Antennas
──────────────────────────────────────────────────
GROUP 1  8  2
 EMILY (Chain of Command) Combi Rifle + Light Grenade Launcher (Normal and E/M), Nanopulser / Assault Pistol, Knife. (0.5 | 35)
 ALGUACIL Hacker (Hacking Device) Combi Rifle / Pistol, Knife. (0.5 | 18)
 ALGUACIL Paramedic (MediKit) Combi Rifle / Pistol, Knife. (0 | 12)
 ALGUACIL HMG / Pistol, Knife. (1 | 18)
 ALGUACIL Combi Rifle / Pistol, Knife. (0 | 10)
 BANDIT Hacker (Killer Hacking Device) Light Shotgun, Adhesive Launcher / Pistol, DA CCW. (0 | 25)
 SPECTOR (AD: Combat Jump) Boarding Shotgun, Nanopulser, Drop Bears / Pistol, E/M2 CC Weapon. (0 | 33)
 UHAHU Hacker (Hacking Device Plus. UPGRADE: Icebreaker) Pitcher, D-Charges / Assault Pistol, Knife. (0.5 | 25)
 REAKTION ZOND HMG / Electric Pulse. (1 | 26)
 VERTIGO ZOND Smart Missile Launcher / Electric Pulse. (1.5 | 18)
GROUP 2  6  1  1
 IRMANDINHO Chain Rifle, D-Charges, Smoke Grenades / Pistol, AP CCW. (0 | 8)
 BRAWLER Lieutenant Rifle + Light Shotgun / Pistol, Knife. (0 | 16)
 JAGUAR Adhesive Launcher, Panzerfaust / Pistol, DA CCW. (0.5 | 13)
 JAGUAR Chain Rifle, Smoke Grenades / Pistol, DA CCW. (0 | 10)
 JAGUAR Chain Rifle, Smoke Grenades / Pistol, DA CCW. (0 | 10)
 JAGUAR Chain Rifle, Smoke Grenades / Pistol, DA CCW. (0 | 10)
 CSU (Specialist Operative) Rifle + Light Shotgun, Nanopulser / Pistol, Knife. (0 | 12)
5.5 SWC | 299 Points

Jurisdictional Command of Tunguska List:

 Jurisdictional Command of Tunguska
──────────────────────────────────────────────────
9  1  1
 INTERVENTOR Hacker Lieutenant (Hacking Device Plus) Combi Rifle / Pistol, Knife. (0.5 | 25)
 HOLLOW MEN Spitfire, Chain-colt / Breaker Pistol, Knife. (2 | 36)
 HOLLOW MEN Missile Launcher, Chain-colt / Breaker Pistol, Knife. (2 | 35)
 HOLLOW MEN (Specialist Operative) Boarding Shotgun / Breaker Pistol, Knife. (0 | 30)
 HOLLOW MEN Combi Rifle, Chain-colt / Breaker Pistol, Knife. (0 | 30)
 HOLLOW MEN Combi Rifle, Chain-colt / Breaker Pistol, Knife. (0 | 30)
 STEMPLER ZOND FTO (Super-Jump) Combi Rifle, Sniffer / Electric Pulse. (0 | 18)
 ZONDNAUT Hacker (Assault Hacking Device) Combi Rifle / Pistol, Knife. (0.5 | 31)
   ZONDMATE Chain Rifle, Smoke Light Grenade Launcher / Electric Pulse. (5)
 SPECTOR (AD: Combat Jump) Boarding Shotgun, Nanopulser, Drop Bears / Pistol, E/M2 CC Weapon. (0 | 33)
 SPEKTR (Forward Observer) Combi Rifle, Antipersonnel Mines / Pistol, Knife. (0 | 32)

5 SWC | 300 Points


Our table was a nice mix of catwalks and tall rocks. Winning the roll, markob tool the side with lower rocks but access to the building. After picking the side with the lower rocks, but better catwalk access. We then got down to the business of setting up.

Deployment:

I couldn’t not take advantage of the massive rock on the right side. I knew I wanted my Hollow Man missile launcher up there, so that dictated that the rest of the link would be around this huge tower. I hid my Interventor prone on a rooftop, the Zondnautica was on my left ready to zip up the middle. The Stempler was on the right of center near the Hollow Men, ready to link up. I had my Spektr in hidden deploy near the central objective.

Markob heavily favored his left side, with two Jaguars, the Brawler LT. CSU and the Vetrigo Zond. Emily and the Alguaciles were huddling around the middle building. A pair of Jaguars watched the right side and back field. Uhahu and the Reaktion Zone hid inside the building. The Irmandinho was off to the right, with the Bandit KHD close to the central antenna.

Top of 1: Jhokalups Tunguska

First, I cancel my Zondnautica impetuous order, I don’t want it to have to fight a Reaktion HMG and Panzerfaust with a single smoke grenade. I then had my Missile launcher Hollow Man take out the HMG and Paramedic Alguaciles, taking out Emily in the blast. After attempting and failing to take down the Vertigo and the Brawler LT. I then attempt to have the Zondnautica shoot out some smoke, and fail, then try and rush over my Stempler to get my close antenna. The Stempler goes down. I try for some more fiddling with my Hollow Man link, but wind up losing the other Hollow Man up top to the missile template. Feeling a little frustrated I pass turn.

Bottom of 1: Markob StarCo

After moving some orders to group one, the Irmandinho runs up with some smoke to get the antenna closest to Markobs side. The Irmandinho wins the smoke versus my Missile Launcher and grabs that antenna before retreating back behind a building. The Vertigo attempts to take out the Hollow Man ML, but the Hollow ML crits the Vertigo down. Markob then attempts to drop Raul in behind my Zondnautica. My interventor has a hack flight and sends him scattering towards the middle of the table. Unfortunately that is right on top of the catwalk leading up to my Hollow Man ML. Due to forgetting how I was playing the Missile Launchers Facing, I have him pointing entirely the wrong way.

I have the Zondnautica that can see take a shot and then declare warning with the Hollow Man who is alive and can see Spector. My ML fails the change face roll, and I put Spector into no Wound Incapacitation. Raul Activates again, taking another shot and another warning from the Hollow Man, I fail on both accounts, and Raul lands a mine by my ML Hollow Man. With another order and a failed change face, Raul knocks out the Hollow Man ML. But does go down in the process to the Zondnautica. The Bandit KHD reveals and captures the middle antenna and then the turn is passed to me.

Top of 2: Jhokalups Tunguska

I attempt to drop my Spector in a spot to go after the remaining troopers on the StarCo side. Unfortunately the Bandit hits Raul with the Adhesive launcher and glues him in place. With the Bandit revealed I walk the Hollow Men around and shoot down the Irmandinho then the Bandit KHD. After tucking the Hollow Men into a safe spot I pass turn.

Bottom of 2: Markob StarCo

Uhahu makes an appearance and walks up to attempt to hack the Hollow Men. After getting them immobilized but failing to actually break the fireteam. The alguacil hacker makes it up near the Hollow Men to help cover. That done Markob passes turn.

Top of 3: Jhokalups Tunguska

First I have the Hollow Men take out the two hackers with Chain Colts and combi shots. Then my Zondnautica smokes up the HMG so that I can take the close antenna. I then attempt to have my Spektr FO take out the TR Bot and Algucil guarding the middle objectives. I get the TR bot but my Spektr dies to the Alguacil. I then spend my last few orders bringing the Hollow Men team across the field, taking out the CSU Specialist on the way to the central objective. With the last order my Hollow Man specialist flips the middle antenna over to me.

Bottom of 3: Markob StarCo

With no specialists left and no ability to flip the antenna back, markob ends turn. Making it a:

Final Score: 6 – 3 Tunguska Minor Victory

Lessons Learned:

One of the obvious things I noticed this game is that I need to make sure to have my front arcs marked. I messed up the facing of my ML Hollow Man and that was because I forgot which gun was being used for the front arc, so it was looking off the board and not the way I thought I had him. I also had an extra Hollow Man up with the Missile Launcher that got killed in the blast of another Missile bot. There was no reason for that Hollow Man to be where he was, and I got him needlessly killed.

I also didn’t like my initial setup, I completely neglected the left side and had my Zondnautica out on its own. The Zondnautica didn’t have a good setup for covering itself with smoke, the Smoke Light Grenade launcher has a different set of good range bands than what I have been used to with thrown Smoke Grenades. I will need more practice with this unit to get a good idea of the range bands.

It was a tight and enjoyable game, I enjoy the full Hollow Man link team, they do some nice work. That’s all for now.

Until Next time.

Jhokalups – Field Operation Action Report – 32

Jhokalups – Field Operation Action Report – 32
Jurisdictional Command of Tunguska vs Steel Phalanx
250/ITS X – Quadrant Control

In our escalation league, the 250 point match was quadrant control. This time I faced off against SprocketGX. The last time we played was in FOAR – 18, where we played Foreign Company vs Caledonian Highlander Army using the ITS X – Frostbyte mission.

This time around we were both on new factions, and at a different point level. It was also going to be interesting, since FOAR – 18 was back in April, so it has been a few months since we last played. After we picked our table and got everything settled we went to our WIP roll.

Wip Roll
Jurisdictional Command of Tunguska – 20
Steel Phalanx – 12

Decision: SprocketGX
Deployment: Jhokalups
Initiative:SprocketGX
1st Turn: SprocketGX
1st Deploy:SprocketGX

Steel Phalanx List:

 Steel Phalanx
──────────────────────────────────────────────────
1
 ACHILLES Lieutenant Spitfire, Nanopulser / Pistol, EXP CCW. (2.5 | 75)
 DIOMEDES Mk12, Nanopulser / Assault Pistol, DA CCW. (0 | 43)
 MACHAON Combi Rifle, Nanopulser, Eclipse Grenades / Pistol, DA CCW. (0.5 | 38)
 MYRMIDON Chain Rifle, Nanopulser, Smoke Grenades / Pistol, AP CCW. (0 | 16)
 MYRMIDON Chain Rifle, Nanopulser, Smoke Grenades / Pistol, AP CCW. (0 | 16)
 MYRMIDON Chain Rifle, Nanopulser, Smoke Grenades / Pistol, AP CCW. (0 | 16)
 THORAKITES Engineer Combi Rifle, Nanopulser, D-Charges / Pistol, Knife. (0 | 18)
 THORAKITES (Forward Observer, 360º Visor) Submachine gun, Chain Rifle / Pistol, Knife. (0 | 13)
 THORAKITES (360º Visor) Submachine gun, Chain Rifle / Pistol, Knife. (0 | 12)
 WARCOR (360º Visor) Flash Pulse / Stun Pistol, Knife. (0 | 3)
3 SWC | 250 Points

Open in Infinity Army

Jurisdictional Command of Tunguska List:

 Jurisdictional Command of Tunguska
─────────────────────────────────────────────────
1
 KRIZA BORAC Lieutenant HMG / Heavy Pistol, CC Weapon. (2 | 54)
 HECKLER Combi Rifle, Jammer, 1 FastPanda / Pistol, Knife. (0 | 23)
 HECKLER Combi Rifle, Jammer, 1 FastPanda / Pistol, Knife. (0 | 23)
 SPECTOR (AD: Combat Jump) Boarding Shotgun, Nanopulser, Drop Bears / Pistol, E/M2 CC Weapon. (0 | 33)
 MARY PROBLEMS Hacker (Forward Deployment L1) Submachine Gun + Zapper, Pitcher / Pistol, Knife. (0.5 | 30)
 METEOR ZOND Combi Rifle / Electric Pulse. (1 | 21)
 PERSEUS (Super-Jump) Breaker Combi Rifle, Nanopulser, Smoke Grenades / 2 Pistols, DA CC Weapon. (0 | 34)
 TRANSDUCTOR ZOND Flash Pulse, Sniffer / Electric Pulse. (0 | 8)
 TRANSDUCTOR ZOND Flash Pulse, Sniffer / Electric Pulse. (0 | 8)
 SECURITATE Paramedic (MediKit) Combi Rifle / Pistol, Knife. (0 | 15)

3.5 SWC | 249 Points

Open in Infinity Army

Losing the roll and Sprocket choosing to have initiative, I elected to have a side that I thought would let me get more cover while just crossing into the far side zones. I also had the side with the slightly more secure deployment zone. Remembering from my last game how Steel Phalanx has access to Diomedes, and how that guy can be a huge jerk.

Deployment:

The Myrmidon Link with Machaon was deployed near the fountain. The three Thorakites were covering left, mid-left and mid-right. A warcor took overwatch on the left and Achilles deployed near the mid-left Thorakites.

I had my Kriza and Securitate prone on a building on my left. My hecklers were mid-left and mid-right, in position to score my zones. Perseus guarded the back right. My transductors covered the center back and the back right. Mary Problems got deployed on my far left.

Top of 1: SprocketGX Steel Phalanx

First thing that happens is that Achilles charges up the board with his Lt, Data Tracker and a couple recular orders, he winds up out of sight on my far right, just over (under?) the midline. Diomedes makes an appearance and positions himself to threaten my Kriza, Securitate and Mary. The Myrmidon Enomotarchos comes forward on the left to cover the gap on that side. The Thorakites also make some advances.

Bottom of 1: Jhokalups Tunguska

First things first, I want to deal with Diomedes, so I drop Spector in behind where Diomedes is and out of sight. He then walks over and shotguns Diomedes just outside of 8, and Diomedes lives. So I have Mary Problems come around the corner and shock Diomedes off the table. I then have my Meteor Zond walk in on the other side of the board, hiding on the other side of the building Achilles is by. Spector walks back up, to what I think is across the center line, and throws down a mine. I then proceed to spend 4 orders attempting to have Mary put Oblivion on Achilles.

Now, if we compare this to Icebreaker on Achilles:

I probably would have been better off trying to just Immobilize Achilles and move on.

Anyways, after spending all those orders I spent an order having my Kriza walk forward, only to find out that Achilles couldn’t have seen him. Kriza does take out Machaon and break the Enomotarchos though, so that’s good. I then use the Krizas Data Tracker order to go into suppressive fire. My thought here was that if any of the Myrmidons come around the corner, or if Achilles comes up to get close, I would rather have the extra burst. And maybe put a little bit of pressure on my opponent.

When I am done we measure zones, and find that Sprocket controls 3, because Spector is not across the midline, nor did I get to advance Perseus up into the zone. Either option would have put me in a better spot to score than I was.

Score at End of 1: 3 – 1 LeadFaction Favor

Top of 2: SprocketGX Steel Phalanx

First, a Warcor solves the problem of Suppressive Fire with a Flash Pulse from out of Range. I could have let it hit me, but the chances of being stunned, even if low, were not something I wanted. So I broke suppressive to shoot back. Then Achilles goes on a little bit of a killing spree, taking out a Transductor and the Meteor Zond, before he gets Isolated by a Heckler with a Jammer. Achilles then goes to ground in the middle of my zone. That done he passes turn.

Bottom of 2: Jhokalups Tunguska

I have Spector attempt to solve the riddle of clearing out some Myrmidons, I move him and throw a drop bear, which fails. I have him move again to the edge of the building, throw another drop bear and fail. Then decide to try and Nanopulser down a Myrmidon and go to no wound incap for my trouble. I do take out that Myrmidon, but then lose Spector to the second around the corner who successfully face tanks the mine I had placed earlier. I have the Kriza start using his orders to long jump down from the building, and then make a long and shooting walk over to hide behind a building that I thought was across the line. While there I have the Kriza shoot at Achilles and manage to do a wound to him. That done, I end my turn and we measure zones.

Turns out that the spot I had put my Kriza in was just on my side of the centerline. So once again, Sprocket controls 3 zones to my 1.

Score at End of 2: 6 – 2 LeadFaction Favor

Top of 3: SprocketGX Steel Phalanx

A very angry Achilles forfeits his impetuous order. In loss of lieutenant Sprocket has the FO Thorakites comes forward and successfully Forward Observes my Kriza from his back arc, completing the classified objective. Achilles then proceeds to kill the Kriza. Some more Thorakites advance and Sprocket passes turn.

Bottom of 3: Jhokalups Tunguska

In loss of lieutenant, I have Perseus throw smoke to safely advance into the zone with Achilles. Then Pursues takes out the two Thorakites in the far zone. I don’t have enough orders left to try and pick up the Kriza. So I end my turn.

I had elected to use my Classified as an intellecom card, and was able to use it to snag the zone that Achilles was in. With me having more zones than Sprocket I scored two points this turn. Making the game a:

Final Score: 7 – 4 Steel Phalanx Minor Victory

Lessons Learned:

Writing this report has shown me a lot of things I missed, and the poor decisions I made. Recently there has been a change in my work schedule that makes Thursday a very long day for me. I was mentally exhausted going into this game. That night, in talking about the game, I lamented my Kriza placement at the end of turn two. And sure, it was not ideal, the Kriza didn’t get across the zone, and was in a spot where he got targeted from out of line of fire.

Looking back I am positive that what lost me the game was the four orders trying to Isolate Achilles. Sure, having Steel Phalanx in loss of lieutenant would be good pressure, but even Isolated, Achilles as the data tracker gets two orders. If he frenzies, he can get three, so that’s not really a good choice. Had I immobilized Achilles, I would have had orders to better develop my Spector positioning. Or even better, put Persues into the Zone with Achilles to dominate it instead of letting Sprocket have it.

Another thing I missed was a mis-play with Spector. On his third, and possibly second, drop bear, there was not a good reason to throw them. Placing the drop bears would have had the same, if not similar effect that I was going for, with the added benefit of no dice roll. The mine would have changed the exchange with the Myrmidons and let Raul be in a good place to cross over and dominate the far zone.

I am glad that I am writing these reports. They are mostly for me, but publishing them does a little bit to keep me honest, or at least somewhat timely with doing them. Looking back at the games and thinking over my decisions I find things that were missed. Or choices that I made that were sub-optimal. By identifying these things, hopefully I can incorporate them into my play, and maybe beat it into a more instinctual level. So that even if I am tired, I don’t miss silly things.

Until next time.

Jhokalups – Field Operation Action Report – 31

Jhokalups – Field Operation Action Report – 31

Raucous August

300/ITS X

Recently we had our monthly ITS event, Raucous August. The attendance was a little lower for this event, but we still got all three rounds. On the docket was Tic Tac Toe, Rescue, and Safe area. An interesting set of missions that didn’t have the strongest of killing elements.

I have been thinking over my style for tournament reports. I have found that having more than one game in these blogs makes writing them a challenge. I am not able to complete them in a timely manner, which diminishes the effectiveness of what I am trying to do. So I will be trying out a different and more abbreviated style for these reports.

Game 1 – Xammy
Tunguska vs Neoterra Capital Army
Tic Tac Toe

Wip Roll
Tunguska – 7
Neoterra Capital Army – 5

Decision: Jhokalups
Deployment: Jhokalups
Initiative: Xammy
1st Turn: Xammy
1st Deploy: Xammy

Neoterra Capital Army List:

 NCA – Bot Bonanza
──────────────────────────────────────────────────
GROUP 1  10
 FUGAZI DRONBOT Flash Pulse, Sniffer / Electric Pulse. (0 | 8)
 FUGAZI DRONBOT Flash Pulse, Sniffer / Electric Pulse. (0 | 8)
 FUGAZI DRONBOT Flash Pulse, Sniffer / Electric Pulse. (0 | 8)
 PATHFINDER DRONBOT Combi Rifle, Sniffer / Electric Pulse. (0 | 16)
 BULLETEER Spitfire / Electric Pulse. (1 | 23)
 BULLETEER Spitfire / Electric Pulse. (1 | 23)
 SIERRA DRONBOT HMG / Electric Pulse. (1 | 25)
 MULEBOT Hacker (EVO Hacking Device) Electric Pulse. (0.5 | 25)
 MACHINIST Combi Rifle, D-Charges / Pistol, Knife. (0 | 15)
 PEACEMAKER Heavy Shotgun + AUXBOT_3 / Electric Pulse. (0 | 21)
  AUXBOT_3 Heavy Flamethrower / Electric Pulse. (- | 4)
 PALBOT Electric Pulse. (0 | 3)
GROUP 2  7
 FUSILIER Hacker (Hacking Device) Combi Rifle / Pistol, Knife. (0.5 | 18)
 FUSILIER Hacker (Hacking Device) Combi Rifle / Pistol, Knife. (0.5 | 18)
 FUSILIER Paramedic (MediKit) Combi Rifle / Pistol, Knife. (0 | 12)
 FUSILIER Paramedic (MediKit) Combi Rifle / Pistol, Knife. (0 | 12)
 FUSILIER Lieutenant Combi Rifle / Pistol, Knife. (0 | 10)
 HEXA Hacker (Killer Hacking Device) Combi Rifle / Pistol, Electric Pulse. (0 | 27)
 GARUDA Tacbot Spitfire / Electric Pulse. (1.5 | 28)
6 SWC | 300 Points

Open in Infinity Army

Tunguska List:

 RA T3 and SA

──────────────────────────────────────────────────
GROUP 1  1
 SALYUT Hacker (EVO Hacking Device) Electric Pulse. (0.5 | 25)
 KRIZA BORAC Lieutenant HMG / Heavy Pistol, CC Weapon. (2 | 54)
 SPECTOR (AD: Combat Jump) Boarding Shotgun, Nanopulser, Drop Bears / Pistol, E/M2 CC Weapon. (0 | 33)
 GRENZER Spitfire / Pistol, Breaker Pistol, Knife. (1.5 | 30)
 SECURITATE Combi Rifle / Pistol, Knife. (0 | 13)
 SECURITATE Paramedic (MediKit) Combi Rifle / Pistol, Knife. (0 | 15)
 SECURITATE Combi Rifle / Pistol, Knife. (0 | 13)
 SECURITATE Combi Rifle / Pistol, Knife. (0 | 13)
 TRANSDUCTOR ZOND Flash Pulse, Sniffer / Electric Pulse. (0 | 8)
 TRANSDUCTOR ZOND Flash Pulse, Sniffer / Electric Pulse. (0 | 8)
GROUP 2  4
 METEOR ZOND Combi Rifle / Electric Pulse. (1 | 21)
 SPEKTR (Forward Observer) Combi Rifle, Antipersonnel Mines / Pistol, Knife. (0 | 32)
 HECKLER Combi Rifle, Jammer, 1 FastPanda / Pistol, Knife. (0 | 23)
 PUPPET MASTERS Submachine Gun / Pistol, Knife. (0 | 12)
5 SWC | 300 Points

Open in Infinity Army

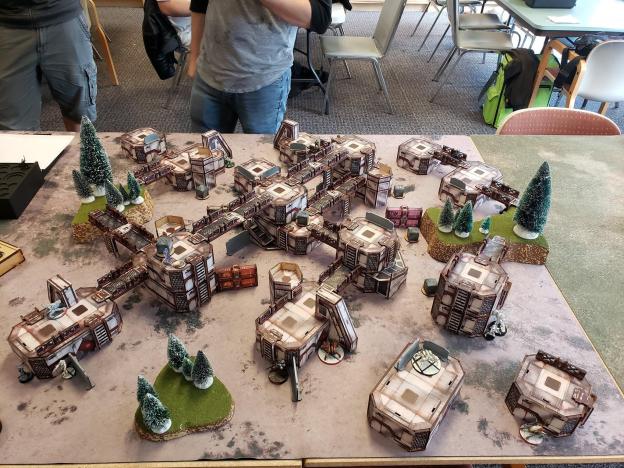
My first game of the day was against Xammy. Xammy plans on switching over to O-12 soon, but for this event, he went back to his NCA roots. Our table was an interesting set of terrain, we had 3 levels of terrain, but realistically only the bottom one got used.
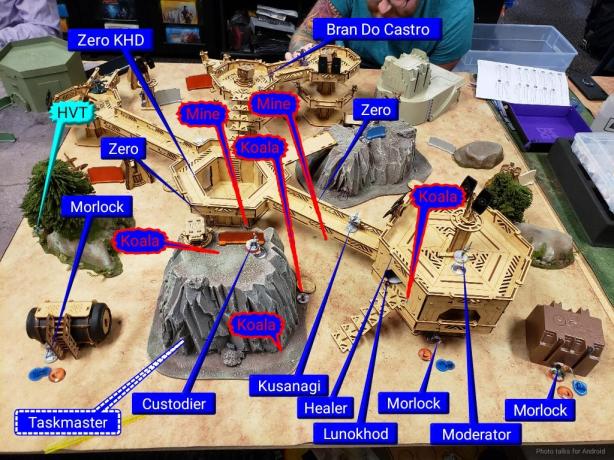
Deployment:

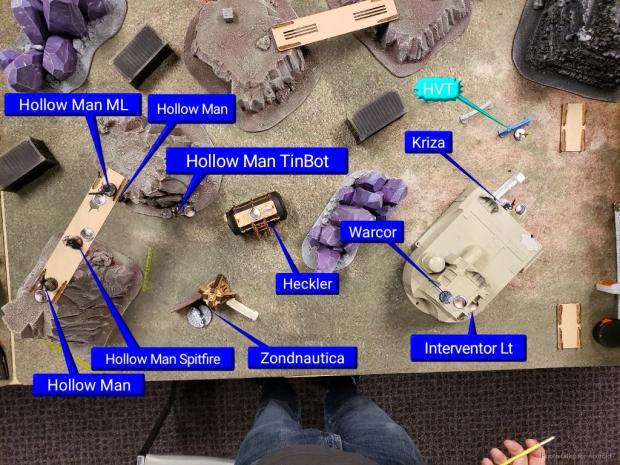
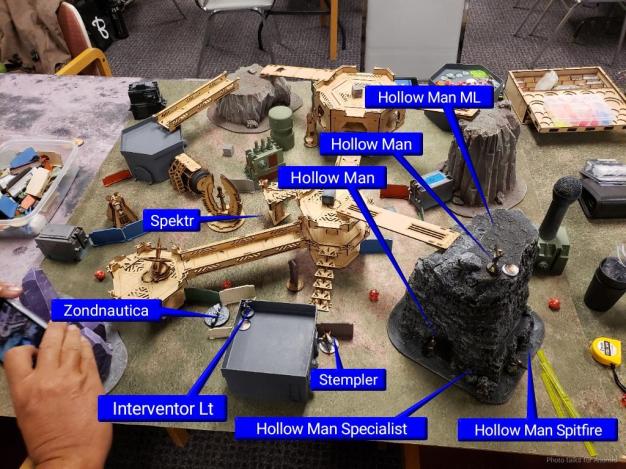
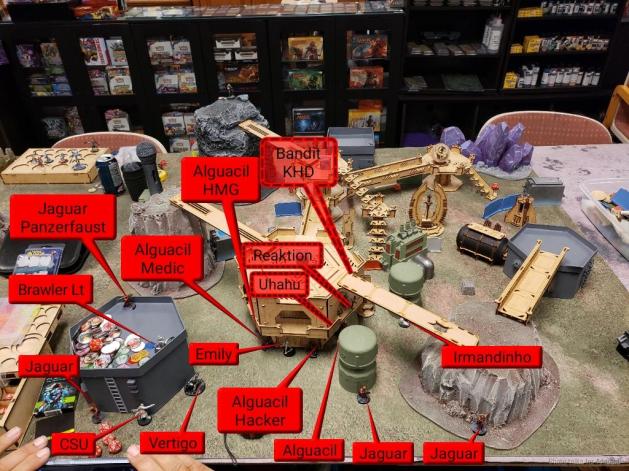
Xammy had a fusilier link full of hackers clustered around a central building. The attack remotes, two Bulleteers and a Peacemaker were set up on the middle third lines. Flash pulse bots the back line and the EVO was placed furthest back. There was a Machinist off on the right, and a TO Hexa Killer Hacker near the central back antenna.

I set up with my Warcor and Perseus on my left in total cover with a Trasductor on the building above them. One of my hecklers was deployed up high with easy access to an antenna. Centrally on the ground I had my Kriza lieutenant and my EVO Salyut Zond. My Tsyklon Sputnik was on top of a building in my deployment zone. I had my Zondnautica and Zondmate deployed seperate as G:Sync on my right side with my last Transductor guarding the right.

Top of 1: Xammy NCA

Before Xammy starts, I spend two of my command tokens to put up overclock and deny 2 orders to order pool 1. Then to start things off for Xammy, a fusilier hacker puts Marksmanship 2 onto the Bulleteer on my right. That Bulleteer then came up and took out my Tsyklone. The Bulleteer on the other side then advanced up to take out my Kriza. When it walked in range it walked into the repeater on a Transductor Zond, and I attempted to carbonite it, but failed. When it fired on my Kriza I manage to immobilize it but lost my LT. The Evo hacker activated to retreat to safety and my left Killer Hacker Heckler took it out with a Red Rum. Finally a Hexa killer hacker revealed and tried to paste my heckler, but my Hecklers took out the Hexa instead.

Bottom of 1: Jhokalups Tunguska

I am in loss of LT this turn, but not without options. I have my Zondnautica mount up with the Impetuous order, and attempted to hack the Bulleteer on my left, putting it into Isolation so that I could activate my Heckler without worry. The left Heckler then captured the top antenna. And I brought Spector in and converted an order to have him Coup De Gras the Evo bot on the far side, completing my classified. Then I passed my turn.

Top of 2: Xammy NCA

Xammy is understandably worried about Raul Spector in his back line, so he spends a couple orders getting robots in position to fire on Spector if he comes out. A garuda then drops in and takes out my left transductor, the right heckler and my Evo Bot. Before finally getting gunned down by my Zondnautica. That done Xammy passes turn.

Bottom of 2: Jhokalups Tunguska

First thing I do is have the Zondnautica mount up and throw some smoke towards the Peacekeeper. Then it drives forward and attempts to throw smoke in front of the bulleteer, that smoke failed. So I have the Rider dismount and capture the right antenna that is closest to my deployment zone, before having them retreat to safety a little. I have spector throw out a drop bear and come a little ways forwards. I attempt to drop my Meteor Zond in to be near the remaining hackers so that I could have my Heckler take them out, but fail and instead land on the left antenna closest to Xammy’s deployment zone. I move Perseus and my Warcor out of cover to look down the middle. Then out of orders I pass turn.

Top of 3: Xammy NCA

Xammy has his Isolated bulleteer take out my Meteor Zond. Then the peacekeeper and Aux bot take down my Zondnautica and Zondmate. After claiming 3 antennas across his side and one antenna on my side, Xammy advanced all his bots up to cover my remaining dudes. After bringing back the Hexa Killer Hacker, Xammy passes turn.

Bottom of 3: Jhokalups Tunguska

I have two antennas that I need to get if I want to win. Getting the middle antenna on my side will allow me to have 3 in a row. And getting an antenna on Xammy’s side will disrupt his 3 in a row. Unfortunately with the Bots covering the way and the hacker coverage, I don’t have the orders to get Spector to an antenna on Xammy’s side. And cannot get my Heckler to the central antenna. With that done, we tally up the final score. With the classified, 3 antennas in a row and an antenna on my side, it is a:

Final Score: 10 – 1 NCA Total Victory

Lessons Learned:

I think I lost this game in deployment. I had Perseus in a very safe spot, and my Kriza LT exposed; If I had swapped them Xammy would have had a harder time killing it. Had I had full regular orders on my first turn I could have developed my position a bit better on turn one. And having the big gun available would have been nice as well. The Tsyklone died immediately to a bulleteer, though that is not the fight it is supposed to be in and win. The Kriza might have been a better fit for that spot as well. I need to practice deploying the Kriza and Tsyklone. This game provided a lot to think about, needing a way to deal with a Bulleteer first strike is important. I think I could have set up a better repeater net with my Transductors to force the Bulleteers into my hacking area in order to fight anything. Perseus would have also been a good anti Bulleteer piece, having smoke grenades to force the closer and ODD to push the odds back towards my side. Things to think about as I started game two.

Game 2 – Zelaponeepus
Tunguska vs Haqqislam
Rescue

Wip Roll
Tunguska – 5
Haqqislam – 15

Decision: Zelaponeepus
Deployment: Jhokalups
Initiative: Zelaponeepus
1st Turn: Zelaponeepus
1st Deploy: Zelaponeepus

Haqqislam List:

 Save em! V3.2
──────────────────────────────────────────────────

GROUP 1  10
 BARID Hacker (Killer Hacking Device UPGRADE: Lightning) Rifle + Pitcher / Pistol, Knife. (0 | 16)
 NAMURR Spitfire, E/Marat, D-Charges / Heavy Pistol, E/M CC Weapon, Knife. (1 | 44)
 KNAUF MULTI Sniper / Heavy Pistol, Knife. (1.5 | 32)
 RAFIQ REMOTE FTO (Fireteam: Duo) Red Fury, Sniffer / Electric Pulse. (0.5 | 22)
 FANOUS REMOTE Flash Pulse, Sniffer / Electric Pulse. (0 | 8)
 GHULAM Doctor Plus (MediKit) Rifle + Light Shotgun / Pistol, Knife. (0 | 16)
 NASMAT Electric Pulse. (0 | 3)
 HAFZA Spitfire / Pistol, Knife. (1 | 22)
 DJANBAZAN Sniper Rifle / Pistol, Knife. (0.5 | 31)
 FIDAY Boarding Shotgun, Smoke Grenades / Pistol, AP CCW, Knife. (0 | 29)
 FARZAN (Minelayer) Boarding Shotgun, Antipersonnel Mines / Pistol, Knife. (0 | 23)
GROUP 2  4
 HAFZA Lieutenant Rifle + Light Shotgun / Pistol, Knife. (0 | 16)
 LIBERTO (Minelayer) Light Shotgun, Chain-colt, Antipersonnel Mines / Pistol, Knife. (1 | 10)
 DAYLAMI (CH: Limited Camouflage, Inferior Infiltration) Light Shotgun, Panzerfaust / Pistol, Knife. (0.5 | 8)
 MUTTAWI’AH Chain Rifle, E/Marat, Jammer, Smoke Grenades / Pistol, Knife. (0 | 5)
 MUTTAWI’AH Chain Rifle, E/Marat, Jammer, Smoke Grenades / Pistol, Knife. (0 | 5)
 MUTTAWI’AH Chain Rifle, E/Marat, Jammer, Smoke Grenades / Pistol, Knife. (0 | 5)
 MUTTAWI’AH Chain Rifle, E/Marat, Jammer, Smoke Grenades / Pistol, Knife. (0 | 5)
6 SWC | 300 Points

Open in Infinity Army

Tunguska List:

 RA Rescue

──────────────────────────────────────────────────
GROUP 1  3
 SPEKTR (Forward Observer) Combi Rifle, Antipersonnel Mines / Pistol, Knife. (0 | 32)
 SPEKTR (Forward Observer) Combi Rifle, Antipersonnel Mines / Pistol, Knife. (0 | 32)
 KRIZA BORAC Lieutenant HMG / Heavy Pistol, CC Weapon. (2 | 54)
 LUNOKHOD Heavy Shotgun, Akrylat-Kanone, D-Charges, CrazyKoalas (2) / Electric Pulse. (0 | 24)
 LUNOKHOD Heavy Shotgun, Heavy Flamethrower, D-Charges, CrazyKoalas (2) / Electric Pulse. (0 | 25)
 SPECTOR (AD: Combat Jump) Boarding Shotgun, Nanopulser, Drop Bears / Pistol, E/M2 CC Weapon. (0 | 33)
 MARY PROBLEMS Hacker (Forward Deployment L1) Submachine Gun + Zapper, Pitcher / Pistol, Knife. (0.5 | 30)
 TRANSDUCTOR ZOND Flash Pulse, Sniffer / Electric Pulse. (0 | 8)
 WARCOR (360º Visor) Flash Pulse / Stun Pistol, Knife. (0 | 3)
 WARCOR (360º Visor) Flash Pulse / Stun Pistol, Knife. (0 | 3)
GROUP 2  1
 PUPPET MASTERS Submachine Gun / Pistol, Knife. (0 | 12)
 SPEKTR (Forward Observer) Combi Rifle, Antipersonnel Mines / Pistol, Knife. (0 | 32)
 TRANSDUCTOR ZOND Flash Pulse, Sniffer / Electric Pulse. (0 | 8)
 WARCOR (360º Visor) Flash Pulse / Stun Pistol, Knife. (0 | 3)
3.5 SWC | 299 Points

Open in Infinity Army

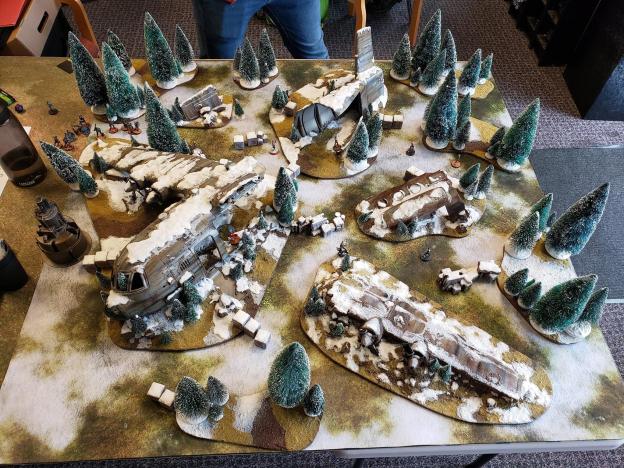
After our lunch break I got paired up with Zelaponeepus. Formerly a Pan Oceania player, Zelaponeepus has been playing Haqqislam to great effect. Our game was played on the plane wreckage table, which is becoming one of my favorite tables to play on. The multitude of saturation zones, low visibility, and difficult terrain makes this table a challenge. Not only do you have to have a plan for what your opponent will do, you need to account for how the table will impact everything you do. The mission for this map was Rescue, which provides an additional complication, requiring careful thought on how to retrieve the HVTs and how to prevent your opponent from rescuing their own HVTs.
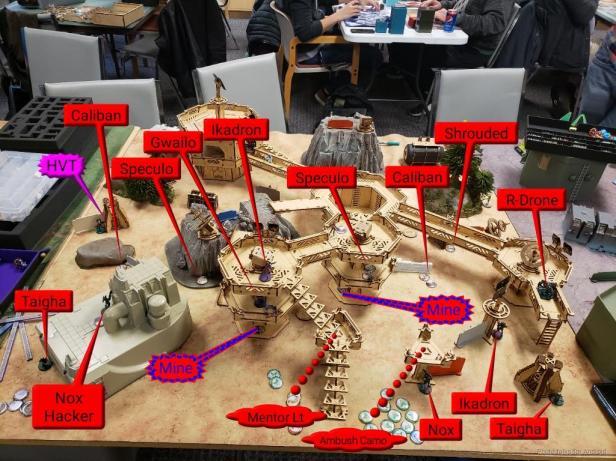
Deployment:

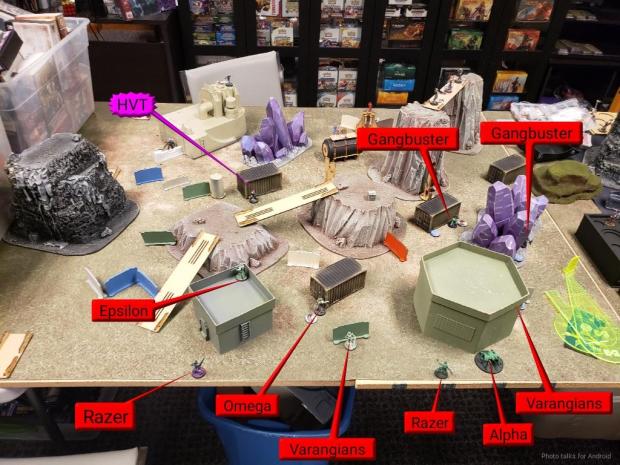
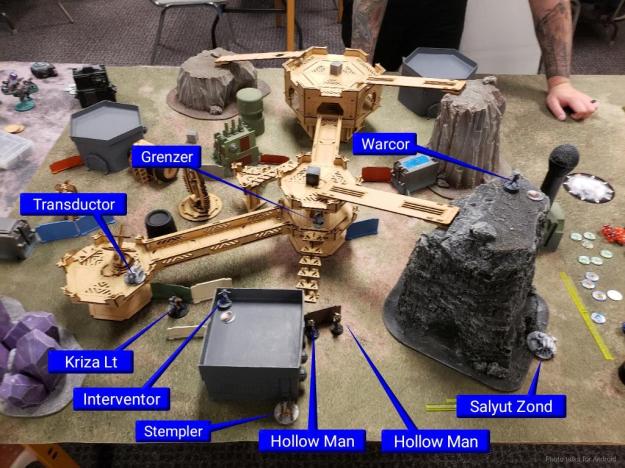
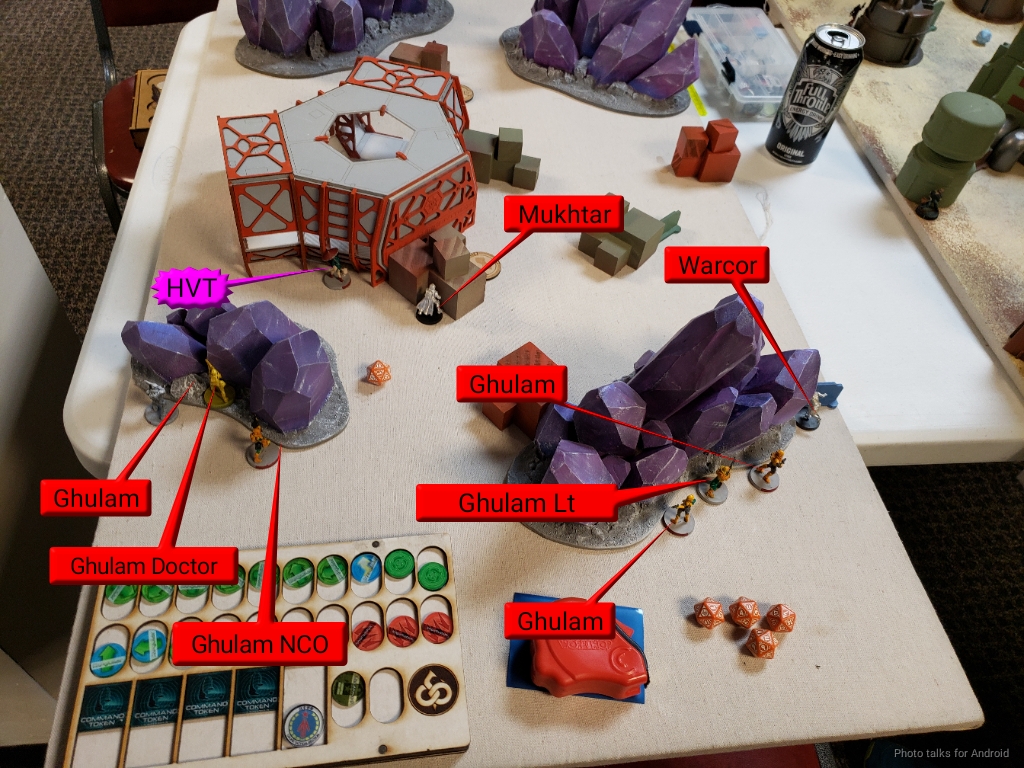
Zelaponeepus had a Daylami that tried to infiltrate across into my dead zone, but failed and deployed on the back line watching the left half of the board. A Farzan minelayer guarded the left side of the dead zone. There was a Liberto Minelayer on the right dead zone. The mutts spread out evenly across the front line, ready to run up and smoke. The two Hafza hid as mercs in a forest on the right. Knuaf, the Baird and a Ghulam were hugging a mid-right forest. There was a Namurr hiding centrally behind a tree. A Djanbazan Sniper was atop part of the plane, able to see much of the map. A Fiday impersonated into my deadzone out of sight of most things.

I had my Tsklone set up on the broken airplane wing, watching my right side. I had the Lunokhod on my left covering the deployment zone with his Koalas. Mary Problems was set up toward the exclusion zone to cover the one HVT on my left. I had my Libertos and Puppet Master minelayers covering the central two HVTs with my Kriza Lt. I had a Warcor set up on my far right. I brought along three Spektrs for this mission, as infiltrating specialists, I was hoping to get one or two in a hidden deploy spot to snag an HVT and then book it across the exclusion zone. I had one fail, and deployed it behind the Lunokhod. The other two made their rolls and were set up in the rear of the airplane’s fuselage and hiding next to some crates to the right of the airplane’s tail.

Top of 1: Zelaponeepus Haqqislam

The main highlights from this turn were that the Tsyklone pulled way more weight than it needed to, critting the Djanbazan off the table and putting the Fiday into unconsciousness. Other things of note are the Mutt that made it all the way across the board to fail at jamming Mary Problems and covering the way for a Libertos to make it forward in camo, before face tanking the crazy Koala.

Bottom of 1: Jhokalups Tunguska

On my turn I had the Lunokhod walk up to hit the Mutt and camo marker behind it with a heavy shotgun. Once I saw the Liberto, it fell prone, making it hard to see. I also had the Warcor Coup de Gras the Fiday so that I could complete my classified. I brought the Kriza up to try and take out some models in the middle, but Knauff pushed him back.

Top of 2: Zelaponeepus Haqqislam

The Liberto managed to bring the HVT back to the dead zone on Zelapneepus’ side before getting taken down by a Spektr in hiding. One of the camo markers came forward to threaten my Spektr. Some more Mutts try to make it forward but get gunned down by the Kriza and the Tsklon.

Bottom of 2: Jhokalups Tunguska

I have my second Spektr reveal and do a complicated mine dance to be able to take out the Faran minelayer with a mine and a shot from the Kriza. After my Kriza goes down to Knauf I drop Raul Spector in to face tank a mine and try to take him (Knauf) out. I manage to get Knauf and try to set up Sepctor defensively. My Spektrs attempt to grab HVTs. The center one goes down while the one on my right gets the HVT and brings it midway across the table.

Top of 3: Zelaponeepus Haqqislam

The Lt that has been disguised as Aida comes forward and with the Namurr takes out Spector before snagging the HVT and bringing it fully into the deadzone.

Bottom of 3: Jhokalups Tunguska

Low on orders and in Loss of Lieutenant, I try and sprint my Spektr and HVT across to my deployment zone. Sadly he goes down and we call the game there. With the HVT tied to his Data Tracker and in his dead zone, and me only having 1 classified the final score is:

Final Score: 4 – 1 Haqqislam Victory

Lessons Learned:

This game was a lot of fun, I did feel bad about the number of times were the dice went my way especially well. Like the Tsyklon winning several face to face rolls with the Djanbazan Sniper before critting it off the table. The bane of this game for me was Knauf, I didn’t have a good plan for him, and did not properly appreciate the effect that his MSV1 would have on face-to-face rolls. Knauf was the primary killer, taking out everything but Spector that I sent in to kill him. I might have been able to drop spector into a different spot to take out Knauf earlier, and then my Kriza would have been able to dominate the rest of the board better. There are some additional things towards the end that I missed, like ARO’s from Spektrs and possibly other paths to take the HVT. All in all, an excellent game, and I look forward to playing Zelaponeepus again soon.

Game 3 – TheDiceAbide
Tunguska vs Steel Phalanx
Safe Area

Wip Roll
Tunguska – 1
Steel Phalanx – 5

Decision: TheDiceAbide
Deployment: Jhokalups
Initiative: TheDiceAbide
1st Turn: TheDiceAbide
1st Deploy: TheDiceAbide

Steel Phalanx List:

 Steel Rescue
──────────────────────────────────────────────────
10

 ACHILLES Lieutenant Spitfire, Nanopulser / Pistol, EXP CCW. (2.5 | 75)
 DIOMEDES Mk12, Nanopulser / Assault Pistol, DA CCW. (0 | 43)
 LAMEDH Rebot Flash Pulse, Sniffer / Electric Pulse. (0 | 8)
 NETROD Electric Pulse. (0 | 4)
 ATALANTA MULTI Sniper Rifle + TinBot E (Spotter) / Pistol, Knife. (1.5 | 39)
 THRASYMEDES Infiltrator (Infiltration) Submachine gun, Nanopulser, Stun Grenades / Pistol, Shock CCW . (0 | 27)
 DACTYL Doctor (MediKit) Combi Rifle, Adhesive-Launcher, Nimbus Grenades / 2 Breaker Pistols, Knife. (0 | 23)
 YUDBOT Electric Pulse. (0 | 3)
 DACTYL Engineer Combi Rifle, Flammenspeer, D-Charges / 2 Breaker Pistols, Knife. (0.5 | 24)
 YUDBOT Electric Pulse. (0 | 3)
 ZAYIN Rebot HMG / Electric Pulse. (1 | 26)
 PROBOT Hacker (EVO Hacking Device) Electric Pulse. (0.5 | 25)
6 SWC | 300 Points


Tunguska List:

 RA T3 and SA
──────────────────────────────────────────────────
GROUP 1  1

 SALYUT Hacker (EVO Hacking Device) Electric Pulse. (0.5 | 25)
 KRIZA BORAC Lieutenant HMG / Heavy Pistol, CC Weapon. (2 | 54)
 SPECTOR (AD: Combat Jump) Boarding Shotgun, Nanopulser, Drop Bears / Pistol, E/M2 CC Weapon. (0 | 33)
 GRENZER Spitfire / Pistol, Breaker Pistol, Knife. (1.5 | 30)
 SECURITATE Combi Rifle / Pistol, Knife. (0 | 13)
 SECURITATE Paramedic (MediKit) Combi Rifle / Pistol, Knife. (0 | 15)
 SECURITATE Combi Rifle / Pistol, Knife. (0 | 13)
 SECURITATE Combi Rifle / Pistol, Knife. (0 | 13)
 TRANSDUCTOR ZOND Flash Pulse, Sniffer / Electric Pulse. (0 | 8)
 TRANSDUCTOR ZOND Flash Pulse, Sniffer / Electric Pulse. (0 | 8)
GROUP 2  4
 METEOR ZOND Combi Rifle / Electric Pulse. (1 | 21)
 SPEKTR (Forward Observer) Combi Rifle, Antipersonnel Mines / Pistol, Knife. (0 | 32)
 HECKLER Combi Rifle, Jammer, 1 FastPanda / Pistol, Knife. (0 | 23)
 PUPPET MASTERS Submachine Gun / Pistol, Knife. (0 | 12)
5 SWC | 300 Points

Open in Infinity Army

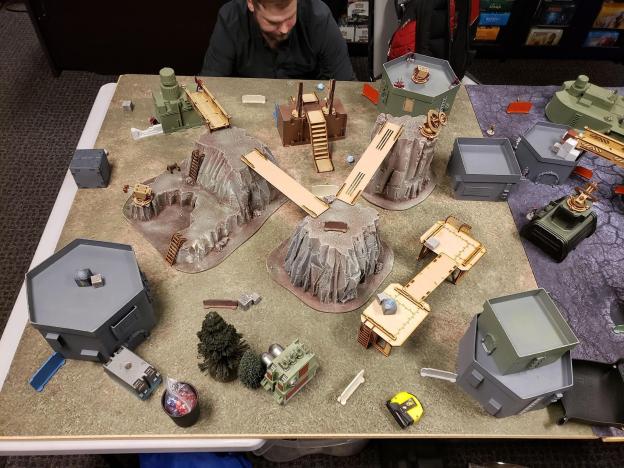
My last game of the day was against one of our Warcors, TheDiceAbide. I was excited to play him again, I haven’t played against TheDiceAbide since my fifth game, last October. This time he was playing Steel Phalanx, instead of FRRM. Our table was the same one I played on round 1, so I had a better idea of what to expect from it.

Deployment:

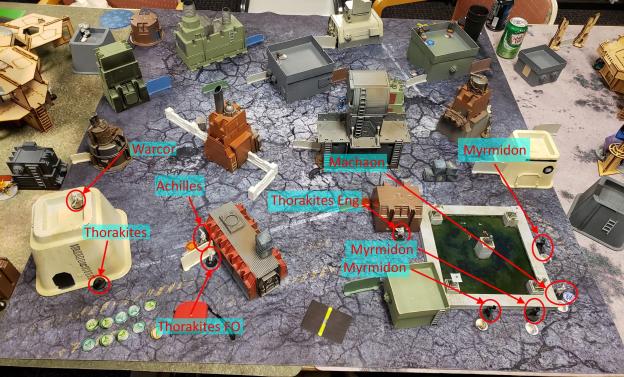
Thrasymedes was deployed in the center, ready to be a scoring piece. The flash pulse and evo bots covered the lower two levels. A total reaction HMG sat up covering the top layer from the middle. Atlanta the sniper was on a tower to the right. The netrod dispersed to be easily accessable by me. The support staff also hid in total cover. Achilles as the reserve model came in below Atlanta.

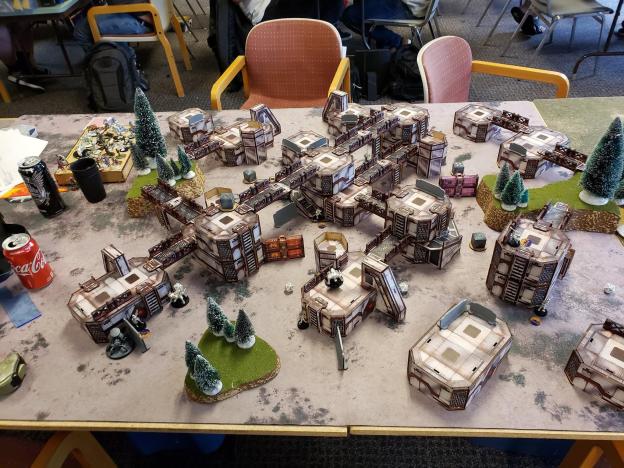
Learning from game one, I had my Kriza hidden behind several layers of boxes. I had my Tsyklon out to ARO. The flash pulse bots tried to watch the back area for a potential AD troopers. I split the Hecklers across the board. Perseus sat in the middle ready for some smoke. And I had the Zondnautica out on my right, dismounted and ready to make some havoc.

Sadly I did not get a picture of this deployment. I was pretty spent by this point in the day.

Top of 1: TheDiceAbide Steel Phalanx

Something I forgot to do at the start of this game, was to have the EVO bot put out Overclocked on all of my repeater bots. So the HMG Bot was able to take out my Tsyklon with ease. Then Diomedes dropped in and completely trashed my backline. I lost the Zondmate to my Zondnautica. I lost both flash pulse bots, and I think the warcor. Then Atlanta took out one of my Hecklers that I thought was safe, but there was a line that could clearly be drawn.

Bottom of 1: Jhokalups Tunguska

I have Perseus hunt down Diomedes, so I don’t have to worry about that anymore. I drop in my Meteor Zond to take out the Total Reaction HMG bot, using a combination of Carbonite and then shooting it. The Meteor Zond also takes out support staff in the back and the Kriza clears out the Netrod.

Top of 2: TheDiceAbide Steel Phalanx

Achilles makes an effort to take out the meteor zond, and then starts to advance across the center of the table. The Zondnautica and Perseus are also taken out. The multiscanner is placed.

Bottom of 2: Jhokalups Tunguska

I get Kriza up and drop off my multiscanner, and get set up a bit for my last turn.

Top of 3: TheDiceAbide Steel Phalanx

Achilese comes through and kills of the Kriza, and the Dactyl runs up to the console at the center of TheDiceAbides right zone. Thrasymedes also runs over to grab a console.

Bottom of 3: Jhokalups Tunguska

In loss of LT I airdrop Spector in to take out the Dactyl in CC. Which lets me control a console and complete my classified. With more sectors, the Xenotech in a dominated sector and two consoles, the game finishes in a:

Final Score: 6 – 2 Steel Phalanx Minor Victory

Lessons Learned:

I really should have put out Overclocked at first. Extra shots would have gone a long ways towards stopping the HMG Bot and Diomedes. I also probably could have left the Tsyklone in a spot to not ARO and better cover my deployment zone. Bots are something I am still working on figuring out. I overextended Perseus to take out Diomedes. I could have used super jump to take the same shot and then fallen into total cover, leaving me with another attack piece and potential zone capturer for turn 3.

Final Thoughts:

I had a lot of fun at this event. I have always viewed the littler events like this one as a small fee to play at least three games in a day. Thank you to TheDiceAbide and WiseKensai for running the event. And thank you to my wonderful opponents Xammy, Zelaponeepus, and TheDiceAbide for the excellent games. I enjoyed playing and learned a lot.

I will continue to refine what I want these event reports to look like. I need to find a way to be able to complete them more quickly.

Until next time.

Jhokalups – Field Operation Action Report – 30

Jhokalups – Field Operation Action Report – 30
Juridictional Command of Tunguska vs Onyx Contact Force
150/Recon+ – Smash and Grab

My brother, DoodleKing has recently started playing, and I had the pleasure of playing game 3 of our escalation league against him.

Wip Roll
Juridictional Command of Tunguska – 5
Onyx Contact Force – 15

Decision: Jhokalups
Deployment: Jhokalups
Initiative: DoodleKing
1st Turn: DoodleKing
1st Deploy: DoodleKing

Onyx Contact Force List:

 DoodleKing Gem Wk3
──────────────────────────────────────────────────
8
 ÍMETRON . (0 | 4)
 RODOK Combi Rifle, 2 Light Shotguns / Pistol, Knife. (0 | 26)
 IKADRON (Baggage, Repeater) 2 Light Flamethrowers, Flash Pulse / Pistol, Electric Pulse. (0 | 9)
 IKADRON (Baggage, Repeater) 2 Light Flamethrowers, Flash Pulse / Pistol, Electric Pulse. (0 | 9)
 Q-DRONE Plasma Rifle / Electric Pulse. (1 | 25)
 RODOK Hacker (EI Killer Hacking Device) Boarding Shotgun, Antipersonnel Mines / Pistol, Knife. (0 | 22)
 NEXUS Lieutenant Hacker (EI Hacking Device) Combi Rifle, Nullifier / Pistol, Knife. (0.5 | 24)
 NOCTIFER Spitfire / Pistol, Knife. (1.5 | 30)
3 SWC | 149 Points

Open in Infinity Army

Juridictional Command of Tunguska List:

 GEL Wk3 S&G HM

──────────────────────────────────────────────────
1
 HOLLOW MEN Spitfire, Chain-colt / Breaker Pistol, Knife. (2 | 36)
 HOLLOW MEN (Specialist Operative) Boarding Shotgun / Breaker Pistol, Knife. (0 | 30)
 STEMPLER ZOND FTO (Super-Jump) Combi Rifle, Sniffer / Electric Pulse. (0 | 18)
 INTERVENTOR Hacker Lieutenant (Hacking Device Plus) Combi Rifle / Pistol, Knife. (0.5 | 25)
 SECURITATE Combi Rifle / Pistol, Knife. (0 | 13)
 SECURITATE Combi Rifle / Pistol, Knife. (0 | 13)
 PUPPET MASTERS Submachine Gun / Pistol, Knife. (0 | 12)
 WARCOR (360º Visor) Flash Pulse / Stun Pistol, Knife. (0 | 3)
2.5 SWC | 150 Points

Open in Infinity Army

We set up an interesting catwalk board. The deployment zones were a bit spare on total cover. We had one Tech Coffin on a raised platform, and one inside a building.

20190801_201918


Deployment:

DoodleKing set up a Noctifer, Q-Drone and the Rodok KHD up top on the catwalk. The Nexus was hiding down low, the Ikadrons and other Rodok were on the ground ready to walk to cover.

Lacking a lot of cover that I could deploy in, I had my securitates prone on the ground, hopefully out of sight of anything unless it really committed to getting into my deployment zone. My Interventor LT was prone at the top of a Staircase near my Hollow Man Spitfire. The Hollowman Specialist was hiding behind some stairs. And the Stempler and Puppet master hid behind the same pillar. I had a Warcor Standing on a platform just to be able to flash pulse anything coming down my left side.

Top of 1: DoodleKing Onyx

DoodleKing starts by having a Ikadron on my right walk into cover. The Nexus puts Marksmanship onto the Q-Drone. Then the Rodok on the right starts walks up and gets a crit flash pulse into stunned. The Rodok continues to walk towards total cover and looking in on the Tech Coffin on my left. Next up the Ikadron on my left gets up to walk into cover, my Hollow Man shoots at it, winning the face-to-face. Ane the Ikadron passes armor to fight another day. Lastly the Q-Drone activates to try and take out my Hollow Man, I elect to shoot back and get a Crit taking out the Q-Drone. That done he passes turn.

Bottom of 1: Jhokalups Tunguska

I start off by having my Hollow Men link walk forward, with the Spitfire hugging the wall to take out the Rodok KHD. I then have them super jump to take out the Nexus. The Specialist Hollow Man becomes the leader and gets the data cube from the left Tech Coffin. I then have that Hollow Man take out the Rodok near him. With that done I have the Stempler jump up to the other Tech Coffin, a Noctifer reveals it self, firing at the Stempler. They exchange fire and the Stempler forces the Noctifer prone before grabbing the other Data Cube and running back to my deployment zone. I leave my Spitfire up for ARO and pass the turn. Having both Data Cubes at the End of 1 I score 1 point..

Score at End of 1: 1 – 0 Tunguska Favor

Top of 2: DoodleKing Onyx

In loss of lieutenant, DoodleKing debates with Xammy and I about options. After some discussion DoodleKing has the Noctifer return to the TO marker state, then stand up and take a surprise shot at my Hollow Man spitfire. The Noctifer inflicts a wound and I have the Hollow Man fail guts prone. Here we had a discussion about options, there was a possibility that an Ikadron could get up and flame over or more of the Hollow Men. After some hypothetical measuring and template theory, it was determined that the Ikadron would only get one of the Hollow Men. Then there was a decision about having the Noctifer enter the camo state or use suppressive fire. After talking through what the Stempler Zond could do with Triangulated Fire outside of 24″ from the Noctifer. The Noctifer entered the TO marker state and walked a bit down the upper catwalk. That done here passed the turn.

Bottom of 2: Jhokalups Tunguska

This turn I knew I wanted to get rid of the Noctifer. I have the Stempler walk around the crate it’s behind and drop off the Data Cube, then I have my Puppet Master come forward to pick up the Cube before retreating back up again. I make the Stempler the link leader and have it walk forward to catch the Noctifer’s marker, the Stempler attempts a discover and fails. I spend several orders shuffling forward my Spitfire Hollow Man to take out the Ikadron on my right without provoking an ARO from the Noctifer. I then back them up prone to get some distance.

Score at End of 2: 2 – 0 Tunguska Favor

Top of 3: DoodleKing Onyx

The Noctifer comes sneaking in around the corner to take a surprise shot at my Hollow Men. Who both elect to Chain Colt the Noctifer. I lose my Spitfire Hollow Man, but manage to take down the Noctifer. With only an Ikadron left he passes turn.

Bottom of 3: Jhokalups Tunguska

I bring up my Stempler to take out the last Ikadron then end my turn. By having all the cubes for the entire game I get a:

Final Score: 9 – 0 Tunguska Total Victory

Lessons Learned:

This was a bit of a brutal game. I had been looking forward to running the Hollow Man Stempler haris. In Recon+ is is only possible at the 150 point bracket. The combination of Super Jump, a burst 5 Spitfire and some of the highest arm/bts that you would see in Recon+ make them a particularly hard nut to crack.

In this game my decisions came down to eliminating models that challenged my path to the Tech Coffins and then squirelling the data cubes away. I did get a fortunate crit on turn 1 to take out the Q-Drone in the reactive turn. Looking back on the game DoodleKing made the right call of shooting with the Q-Drone in the active turn, the odds are better than doing it with a Noctifer and the Hollow Man has a much better shot of winning in my active turn. Winning that roll really helped my game.

At the end of my first turn, when I left my Hollow Man Spitfire standing, I had a choice about whether I wanted him to go into Suppressive Fire or not. I chose not to for a couple reasons, first, the haris bonus. Going into Suppressive Fire would have removed him from the link for 1 more burst than I had already. Secondly, position. With where I left the Hollow Man, almost everything on the board was sin my +3 range band.

At the end of DoodleKings second turn, he had a similar decision about the Noctifer. He had already knocked the Hollow Man prone, so the Noctifer was free to move about without AROs. I think that DoodleKing made the correct choice here again. Had the Noctifer been in Suppression, the Stempler likely could have taken it out with a Triangulated fire from outside of 24”. Additionally, putting the Noctifer into Suppressive fire would nor improve his board position. I would have had a free-ish turn to pull my models back and pass the Data Cubes off to other safer models.

Overall it was an interesting game, if brutal. Next game is 200 points and regular ITS, so no more character, wound, nor warband restrictions. I will have to give some thought to how I want to prepare for that.

Until next time.

Jhokalups – Field Operation Action Report – 29

Jhokalups – Field Operation Action Report – 29

Tunguska vs Ramah Taskforce

120/Recon+ – Sweep and Clear

It’s week two of the escalation league! For this week I was paired against RomanLegion, normally a YuJing player, for the league he is running Ramah. This week was 120 points and Sweep and Clear, which is a mini Quadrant Control mission. After finding out table we rolled for initiative.

Wip Roll

Tunguska – 4

Ramah Taskforce – 9

Decision: RomanLegion

Deployment: RomanLegion

Initiative: Jhokalups

1st Turn: Jhokalups

1st Deploy: Jhokalups

Ramah Taskforce List:

RomanLegion S&C

──────────────────────────────────────────────────

17

GHULAM Rifle + Light Shotgun / Pistol, Knife. (0 | 12)
GHULAM Lieutenant Rifle + Light Shotgun / Pistol, Knife. (0 | 12)
GHULAM Doctor Plus (MediKit) Rifle + Light Shotgun / Pistol, Knife. (0 | 16)
GHULAM (NCO) Rifle + Light Grenade Launcher (Normal and Smoke Ammo.) / Pistol, Knife. (1 | 16)
MUKHTAR (Multispectral Visor L2) Red Fury, 2 Nanopulsers / Pistol, Knife. (1 | 37)
WARCOR (360º Visor) Flash Pulse / Stun Pistol, Knife. (0 | 3)
2 SWC | 120 Points

Open in Infinity Army

Tunguska List:

Gel Wk2 S&C

──────────────────────────────────────────────────

5

HOLLOW MEN Spitfire, Chain-colt / Breaker Pistol, Knife. (2 | 36)
INTERVENTOR Hacker (Killer Device Plus UPGRADE: Lightning) Boarding Shotgun, 1 FastPanda / Pistol, Knife. (0 | 20)
SECURITATE Lieutenant Combi Rifle / Pistol, Knife. (0 | 13)
SPEKTR (Forward Observer) Combi Rifle, Antipersonnel Mines / Pistol, Knife. (0 | 32)
HECKLER Boarding Shotgun, E/Marat / Pistol, Knife. (0 | 19)
2 SWC | 120 Points

Open in Infinity Army

This week our table was based off of something like Moon Base Alpha, we had large purple stones in and around the deployment zones, and a small corridor module in the middle.

Deployment:

The first thing I deployed was my Spektr in hidden deploy on top of the Moon base. I had my Interventor on the left side behind the rocks. My Hollowman and Securitate were on the right side. And I held the Heckler as my reserver and put it near some boxes by the crate.

RomanLegion had his Ghulams lined up behind the rocks with the LGL and Doctor on the left side. There was a Warcor out for ARO on his right. The Mukhtar was a reserve and was placed in cover by some crates near the Moonbase.

Top of 1: Jhokalups Tunguska

To start things off I have my Hollowman walk forward to the Moonbase, before jumping on top of it. He walks over to a spot and puts four shots into a Ghulam, putting him down. The Warcor successfully flash-pulses the Hollowman and he gets stunned. So I reveal my TO marker and then use a command token to get some distance forward with the Hollowman, Heckler, Securitate and Interventor. The heckler gets revealed on the way. So I pass turn.

Bottom of 1: RomanLegion Ramah

The first thing that happens is the NCO goes out to shoot a smoke grenade. After much discussion it is determined that if the smoke hits the edge of a building it will not go over the lip, and if the Mukhtar climbs to the roof it will be visible. So the smoke goes down by the Mukhtar instead and the Mukhtar walks out to see the TO marker. Another order is a discover shoot, so I try and have the Spektr dodge. I fail the Dodge but pass armor so I fail guts to safety. The Mukhtar then advances and guns down my Heckler. Out of orders the turn gets passed. I have control of two zones to his one. So I score first turn.

Score at End of 1: 1 – 0 Tunguska Favor

Top of 2: Jhokalups Tunguska

There are a lot of things in places I don’t like. So I have my Hollowman go around to try and deal with them. A few chain colts from the roof puts the Mukhtar into No Wound Incapacitation. I am unable to finish off the Mukhtar and cannot take down the Ghulam Doc. Out of Orders I pass turn.

Bottom of 2: RomanLegion Ramah

First smoke goes down to cover the Mukhtar’s advance. The Mukhtar then circles around some crates in smoke to shoot at my Hollowman, I attempt to chain colt but am just out of range. The Hollowman takes a hit, saves armor and I try to fail guts prone, forcing the Mukhtar to move out. The Mukhtar does and puts my Hollowman into unconscious 2, and the Ghulam Doc comes around to Coup de Gras the Hollowman. A couple spec fires take down my Securitate LT. The last order puts the Mukhtar into suppressive fire. Having two zones to my one, RomanLegion scores.

Score at End of 2: 4 – 1 Ramah Favor

Top of 3: Jhokalups Tunguska

I am in loss of LT and have only two orders to have the Spektr do things. I spend one to have it walk up and split burst at the Mukhtar and the Ghulam NCO. After the roll, I thought I would need a 3 to Crit the Mukhtar, roll a three, then recheck the math. It’s only a normal hit, so the Spektr will take two saves. The other two shots put the Ghulam NCO unconscious. My Spektr goes down. I have the Interventor killer hacker run up towards the console, am out of orders and pass turn.

Bottom of 3: RomanLegion Ramah

The Ghulam doc picks up the NCO who spec fires a couple times at the Interventor before ending turn. Occupying two zones to my one, the game ends in:

Final Score: 8 – 1 Ramah Total Victory

Lessons Learned:

I was a bit bad brained for this game. It’s not an excuse for the loss, RoamnLegion beat me hands down. I do think that my mental and physical fatigue affected some of my decisions. I never looked at the actual zones and where the break lines were. So instead of using the Securitate and Interventor to hold my back two zones with the Hollowman up front. I wouldn’t have felt the need to reveal my Spektr so early, and wouldn’t have moved my Heckler. When I had the Hollowman super jump to take out the first Ghulam, I committed to my attack before we realized the Warcor could have flashed pulsed. I elected not to change my choice or the result of the dice we rolled. Which led to the Hollowman be stunned in a situation that would have been beneficial to not be. Had I split the burst I would have had a chance of taking out the Warcor, and a better chance of not being stunned. Having the Hollowman not stunned and able to crawl up to chain colt the Mukhtar could have made a huge difference in the game.

For my Spektr, I definitely revealed too early, and then the only model it could see was the Mukhtar with MSV2 which negates what the Spektr brings. I wish I had paid more attention to zones and kept the Spektr for turn two or three.

Until next time.