Jhokalups – Field Operation Action Report – 19

Jhokalups – Field Operation Action Report – 19

Foreign Company vs Varuna

300 / ITS X – Power Pack – Red Deck

Back at game night playing against Xammy and his VIRD again. This week our Warcor, WiseKensai suggested that we all play the same scenario so that we can make comparisons about our experiences.

Wip Roll

Foreign Company 19

Varuna 13
Decision: Jhokalups
Deployment: Jhokalups
Initiative: Xammy
1st Turn: Xammy
1st Deploy: Xammy

Varuna List:

 VIRD – Killer Bee Assault
──────────────────────────────────────────────────
GROUP 1  1
 CROC MAN (Forward Observer, Deployable Repeater) Combi Rifle, Antipersonnel Mines / Pistol, Knife. (0 | 32)
 ZULU-COBRA Hacker (Killer Hacking Device) Breaker Combi Rifle / Pistol, Knife. (0 | 28)
 ZULU-COBRA Spitfire / Pistol, Knife. (1.5 | 28)
 KAMAU (Multispectral Visor L2) MULTI Sniper Rifle / Pistol, Knife. (1.5 | 32)
 FUSILIER Combi Rifle / Pistol, Knife. (0 | 10)
 FUSILIER Combi Rifle + Light Grenade Launcher / Pistol, Knife. (1 | 14)
 FUSILIER (Forward Observer, Deployable Repeater) Combi Rifle / Pistol, Knife. (0 | 12)
 FUSILIER Paramedic (MediKit) Combi Rifle / Pistol, Knife. (0 | 12)
 ECHO-BRAVO Paramedic (MediKit) Combi Rifle + Light Shotgun, WildParrot / Pistol, Knife. (0.5 | 27)
 HELOT MILITIAMAN Submachine Gun, Light Rocket Launcher / Pistol, Knife. (0.5 | 9)
GROUP 2  3
 ECHO-BRAVO Red Fury / Pistol, Knife. (1 | 25)
 ZULU-COBRA (Sensor) Combi Rifle, Jammer / Assault Pistol, Knife. (0 | 29)
 TECH-BEE (Remote Assistant Level 1, Specialist Operative) Flash Pulse / Pistol, Knife. (0 | 5)
 FUSILIER Lieutenant Combi Rifle / Pistol, Knife. (0 | 10)
 FUSILIER Combi Rifle / Pistol, Knife. (0 | 10)
 HELOT MILITIAMAN Shock Marksman Rifle / Pistol, Knife. (0 | 13)
 WARCOR (360º Visor) Flash Pulse / Stun Pistol, Knife. (0 | 3)
6 SWC | 299 Points

Foreign Company List:

 Power Pack
──────────────────────────────────────────────────
GROUP 1  10
 CSU (Specialist Operative) Rifle + Light Shotgun, Nanopulser / Pistol, Knife. (0 | 12)
 CSU (Specialist Operative) Rifle + Light Shotgun, Nanopulser / Pistol, Knife. (0 | 12)
 CSU (Specialist Operative) Rifle + Light Shotgun, Nanopulser / Pistol, Knife. (0 | 12)
 SECURITATE Feuerbach / Pistol, Knife. (1 | 22)
 SECURITATE Combi Rifle / Pistol, Knife. (0 | 13)
 KRIZA BORAC Lieutenant HMG / Heavy Pistol, CC Weapon. (2 | 54)
 BOLT Missile Launcher, Light Shotgun / Pistol, Knife. (1.5 | 26)
 SEÑOR MASSACRE Boarding Shotgun, E/M Grenades, Eclipse Grenades / Pistol, AP CCW, E/M CCW. (0 | 26)
 HANNIBAL (Chain of Command, Strategic Deployment) Boarding Shotgun, Nanopulser / Pistol, Knife. (0 | 37)
 CROC MAN MULTI Sniper Rifle, Antipersonnel Mines / Pistol, Knife. (1.5 | 38)
GROUP 2  3
 ZERO Hacker (Killer Hacking Device) Combi Rifle, Antipersonnel Mines / Pistol, Knife. (0 | 21)
 ZERO (Forward Observer) Combi Rifle, Antipersonnel Mines / Pistol, Knife. (0 | 19)
 FUGAZI DRONBOT Flash Pulse, Sniffer / Electric Pulse. (0 | 8)
6 SWC | 300 Points

I recently got a box to carry the apartments in, which makes them easier to set up for game night. Bringing them in we set up the apartments with a main road running diagonally down the middle. There was an industrial construction and a small park in opposite corners, and some containers interrupting the middle fire lane. Looking at the sides there was one that let me set up with two sides up high. So I picked that one. After reviewing everything we got underway.

Deployment:

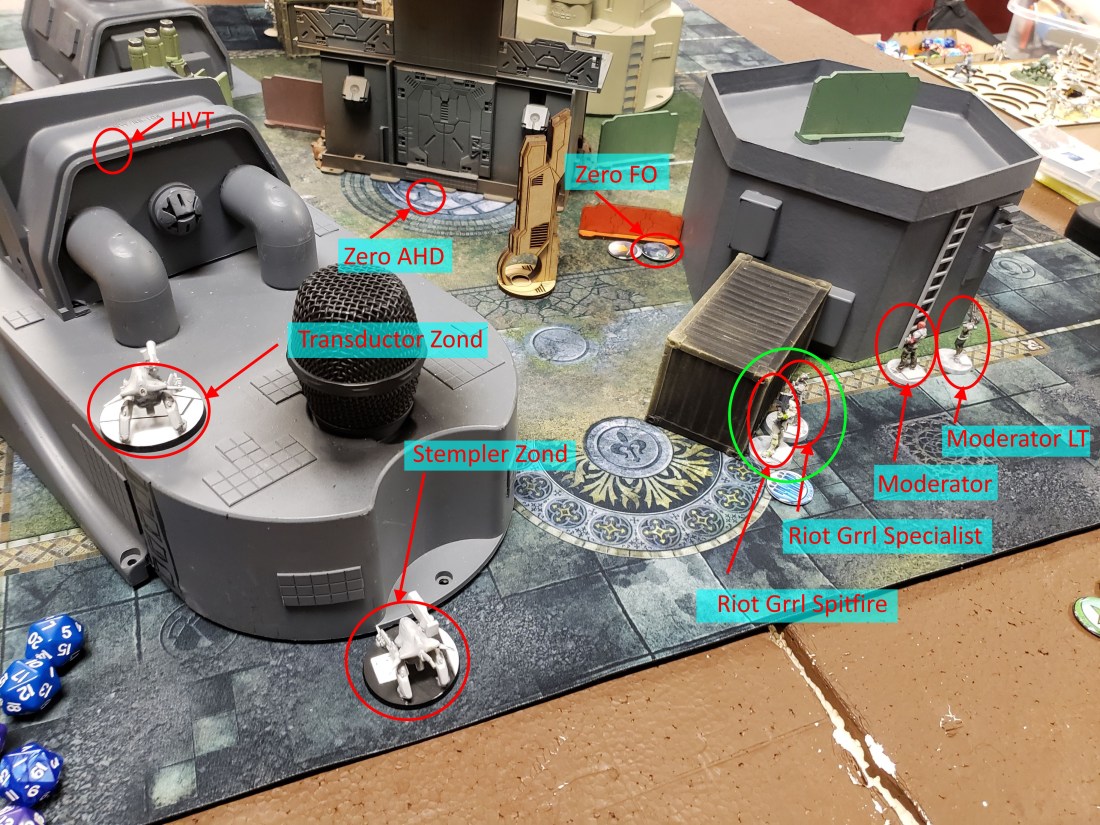
Xammy spent a long time thinking about his deployment. The apartment buildings present a deceptive challenge to deployment. The table looks more open than it is. And the places where it is really open are unexpected. Power Pack provides additional challenges by taking a large chunk out of the middle. Eventually Xammy put his Kamau Fusilier link into the large apartment on my right. Some Camo Markers on the Ground in and around the building. On top of that building there was a warcor looking at everything. A techbee was inside the building linked to the Xenotech. In the building on his right Xammy had a few more camo markers. A healot and two Zulu Cobras, the jammer and killer hacker. There was another Fusilier in the back on my right.

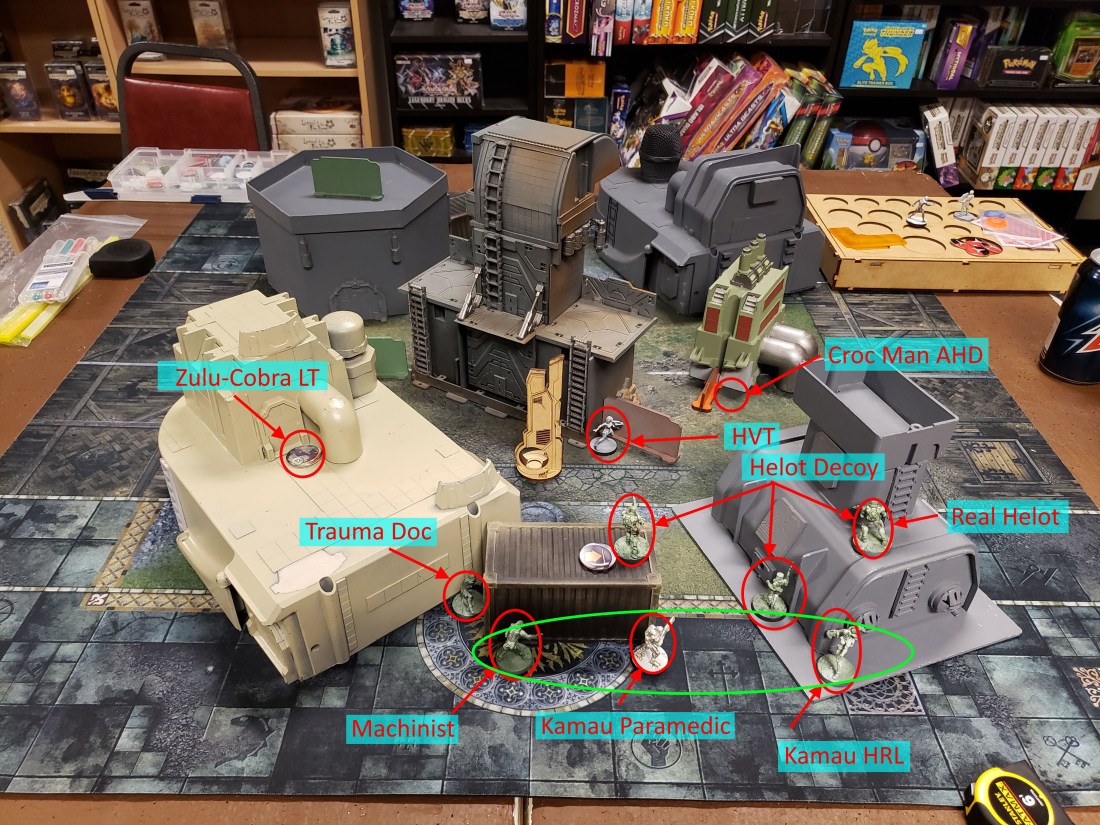
I set my Kriza up on the roof of the apartment on my left, linked to the Xenotech. I deployed my Securitate link in and around the same building, the Feuerbach on an awning to the right. I had my FO Zero in that same apartment prone and far forward on the first floor. My Zero KHD was on the middle floor of a central apartment with two of the antennas in it’s zone of control. I held Hannibal and the haris back with strategic deployment and distributed them on the construction platform on my right. I had the Fugazi further back on the same platform.

Top of 1: VIRD

At the start of this turn I removed two regular orders from the pool with the Xenotech. This proved advantageous as it was the group that had all of the AD units that I totally should have been expecting, but wasn’t. Starting things off the Tech Bee Moved the Xenotech towards the saturation zone. Then the Fusilier link started moving around. With one of the second orders the Multi-Sniper Kamau popped up to the roof on an elevator. The Hidden Deploy Crocman (As played by a Spektr) revealed to take a free shot at the Kamau, blowing it off the table. Next an Echo Bravo walks on behind my Crocman and takes it out. Xammy then reveals his own Crocman and takes the middle antenna. A Zulu-Cobra reveals itself and puts my Bolt ML and my Fugazi into unconsciousness. A second Echo Bravo walks on and sends a Wild Parrot into my link team. With not enough orders to set it off like he would like to (Rose City Raid Terrain Rules), the Echo Bravo sets up to watch the Antenna on my left. Without a lot else to do with the orders some camo shuffles around and Xammy passes turn.

Bottom of 1: ForCo

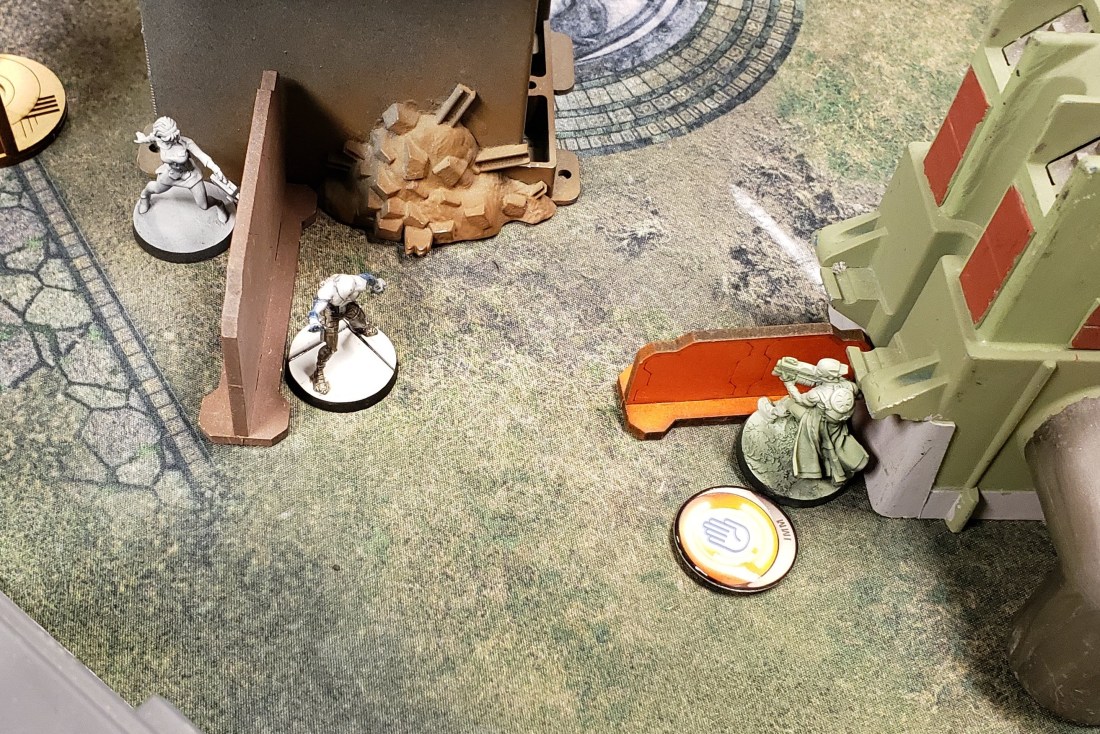
To start things off, I move my Zero FO into group 1 with a command token. I plan on using him to clear the Wild Parrot and free up the link team. This month is all about close combat, so I want to get Senor Massacre over to go whap some dudes. I start off moving a little and throwing some smoke to block the Echo Bravo. Then throw smoke to block the Zulu Cobra that took out my bolt. That done Senor Massacre walks across to be behind that zone. At this point I notice that I had left a small gap between a rock and my Eclipse zone, letting a Fusilier get an ARO on Senor Massacre. Senor Massacre loses the face to face, fails the armor roll and falls unconscious. Fortunately where he wound up is out of los of that pesky Fusilier, so I attempt regeneration, get the roll I wanted for Armor, and Senor Massacre dies. I switch sides and have the Zero FO go over to clear out the parrot, which I thought was a perimeter weapon, but was an E/M mine that walked. The Zero Fails to dodge, but makes it’s BTS then goes and drops a mine to look out at the Echo Bravo on my corner. I walk the link a little bit forward, but am unable to trigger the right ARO for the Echo Bravo. After walking my Kriza forward to have the Xenotech place the multiscanner and take out a Warcor, I pass turn.

Score at End of 1: 2 – 3 VIRD Favor

Top of 2: VIRD

On this turn, Xammy spent the Tech-Bee’s irregular to place the multi scanner. The Fusilier link did a couple spec fires, but where unable to eliminate Hannibal. They eventually maneuvered to get a FO into base with the antenna and activate it. A camo marker on my left side advanced over to the antenna on my left. It revealed and took out my FO Zero before basing the Antenna on my left. When Xammy was reminded that in Power Pack you could only ever have two of the antennas controlled, he elected not to have the Zulu Cobra Killer hacker take that antenna. The last few orders trying to jam my Kriza, who successfully avoided getting isolated. Putting a couple models into suppression, Xammy passes turn.

Bottom of 2: ForCo

So, I know that I have two Antenna that I want to secure. I would prefer the one on my left and the middle, since those are easier to protect. I activate the Securitate link, jumping the feuerbach down and advancing towards the Killer Hacker, hoping to take it out and flip the antenna. The First CSU that gets in range is jammed and out of the link. The next model I sent in was a CSU outside of jam range, who died to the Zulu Cobra, breaking the link. I refrormed the link and Tried to send the Feuerbach against that Zulu Cobra with a pistol. I lose the Feuerbach as well. At this point I am fairly discouraged. I have lost the majority of my link team to stupid mistakes and tunnel vision. I am tempted to call the game there. After taking a minute and looking at the board I notice that my Zero KHD could get normal rolls onto the two Zulu Cobras that I had crashed the link team into. I used that Zero to remove the Jammer. I try to have it take out the Zulu KHD as well but fail that one. I then use my LT order to set up to cover the rest of the board and remove some pesky Helots. I also have Hannibal stand up and take a shot at the Fusilier FO and Zulu Cobra on my right. I remove the Zulu Cobra but the fusilier remains.

Score at End of 2: 2 – 6 VIRD Favor

Top of 3: VIRD

I remind Xammy at the end of my turn or the start of his, that my CSU is isolated, not dead, which means it could get to the antenna and flip it to my side. So Xammy spends his turn trying to set up to make sure that doesn’t happen. A tech-bee dies trying to get into a spot to flash pulse things. Xammy’s croc man puts down more mines and tries to take out the Kriza, several times. The Zulu Cobra KHD attempts to walk around to get into the building and take out the very close CSU. But is blocked by another CSU. And an Echo Bravo goes in to base my console. Before the Fusilier goes into suppressive fire on the antenna on my right.

Bottom of 3: ForCo

Alright, it’s hero time! Not really, the Isolated CSU attempts to flip the antenna on my left, she gets to the antenna, but fails the WIP roll and dies. Next I try to have my Zero KHD get to the middle antenna. I use an elevator and walk. Then walk into base with the antenna and attempt to flip it while tanking a mine. The Zero KHD fails at both. Next I have the Kriza use his LT order to try and take out the Echo Bravo, but fail. It takes a regular. At this point I don’t have enough orders to successfully get to and flip any antennas that Xammy controls. I end my turn.

Final Score: 7 – 3 Varuna Minor Victory

Lessons Learned:

Before starting a turn, look at all the assets available. Had I remembered and used my killer Hacker to take out the Jammer Cobra before advancing my link, I could have easily used the link to secure my left antenna, and put considerable third turn pressure on Xammy to deal with a link team with three specialists. When we realized what happened, Xammy offered to let me roll back the turn and start over. I decided not to, because the harness of the lesson will better stick. The checklist was fine, but I didn’t fully assess where everything was before running team in to die.

I am glad that I lost this game. Had I managed the Hail Mary win I would not have learned as many lessons. And I certainly would not have deserved it. Going second on Power Pack is a very powerful choice. Having to defend the antennas through a turn where last ditch efforts can easily strip your lead away is difficult. I think Xammy played it fairly well. Though putting a mine on the other side of an awning instead of shooting at the Kriza would probably have fully stopped any chance of taking the middle objective. I guess the lesson here is that if you are going first you need to have a good coverage net of your two antennas that lets you ARO models further out than one short move into the antenna. Overall it was a good game and I look forward to playing Xammy again.

Jhokalups – Field Operation Action Report – 18

Jhokalups – Field Operation Action Report – 18

Foreign Company vs Caledonian Highlander Army

300/ITS X – Frostbyte

Playing against Sprocketgx and his Highlanders again. Practicing for Rose City Raid, and testing out my checklist plan for Frostbyte.

Wip Roll

Foreign Company 7

Caledonian Highlander Army 14

Decision: Jhokalups

Deployment: Sprocketgx

Initiative: Jhokalups

1st Turn: Jhokalups

1st Deploy: Jhokalups

Caledonian Highlander Army List:

Heavy

──────────────────────────────────────────────────

GROUP 1 10

HIGHLANDER GREY AP HMG, Smoke Grenades / Pistol, CCW. (1.5 | 34)

HIGHLANDER GREY T2 Rifle, 2 Light Shotguns, Grenades, Smoke Grenades / Pistol, CCW. (0 | 33)

HIGHLANDER GREY T2 Boarding Shotgun, Grenades, Smoke Grenades, D-Charges / Pistol, CCW. (0 | 25)

HIGHLANDER GREY T2 Boarding Shotgun, Grenades, Smoke Grenades, D-Charges / Pistol, CCW. (0 | 25)

HIGHLANDER GREY T2 Boarding Shotgun, Grenades, Smoke Grenades, D-Charges / Pistol, CCW. (0 | 25)

CALEDONIAN MORMAER (Fireteam: Haris) AP HMG / Pistol, Knife. (2.5 | 43)

CALEDONIAN MORMAER (X Visor) T2 Rifle / Pistol, Knife. (0 | 33)

CALEDONIAN MORMAER (X Visor) T2 Rifle / Pistol, Knife. (0 | 33)

112 (Motorized) Light Shotgun / Pistol, CCW. (1 | 20)

DOZER Rifle, Akrylat-Kanone / Pistol, Knife. (0 | 14)

GROUP 2 1 1 1

VOLUNTEER Lieutenant Rifle / Pistol, Knife. (0 | 8)

HIGHLANDER Chain Rifle, Smoke Grenades / Pistol, AP CCW. (0 | 6)

5 SWC | 299 Points

Open in Infinity Army

Foreign Company List:

Frozone

──────────────────────────────────────────────────

GROUP 1 10

KRIZA BORAC Lieutenant HMG / Heavy Pistol, CC Weapon. (2 | 54)

HANNIBAL (Chain of Command) MULTI Marksman Rifle, Nanopulser / Pistol, Knife. (0 | 39)

SEÑOR MASSACRE Boarding Shotgun, E/M Grenades, Eclipse Grenades / Pistol, AP CCW, E/M CCW. (0 | 26)

BOLT (Multispectral Visor L1) MULTI Sniper Rifle / Pistol, Knife. (1.5 | 27)

VALKYRIE Heavy Shotgun, Grenades / Heavy Pistol, EXP CC Weapon. (0 | 35)

SECURITATE Feuerbach / Pistol, Knife. (1 | 22)

SECURITATE Combi Rifle / Pistol, Knife. (0 | 13)

CSU (Specialist Operative) Rifle + Light Shotgun, Nanopulser / Pistol, Knife. (0 | 12)

CSU (Specialist Operative) Rifle + Light Shotgun, Nanopulser / Pistol, Knife. (0 | 12)

CSU (Specialist Operative) Rifle + Light Shotgun, Nanopulser / Pistol, Knife. (0 | 12)

GROUP 2 3

ZERO (Forward Observer) Combi Rifle, Antipersonnel Mines / Pistol, Knife. (0 | 19)

ZERO Hacker (Killer Hacking Device) Combi Rifle, Antipersonnel Mines / Pistol, Knife. (0 | 21)

FUGAZI DRONBOT Flash Pulse, Sniffer / Electric Pulse. (0 | 8)

4.5 SWC | 300 Points

Open in Infinity Army

The board was a catwalk collection with a few high buildings that offered some nice sniper perches on either side. There was a long catwalk approach to the central building on either side where the central console was. Thanks to the Rose City Raid Terrain standards, this building could be shot into, and out of, but not through, so the approach to it wasn’t so bad. Sprocket got to choose sides and picked the side with two sniper nests and then had me deploy first.

Deployment:

Looking at my zone I knew I wanted the Kriza up in the sniper nest, but didn’t want to telegraph that, so I held the Kriza in reserve. I set up my Hannibal, Massacre, Bolt haris up on my left side, with Hannibal and Senor Massacre in total cover out of sight and the Bolt prone on the catwalk. My idea being that she would have decent board coverage there. My Securitate link was in the middle, split with a CSU and the feuerbach on the top and the other two CSUs and my other Securitate spread out on the ground, all prone. I had my FO zero in the deadzone on my left, within a Move-Move of the Console, and the Killer Hacker Zero in a similar spot on my right. The Fugazi was in the lower portion of the sniper nest on my right and Valkyrie was on the center right ready to mix it up if needed. With my reserve I stuck the Kriza prone up high.

Sprocket also brought a core and a haris to the party, and split them on either side of the building and split level on the catwalks. On my left was the Mormaer Haris with T2 X-visors up top ready to ARO. On my right he had the Grey Core with an AP HMG out to ARO. A volunteer took the high sniper nest on my left. Behind the nest were the 112 motorized medic and a dozer. A highlander was on my right. With that done we got to rolling dice.

Top of 1: ForCo

One of my CSU’s picked up an 8-4 move from Metachemistry, so I knew I wanted to use the core to activate some heaters on my first turn. Unfortunately the Mormaer’s had a good view of a CSU and Securitate. I had Senor Massacre through eclipse smoke blocking the line of fire between a bolt and one of the Mormaers. Then had the Bolt stand up and send several sets of DA shots into the first one before it went down. Another set of orders took out the other Mormaer. I had the Kriza pop up to try and fight the Grey Core. The only thing he succeeded in doing was having the Greys smoke themselves out of any more ARO’s. I had the Zero KHD walk up to the console on my right and attempted to turn on a heater. Unfortunately even with two tries he failed. The Securitate link advanced up and covered themselves to get a CSU into the central building. That CSU failed to activate a heater with two attempts. With that all done I passed turn.

Bottom of 1: CHA

To start things off the Highlander came up to have a party with the Zero KHD. The Zero lived through a chain rifle and placed a mine, stifling the Highlanders attempts. The Grey Team then started advancing up the catwalk, and after two orders took down the Zero KHD and the Fugazi. When the Greys got to the central building they started filtering models in 1 at a time. The first was a T2 boarding shotgun Grey. Of note was a CSU shooting a light shotgun at BS21 burst 2 against the Grey, and a Feuerbach also making some shots. Eventually the CSU went down breaking the link. But I was also able to take the Greys down to a 4 man link (after a reform). As other Greys came into the building Sprocket was also able to take out my Feuerbach. I believe the last Mormaer came out of hiding this turn and got into a gunfight with the Bolt Sniper, going down in the process. With that done Sprocket passed it back to me.

Top of 2: ForCo

Ok, based off of the list of things, my Data Tracker is safe, and I don’t have any easy access to Sprocket’s data tracker (the 112). The next step is to eliminate some army points. Imove the FO zero into the main group. And then I start spending orders with my Kriza, split bursting between the two Greys I can see. After a few attempts I get both to go down. I then have the FO zero go capture the Console on my left, turning on my deployment zone heater. Some coordinated orders with the CSU’s and the Zero get the CSU’s in place to cove the lower entryways to the central building and take out the Highlander on my right. I leave the Kriza up to ARO and pass turn.

Bottom of 2: CHA

Sprocket has a few orders and a lot to get done. Moving the AP HMG grey carefully through the building he fights with the Kriza in cover. The Kriza takes a wound and elects to go prone. The last order has a boarding shotgun fight with a CSU Zero and Securitate, and the Bolt. The T2 Grey takes out my CSU but dies in the process. Out of orders he passes turn.

Top of 3: ForCo

Alright, action time, I need to get Senor Massacre into the exclusion zone and a safe spot. I spend a few orders to spread out and advance the haris up. Masacre gets into the zone behind a 2” piece of cover. I have a CSU turn on the dead zone heater and stand back up the Kriza. That done I pass turn.

Bottom of 3: CHA

With only 4 orders left there is not a lot for Sprocket to do. He uses one order to put out smoke so that the 112 can get out from behind the building without eating a Bolt to the face. A few orders later the 112 is in base contact with a console, but fails to flip it. The volunteer uses its LT order to try and shoot Senor Massacre, who takes a wound and goes to No Wound Incapacitation. With done we end the game and the cold kills a few models. But both Data Trackers are hanging out in the exclusion zone.

In the end I have more army points alive and the only heaters, which makes it a:

Final Score: 4 – 0 Foreign Company Victory

Lessons Learned:

Going into this game I had the following checklist in mind.

Frostbyte Priority Checklist:

  1. Kill the Enemy Data Tracker : +2 Points / -3 Points

  2. Secure the Exclusion Zone with my Data Tracker : +3 Points / -2 Points

  3. Kill lots of Points : +3 Points / -3 Points

I feel like this was a good list to run down at the start of my turns and kept me focused on what I needed to do. In this game I felt incontrol almost the whole time. Even when I failed 4 WIP roles to activate consoles I wasn’t too concerned. Senor Massacre made a great Data Tracker, his ability to live through a bit more punishment than a typical 1 wound model really helped in that last hail mary order from Sprocket.

Sprocket was very aggressive on his turn, which put a few models into positions where I got favorable AROs against them. I think had he turtled up a bit more with the Greys and forced me to hunt his Data Tracker he would have been in a stronger position. He had 8 models that he didn’t need to move or activate a heater. If they had stayed in favorable ranges I would have had a much harder time dealing with them. Although, I think if he had turtle with the Greys, I probably would have tried to get the Securitate Feuerbach into a place to start taking shots at the 112. Overall a good game. I look forward to the next one.

Jhokalups – Field Operation Action Report – 15

Jhokalups – Field Operation Action Report – #

Bakunin vs Varuna

300 ITS X – Deadly Dance – Soldiers of Fortune


This week I had a rematch against Xammy, one again a Bakunin Expeditionary Force facing a Varuna Oppression Squad. Our monthly tournament for March is Deadly Dance, so both forces decided to see what the TAGs available could do. With the table set up we rolled and got started.


Wip Roll

Bakunin 15

Varuna 3


Decision: Xammy

Deployment: Jhokalups

Initiative: Jhokalups

1st Turn: Xammy

1st Deploy: Xammy


Varuna List:

 Xammy Mambo Squallo Practice
──────────────────────────────────────────────────
10
 SQUALO (Armored Cav.) (Varuna Div.)(Fireteam: Duo, Aquatic Terrain) MULTI HMG, Zapper / AP Heavy Pistol. (2 | 94)
  CRABBOT Flash Pulse / Knife. ()
 PATSY GARNETT Submachine Gun, Nimbus Plus Grenades, D-Charges / Pistol, Knife. (0 | 37)
 FUSILIER Combi Rifle / Pistol, Knife. (0 | 10)
 FUSILIER (Forward Observer, Deployable Repeater) Combi Rifle / Pistol, Knife. (0 | 12)
 FUSILIER Paramedic (MediKit) Combi Rifle / Pistol, Knife. (0 | 12)
 KAMAU (Multispectral Visor L2) MULTI Sniper Rifle / Pistol, Knife. (1.5 | 32)
 KAMAU Heavy Rocket Launcher, Submachine Gun / Pistol, Knife. (1.5 | 23)
 CROC MAN (Minelayer) Combi Rifle, Antipersonnel Mines / Pistol, Knife. (0.5 | 31)
 ZULU-COBRA Lieutenant (Sensor) Combi Rifle, Jammer / Assault Pistol, Knife. (0 | 29)
 MACHINIST (Varuna Div.) (CH: Mimetism, Stealth, Aquatic Terrain) Combi Rifle, D-Charges / Pistol, Knife. (0 | 17)
 PALBOT Electric Pulse. (0 | 3)
5.5 SWC | 300 Points


Bakunin List:

 Mambo KV1
──────────────────────────────────────────────────
1
 LIZARD MULTI HMG, Heavy Grenade Launcher / . (2.5 | 87)
  LIZARD PILOT Submachine Gun / Pistol, Knife. ()
 ZOE & PI-WELL . (0 | 47)
  ZOE (Hacking Device. UPGRADE: Stop!) Combi Rifle, D-Charges / Pistol, Knife. (0 | 28)
  PI-WELL Combi Rifle / Electric Pulse. (0 | 19)
 ZONDBOT Electric Pulse. (0 | 3)
 KUSANAGI Lieutenant MULTI Rifle + Light Flamethrower, E/M Grenades / Pistol, Shock CCW. (+1 | 44)
 REVEREND CUSTODIER Hacker (Assault Hacking Device UPGRADE: Icebreaker) Boarding Shotgun / Pistol, Knife. (0.5 | 30)
 REVEREND HEALER Boarding Shotgun, Nanopulser / Pistol, EXP CCW. (0 | 32)
 MODERATOR Combi Rifle / Pistol, Electric Pulse. (0 | 9)
 ZERO Hacker (Killer Hacking Device) Combi Rifle, Antipersonnel Mines / Pistol, Knife. (0 | 21)
 METEOR ZOND Combi Rifle / Electric Pulse. (1 | 21)
 MORLOCK Chain Rifle, Smoke Grenades / Pistol, DA CCW. (0 | 6)
4 SWC | 300 Points


The table was set up fairly balanced with three parks across the middle of the table. We played these parks as jungle terrain; difficult terrain, a low visibility zone, and a saturation zone. This is part of ongoing practice for Rose City Raid, which will feature terrain rules heavily.


Deployment:

Xammy deployed first, a Fusilier/Kamau mixed link was set up I’m the smaller apartment, split up inside and outside of the building on the bottom floor. There was a camo marker near the park in my right, hiding the hidden deploy Crocman minelayer in the park. Another camo marker was on the second floor of the larger apartment. A machinist was hanging it with the Fusilier link and his Palbot was hiding in the other apartment. Patsy Garnett was hanging near the Palbot and a Reserve Squallo was placed and joined a duo team with Patsy.

VIRD Deployment

Looking at the table I knew one spot that I wanted to put my Lizard. So I put my Zondmate and the Morlock near my small apartment.  Zoe, the Moderator, and πWell were in my middle large apartment, ready to go hunting as needed. My zero was in the park on my right, prone and in cover. And I had the Reverend Haris in my right most apartment building, split across floors and rooms to protect them from speculative fire.

Bakunin Deployment

Top of 1: VIRD

Our Warcor has only the person going first drawing a classified for the zone. The person going second gets their zone in the opposite corner from that. Xammy drew Zone 4 and I got Zone 2. With that settled orders started getting spent. Xammy’s goal with this list was to throw out the Squallo and see what he could do with it. So to start, it and Patsy started walking towards the jungle. Another order and they were into the jungle on my left. Another order and the Lizard and Squallo could see each other, and elected to start shooting. With a Saturation, Low Visibility zone and the Lizard in cover we were looking at some odd shots. The Squallo lost the exchange and had to make explosive armor rolls. After failing one and passing two it continued to advance, once again losing the face to face. This time it’s armor couldn’t save it and it went unconscious. Spending a few orders Xammy was able to get his machinist over and brought the Squallo back to functionality. Advancing again the Squallo fights the Lizard in cover but loses again, once again falling unconscious. The Croc man reveals and walks towards my camo marker. Which chooses to do nothing. With that done Xammy passes turn.


Bottom of 1: Bakunin

Alright, I have a couple things to work on this turn, I need to get rid of the Squallo, get my Lizard into my scoring quadrant, and make sure that I have more points in Xammy’s quadrant so that he cannot score. Step one, getting rid of the Squallo. I attempt to have the Lizard shoot it off the table, which doesn’t work so well. So instead I have my Morlock walk up and Coup de Gras the Squallo. Good news step one complete. Next I drop my Meteor Zond onto the roof of the apartment building with the Fusillier link team in it. I then spend a couple orders having Zoe put spotlight onto the Fusilier medic. A couple of spec fire Heavy Grenades later and I have broken the fusilier link, killed the medic and taken out the multi-sniper. Next I send my Lizard on an aggressive mission to get it into my scoring zone. The Lizard eventually makes it, with minor structural damage and some paint scratches. (One wound taken). Finally I advance the Reverend link to have points in the zone and pass turn. With the Lizard in my Zone of operations and more points in the VIRD zone than Xammy I get 2 to his 0.

Photo_talks_1551634111740

Score at End of 1: 2 – 0 Bakunin Favor


Top of 2: VIRD

The VIRD force needs to get some things done this turn if it wants to turn the game around. Step one is taking out the Lizard. Patsy crawls through the forest to avoid getting tagged by the Morlock. After sneaking up behind the Lizard Patsy puts enough bullets into it to lose all structural integrity. Unable to advance up and perform a Coup De Gras, Patsy elects to shoot some more, and the Lizard becomes an exploded bit of scrap metal. The Crocman spends a bit of time chasing around the Zero KHD before finally taking it out. WIth that all done Xammy passes turn.


Bottom of 2: Bakunin

With my TAG down I will not be able to get the maximum number of points this game. So I focus on other objectives. I have the morlock advance out and create a smoke screen. After having good cover the morlock makes it into the jungle park and takes out the Machinist, who was the Varuna Data Tracker. I attempt to then get my Zondmate up to the HVT and get my Classified done, but didn’t have enough orders to get it done. After looking at the board we decide to call it there since the best that VIRD could do would be a tie. Which makes it a…


Final Score: 4 – 0 Bakunin Victory


Lessons Learned:

  • TAGs are fun, but challenging. I enjoyed having a large stopy robot, but it was also so many points tied up in one model. More practice is needed.
  • The spec fire with the heavy grenade launcher worked out exactly like I wanted it to, I was able to get a meteor zond in place to be able to put targeted on the link team.
  • I still need to work on my deployment. I found myself awkwardly constrained by some of the set up I did.
  • The Reverends are medium infantry and could have been deployed further up, which would have needed fewer orders to contest zones. Something to remember for next time.

Jhokalups – Field Operation Action Report – 11

Jhokalups – Field Operation Action Report – 11

Bakunin vs Varuna Immediate Response Division

300 / ITS X – Firefight – Spec Ops (Unused)

After what feels like a month without playing I finally got a game in. This was my second game against Xammy’s VIRD, first game at 300 points. I arrived a bit late to the game night, but the table was set up when I got there, so we were able to dive right in.

Special shout out to UselessWizard, who came into the shop right before the game. We hadn’t seen him in store in a while and spent some time geeking out about painting things.

So, after showing off all the things, we were able to dive right in.

Wip Roll
Bakunin – 4
VIRD – 5

Decision: VIRD (Xammy)
Deployment: Bakunin (Jhokalups)
Initiative: VIRD (Xammy)
1st Turn: VIRD
1st Deploy: VIRD

VIRD List:

 VIRD – Armed
──────────────────────────────────────────────────
GROUP 1  1
 HELOT MILITIAMAN Submachine Gun, Light Rocket Launcher / Pistol, Knife. (0.5 | 9)
 ZULU-COBRA Hacker (Killer Hacking Device) Breaker Combi Rifle / Pistol, Knife. (0 | 28)
 FUSILIER Lieutenant Combi Rifle / Pistol, Knife. (0 | 10)
 FUSILIER Combi Rifle / Pistol, Knife. (0 | 10)
 FUSILIER Paramedic (MediKit) Combi Rifle / Pistol, Knife. (0 | 12)
 KAMAU HMG / Pistol, Knife. (1 | 28)
 KAMAU (Multispectral Visor L2) MULTI Sniper Rifle / Pistol, Knife. (1.5 | 32)
 KAMAU Heavy Rocket Launcher, Submachine Gun / Pistol, Knife. (1.5 | 23)
 PATSY GARNETT Submachine Gun, Nimbus Plus Grenades, D-Charges / Pistol, Knife. (0 | 37)
 MACHINIST (Varuna Div.) (CH: Mimetism, Stealth, Aquatic Terrain) Combi Rifle, D-Charges / Pistol, Knife. (0 | 17)
GROUP 2  2
 HELOT MILITIAMAN Submachine Gun, Light Rocket Launcher / Pistol, Knife. (0.5 | 9)
 ZULU-COBRA (Sensor) Combi Rifle, Jammer / Assault Pistol, Knife. (0 | 29)
 CROC MAN Hacker (Assault Hacking Device) Combi Rifle, Antipersonnel Mines / Pistol, Knife. (0.5 | 36)
 FUGAZI DRONBOT Flash Pulse, Sniffer / Electric Pulse. (0 | 8)
 FUGAZI DRONBOT Flash Pulse, Sniffer / Electric Pulse. (0 | 8)
 WARCOR (Sixth Sense L1) Flash Pulse / Stun Pistol, Knife. (0 | 3)
5.5 SWC | 299 Points

Open in Infinity Army

Bakunin List:

 Falcon Punch!
──────────────────────────────────────────────────
GROUP 1  10
 MODERATOR Combi Rifle / Pistol, Electric Pulse. (0 | 9)
 MODERATOR Combi Rifle / Pistol, Electric Pulse. (0 | 9)
 MODERATOR Combi Rifle / Pistol, Electric Pulse. (0 | 9)
 MODERATOR Combi Rifle / Pistol, Electric Pulse. (0 | 9)
 MODERATOR Combi Rifle + Light Grenade Launcher / Pistol, Electric Pulse. (0.5 | 13)
 TASKMASTER Lieutenant Red Fury, Pulzar, CrazyKoalas + TinBot A (Deflector L1) / Heavy Pistol, DA CCW. (1 | 53)
 KUSANAGI Spitfire / Pistol, Shock CCW. (2 | 43)
 REVEREND CUSTODIER Hacker (Hacking Device Plus) Combi Rifle + Pitcher / Pistol, Knife. (0.5 | 34)
 REVEREND HEALER Boarding Shotgun, Nanopulser / Pistol, EXP CCW. (0 | 32)
 BRAN DO CASTRO (Specialist Operative) Combi Rifle + E/Mitter / Pistol, DA CCW. (0 | 37)
GROUP 2  2
 ZERO Hacker (Killer Hacking Device) Combi Rifle, Antipersonnel Mines / Pistol, Knife. (0 | 21)
 ZERO (Minelayer) Combi Rifle, Antipersonnel Mines / Pistol, Knife. (0.5 | 19)
 MORLOCK Chain Rifle, Smoke Grenades / Pistol, DA CCW. (0 | 6)
 MORLOCK Chain Rifle, Smoke Grenades / Pistol, DA CCW. (0 | 6)
4.5 SWC | 300 Points

Open in Infinity Army

After choosing sides and who would go first, and about halfway through Xammy’s deployment I noticed that the deployment zone for Firefight is 16”, not 12”. Which makes the side I had tried to inflict on VIRD a much better option.

Deployment:

vird deployment

Xammy set up a fusilier link with two Kamau, a multi sniper and a heavy rocket launcher on top of a central building. There was a Kamau haris with Patsy, Machinist and HMG Kamau hiding behind a building ready to come up through the center. There were several Camo markers scattered around the deployment zone, two Zulu Cobra and two Helots. Two Fugazi, and a hidden deployment Croc Man rounded out deployment.

bakunin deployment

I had my moderator link on a building to my left. My Reverend haris was central and forward. I split the Zero’s right and left. The Taskmaster was central rear. And I had my Morlocks covering the right. Bran did some deep infiltrating to be on top of a building near the Fusilier link.

Top of 1: VIRD

First thing that happens is Xammy starts to walk a camo marker around a corner near my mine. Then he remembers, that there is a decent chance I brought a mine layer and decides, that perhaps this wasn’t the best choice. Instead he attempts to discover my Zero on my right, but fails the discover roll. A coordinated order brings the Fugazi and a camo marker forward, who drop a lot of sniffers. The camo marker reveals itself to be a sensor Zulu-Cobra, who declares sensor and reveals both Zeros and the mine. The Multi Sniper took a couple shots and eventually took the Zero KHD off the field. The Zulu-Cobra and minelayer Zero exchanged a shot and the Zero dodged around a corner. The Patsy Haris started to advance up the field, the HMG Kamau and the Reverend Healer had an exchange. After a few successful dodges and armor saves, Patsy takes a turn. The Healer put a wound on Patsy and take out a Helot hiding behind her. After that the Kamau HMG put the healer into unconsciousness.
With that done Xammy passed turn.

Bottom of 1: Bakunin

Looking at the board, I was reasonably sure that my super jump morlock was going to eat a rocket to the face if I let it rage, canceling it’s order seemed a good choice. The other morlock was able to safely walk up the board a little ways. I attempted to speculative a smoke grenade from from one morlock to cover the other, but that failed. The remaining morlock then walks up the field to get into range of Patsy, and chain rifles her down while eating a hail of rockets and bullets. Unsure of the distance from my Moderator LGL to the Fugazi, I decided that I would use Kusanagi to clear out the left side so I could come up that flank and then sweep towards Bran.
To start off I advanced Kusanagi up and advanced the custodier. The custodier put out some white noise to protect the side from the Multi Sniper. Kusanagi then took several shots at the Zulu Cobra, who successfully dodged. Next I had Kusanagi take a shot at the HRL Kamau, the Kamau won the face to face and Kusanagi burned to death. Super awesome.
I knew that if I couldn’t clear out at least one member of the link I was going to be in trouble. I thought about using Bran, but with the line of sight that the Kamau had, he had no way to stand and safely shoot people. I had Bran climb down the side of the building he was on to take a shot at the machinist and Kamau. After that I spent a couple orders bringing the Taskmaster forward and took a couple shots at the Kamau HRL, ineffectively.
With that I was out of orders and passed turn.

Top of 2: VIRD

The first thing Xammy does is have his link start to walk over to get eyes on the Taskmaster. The first shot fails to kill the Taskmaster. The multi sniper then takes a shot at Bran, taking him down. Another order in the link takes down the Taskmaster.
At this point we called the game, I would start my turn in loss of lieutenant. I had also lost the majority of my points, ability to kill, and ability to do anything taken off the field. It was also very late.

Final Score: 7 – 0 VIRD Total Victory

Lessons Learned:

  • If I had been better at estimating distances, my LGL Moderator would have speculative fired off a shot at the close Fugazi and probably taken out it and the nearby Zulu cobra.
  • I should have checked the angles that the Multi Sniper could have seen. Walking Kusanagi around the other side of the building would have let her take out a lot on the other side.
  • I didn’t have much of a chance to try out the Custodier’s Pitcher. It would have been useful as an extension area for White Noise.

Jhokalups – Field Operation Action Report – 10

Jhokalups – Field Operation Action Report – 10
Bakunin vs Caledonian Highlander Army (CHA)
300 / ITS X – Hunting Party
Finally able to play a game again, it feels like it has been too long. This last week I once again faced off against Sprocketgx, who has been one of my more challenging opponents. This week we tried hunting party, in preparation for an ITS in January. I was trying out Cassandra Kusanagi and Bran Do Castro for the first time. After getting our terrain on the table we rolled off.
Wip Roll
Bakunin – 6
CHA – 3
Decision: Bakunin
Deployment: CHA
Initiative: Bakunin
1st Turn: Bakunin
1st Deploy: Bakunin

Caledonian Highlander Army List:

 Jordan’s Hunting Party
──────────────────────────────────────────────────
GROUP 1  3
 WALLACE Lieutenant Combi Rifle + Light Flamethrower, Smoke Grenades / Pistol, EXP CCW. (0 | 35)
 HIGHLANDER Chain Rifle, Smoke Grenades / Pistol, AP CCW. (0 | 6)
 HIGHLANDER Chain Rifle, Smoke Grenades / Pistol, AP CCW. (0 | 6)
 S.A.S. (Forward Observer) Rifle / Pistol, AP CCW, Knife. (0 | 24)
 S.A.S. (Forward Observer) Rifle / Pistol, AP CCW, Knife. (0 | 24)
 McMURROUGH 2 Chain Rifles, Grenades, Smoke Grenades / Templar CCW (AP + DA). (0 | 31)
 SCOT (2nd Battalion) CH: Camouflage Missile Launcher / Assault Pistol, Knife. (1.5 | 31)
 SCOT (2nd Battalion) CH: Camouflage Molotok / Pistol, Knife. (1.5 | 30)
 CATERAN T2 Sniper Rifle / Pistol, AP CCW. (1 | 24)
GROUP 2  7
 UXÍA McNEILL (Covert Action) (CH: Limited Camouflage, Superior Infiltration, Specialist Operative) Boarding Shotgun, D-Charges, Smoke Grenades / 2 Assault Pistols, AP CCW, Knife. (0 | 27)
 VOLUNTEER HMG / Pistol, Knife. (0.5 | 19)
 VOLUNTEER Paramedic (Medikit) Rifle / Pistol, Knife. (0 | 10)
 VOLUNTEER Chain Rifle, Light Shotgun / Pistol, Knife. (0 | 6)
 VOLUNTEER Chain Rifle, Light Shotgun / Pistol, Knife. (0 | 6)
 VOLUNTEER Rifle / Pistol, Knife. (0 | 8)
 VOLUNTEER (CH: Limited Camouflage, Inferior Infiltration) Light Shotgun, Light Grenade Launcher / Pistol, Knife. (1 | 13)
5.5 SWC | 300 Points
Bakunin Army List:
 KusaSmoke for ED
──────────────────────────────────────────────────
GROUP 1  10
 KUSANAGI Lieutenant MULTI Rifle + Light Flamethrower, E/M Grenades / Pistol, Shock CCW. (+1 | 44)
 REVEREND HEALER Boarding Shotgun, Nanopulser / Pistol, EXP CCW. (0 | 32)
 REVEREND CUSTODIER Hacker (Hacking Device Plus) Combi Rifle / Pistol, Knife. (0.5 | 33)
 PROWLER Spitfire, D-Charges / Pistol, CCW. (2 | 36)
 PROWLER Combi Rifle + Light Flamethrower, Adhesive Launcher / Pistol, CCW. (0 | 32)
 ZERO Hacker (Killer Hacking Device) Combi Rifle, Antipersonnel Mines / Pistol, Knife. (0 | 21)
 ZERO (Minelayer) Combi Rifle, Antipersonnel Mines / Pistol, Knife. (0.5 | 19)
 ZERO (Forward Observer) Combi Rifle, Antipersonnel Mines / Pistol, Knife. (0 | 19)
 BRAN DO CASTRO (Specialist Operative) Combi Rifle + E/Mitter / Pistol, DA CCW. (0 | 37)
 MODERATOR Combi Rifle / Pistol, Electric Pulse. (0 | 9)
GROUP 2  3
 MORLOCK Chain Rifle, Smoke Grenades / Pistol, DA CCW. (0 | 6)
 MORLOCK Chain Rifle, Smoke Grenades / Pistol, DA CCW. (0 | 6)
 MORLOCK Chain Rifle, Smoke Grenades / Pistol, DA CCW. (0 | 6)
3 SWC | 300 Points

Winning the roll, I took a look at the table, and deciding that I liked both sides fairly evenly, that I would like to set the pace for the first engagement, and elected to go first.

Deployment:
Deploying this list was interesting, there are only seven models that are not in a marker state. I had my Reverend haris off on my right surrounding a nice sniper tower. The tower had my moderator lying prone, and I spread my Morlock off on my left flank, rolling Armor, Physique, and BTS with their meta chemistry. My prowlers went on either side of the board, towards the middle. The Zero hacker was in the middle near my HVT. The minelayer Zero placed it’s mine forward of itself in cover, whole being prone in cover further back. The FO Zero was up on a building near the antenna on my right. I held Bran in reserve, hoping to do some damage with him.

CHA Deployment.jpg
Sprocket brought a lot of Camo markers as well. Wallace was prone up on a roof. A volunteer link was off to the right on his side. The Inferior Infiltrating Volunteer failed it’s roll and walked on near the other volunteers. Uxia successfully deployed near my Reverend haris.

CHA Deployment

Top of 1: Bakunin
One of our Warcors has been writing about mental fatigue and how a checklist can help reduce mental strain and improve results, soto follow that theme I had the following list.

  1. Keep Kusanagi alive and un-hunted.
  2. Capture antennas and make it difficult for Sprocket to recapture.
  3. Use Bran to disrupt things in the back.

To start things off, the Morlocks went on a rampage, one advancing and throwing out a smoke cloud, then another double moved, I misjudged the distance and angles and that poor Morlock got plastered by a volunteer with a rifle. The final Morlock moved up just behind the others limp body. In retaliation I moved my left most Prowler forward along the crates, as it cleared them it was able to take a shot on the volunteers, taking the link down from 5 to 4. Another order takes down the infiltrating volunteer that wasn’t able to infiltrate. And then finally the Prowler circles around the boxes to lure out an SAS and then blasts it off the table.
The camo marker close to my Lieutenant was concerning. The healer volunteered to take care of the issue, wandering over to bait out ARO’s from the marker. The marker revealed itself to be Uxia, and after a few exchanges Uxia was unconscious. Next up my Zero FO camo marker crawled towards the antenna and dropped a mine marker (rules flub, cannot drop mines with a camo marker in the trigger area), then walked over to the antenna. An SAS revealed itself, tanked the mine and shots from the Zero. Another attempt by the Zero to deal with the SAS got the Zero frozen. Some orders got Kusanagi into cover, the healer covering a possible approach from McMurrough. Final orders re-camouflaged the Prowler and then a coordinated order moved my markers forward.

Bottom of 1: CHA
Sprocket had a bit of a puzzle on his hands. I have some camo markers up in aggressive spots and doing too much with the volunteer link would risk the wrath of Bran. To start off, the Highlanders took their Impetuous moves towards Bran. Then McMurrough took his towards my Zero up top. After winning a smoke face to face with the Reverend Healer, McMurrough proceeds to start creeping up in the smoke, hoping to take out Kusanagi and the link. McMurrough face tanks the mine bluff. Unfortunately on his next walk he gets an adhesive launcher to the face and gets stuck in glue. Next a Scot wielding a missile launcher popped out of camo and took shots at my Reverend healer. Fortunately she dodged well out of site.
The last group to activate was the fourman link, which was down to four orders. One member starting climbing up a ladder toward Bran, while the others advanced to cover the objective marker. Bran lucked out and the volunteer that made it up failed it’s first discover roll. That left the volunteers without much else to do and so Sprocket passed turn.

Top of 2: Bakunin
Going back to my checklist, so far I haven’t accomplished much on it. I need to capture antennas still. I have eliminated but not hunted down a couple specialists, and have revealed where others are. With my impetuous orders I bring my two remaining Morlocks up. The first climbs a ladder towards the volunteers, while attempting to chain rifle one down, it dodges. The other starts the long climb towards the ML Scot. The leftmost Morlock decides it is time to sacrifice itself to free Bran up. It advances and takes the volunteer standing by Bran out, whole getting gunned down itself. I use Bran to then isolate the volunteer paramedic, and start to play Spider-Man, hiding on the sides of the walls to block line of sight. My other Morlock climbs up the ladder and chain rifles the Scot down. At one point, Bran got Immobilized, so I spent a good chunk (3-4) orders trying to reset him. When he did he went back into Camo. My FO zero stunned the SAS that was by him. And my hacker Zero came forward and secured the left antenna. Also while using it for cover.

Bottom of 2: CHA
With the volunteers down to three members, Sprocket moves the two over to group 1, to fill out orders. Bran, a Highlander, and the volunteers all have a Merry game of tag that ends with a dead Highlander, dead Prowler, and Bran dancing in the sides of a building. Unable to secure any of my specialists the turn is passed.

Top of 3: Bakunin
Third turn, I have captured one antenna, and between Bran, my Zero and isolating the paramedic, there isn’t much to fear about losing control of it. I therefore forces on getting the second antenna, protecting Bran, and setting up a good defense block.
The FO zero successfully knocks out the SAS next to him and then captures the right hand antenna. I spend a few orders trying to get Bran into a good spot to isolate the LT, and then use a coordinated order to move my camo marker spitfire prowler up. With that done I pass turn.

Bottom of 3: CHA
Looking at points, Sprocket needs to hunt down more specialists than me to tie. So that’s what he sets out to do. Fortunately Bran dodges around the building, but my Zero hacker gets glued.
Next up Wallace decides to take a stab at binding Bran, when he stands up to walk the Prowler sends a glue ball omat Wallace, which he easily avoided with a smoke screen. Unfortunately when walking over with the last two orders to take Bran out, Wallace gets tagged by the Prowlers adhesive launcher. Which ends the game. With two antennas, a tie on specialists, no classifieds and one stuck Lieutenant, the Bakunin force takes home victory.

Final Score: 6 – 0 Bakunin Total Victory

Lessons Learned:

  • The checklist plan is actually very helpful. Having a list to fall back on in times of doubt really helped this game. Thanks WiseKensai!
  • Mines cannot be dropped with a camo marker in their trigger area, write it down and remember it.
  • I have found nothing in the rules saying that a model that is unconscious cannot also be isolated or immobilized. This could be helpful information for future Hunting Party missions.
  • Bran Do Castro was an awesomely disruptive piece. He tied up a whole link team with his infiltrating and distracted my opponent from pushing forward. I just wish I had been able to do super jumping with him.
  • I really like the Kusanagi haris supported by all the camo markers. Though another list may have done a bit better in Hunting Party.

Jhokalups – Field Operation Action Report – 9

Jhokalups – Field Operation Action Report – 9
Bakunin vs Varuna Immediate Reaction Division
150 Recon+ – Sweep and Clear

A new week and it’s back to the local game store to throw some dice. One of our local Warcor’s lived the dream of having a birthday on the local game night. Several people showed up for his Showdown Birthday Bash. I was planning on joining them, unfortunately my duties as a Pundit meant that I couldn’t participate, I had to roll dice for a different game. After my games were done, I was able to finally get a real game of Infinity against the person who got me into the game. We selected Recon+ so we could set up a table and finish quickly. I choose a repeat list, and my opponent built a brand new Varuna Immediate Reaction Division (VIRD) list. There was a lot of excitement and the Recon+ rules for list building were briefly forgotten. Patsy is not a valid choice, and had to be pulled off the table. With that done we got to the game.

Wip Roll
Bakunin – 4
Varuna Immediate Reaction Division – 15

Decision: Bakunin
Deployment: Varuna
Initiative: Bakunin
1st Turn: Bakunin
1st Deploy: Bakunin

Varuna Immediate Reaction Division List:

 Varuna Immediate Reaction Division
──────────────────────────────────────────────────
1
 MACHINIST (Varuna Div.) (CH: Mimetism, Stealth, Aquatic Terrain) Combi Rifle, D-Charges / Pistol, Knife. (0 | 17)
 KAMAU Paramedic (MediKit) Combi Rifle / Pistol, Knife. (0 | 22)
 KAMAU Heavy Rocket Launcher, Submachine Gun / Pistol, Knife. (1.5 | 23)
 TRAUMA-DOC Combi Rifle / Pistol, Knife. (0 | 14)
 HELOT MILITIAMAN Submachine Gun, Light Rocket Launcher / Pistol, Knife. (0.5 | 9)
 CROC MAN Hacker (Assault Hacking Device) Combi Rifle, Antipersonnel Mines / Pistol, Knife. (0.5 | 36)
 ZULU-COBRA Lieutenant (Sensor) Combi Rifle, Jammer / Assault Pistol, Knife. (0 | 29)
2.5 SWC | 150 Points
Bakunin List:
 Riot GRRL Recon+
──────────────────────────────────────────────────
8
 RIOT GRRL (Specialist Operative) Combi Rifle, Blitzen, Stun Grenades / Pistol, Knife. (0 | 30)
 RIOT GRRL Spitfire / Pistol, Knife. (2 | 34)
 MODERATOR Lieutenant Combi Rifle / Pistol, Electric Pulse. (0 | 9)
 MODERATOR Combi Rifle / Pistol, Electric Pulse. (0 | 9)
 ZERO (Forward Observer) Combi Rifle, Antipersonnel Mines / Pistol, Knife. (0 | 19)
 ZERO Hacker (Assault Hacking Device) Combi Rifle, Antipersonnel Mines / Pistol, Knife. (0.5 | 24)
 TRANSDUCTOR ZOND Flash Pulse, Sniffer / Electric Pulse. (0 | 8)
 STEMPLER ZOND Combi Rifle, Sniffer / Electric Pulse. (0 | 17)
2.5 SWC | 150 Points

The table we had set up had several high spots with lanes across each side of the table. The middle had a giant obnoxious building that meant no shooting corner to corner and no single sniper dominance.

Deployment:

20181129_225735

I set my moderators close together on my right, behind a building and hopefully out of site. The Riot Grrl link covered was to the left, ready to make a bee line for the close console. Transductor Zond was on the roof of a building on my left, the Stempler on the ground behind it. I had my FO zero prone in camo up to the right of the console, and held my AHD zero in reserve.

20181129_230435

The VIRD commander had a camo marker on top of a building on his left. A Trauma doc nestled between a building and a trash can. The Kamau link (with Machinist) settled in behind some buildings at the middle. And a Helot Decoy set up across the roof of those buildings. Then I was asked to leave the table as a hidden deployment Croc Man hacker was placed up on my left.

Top of 1: Bakunin

First thing I wanted to do was figure out which Helot was the real one, and what equipment it had. I had the transductor expose itself and trigger some AROs. The kamau took a shot, the Helot didn’t. My zond flash pulsed the Kamau for a face to face. But the Kamau passed BTS. Next the Grrls walked out to get up to the close console. The Helot revealed itself and fired a light rocket launcher. Fortunately the Helot missed. Not wanting to take another LRL I had my AHD Zero sneak up in camo to the corner, then take a Surprise shot at the Helot, who went down in a hail of bullets. Since the Zero was already revealed I decided to have it make things more difficult and lay down some mines. As he advanced up, a Croc Man AHD revealed itself to try and Carbonite my Zero. The Zero decided to send some frozen programming back at the Croc Man. The Zero got a critical in the face to face and froze up the Croc Man.

20181129_232229

The Grrls then walked up and around the console, taking a shot at the Croc Man, successfully securing the console. Unfortunately the Croc Man passed armor and went prone, also successfully resetting itself. With a coordinated order I got the Grrls out of hacking range and up towards the passage on my right. My Zero as the spearhead, layed down a mine. That done, I passed my turn.

Bottom of 1: VIRD

The Varuna commander had concerns about the mine, there were several high value pieces that would trigger the mine. The camo marker revealed to be a Zulu-Cobra who attempted, and failed, to reveal the mine with three orders (it was late and sensor was missed). After the mine was discovered and destroyed, the HRL Kamau came up and did mean things to my AHD zero, who responded by dropping another mine. The Zero died for his efforts, but trading a zero for 5 regular orders seems like a really good trade. In order to deal with the mine, the Trauma doc climbed over the container to tank the blast, successfully dodging the blast (this was technically illegal, climbing for the trauma doc is an entire order). With the mine dealt with the Zulu-Cobra used it’s Lieutenant order to re-camo itself.

I used the console to score 3 of the zones at the end of turn 1.

Score at End of 1: 1 – 0 Bakunin Favor

Top of 2: Bakunin

Well, I know who the Varuna lieutenant is, and the Riot Grrls have MSV1… So I decide that this will be the best plan. I use a command token to re-link the Riot Grrls, then have the Spitfire Grrl walk over and attempt to discover the Zulu-Cobra, and fail. The Specialist Grrl tries next and succeeds in the discover. And a third order puts the Zulu Cobra into the ground. Next task is taking out the pesky HRL Kamau, which they do with the next order, also dropping the trauma doc. More orders put the trauma doctor into the ground and brings the Grrls close to the far console. With that done I pass turn.

Bottom of 2: VIRD

Starting in Loss of lieutenant and down 3 of the 6 remaining troopers, The Varuna Commander first attempts to have a Kamau heal a Kamau, but in true Pan-O fashion kills off the Kamau. The engineer ambles up a bit and the Croc Man goes around a corner towards my HVT. A new lieutenant is appointed and the turn is passed.

With models in 3 of the 4 zones and a connected console, I get 2 points for round 2.

Score at End of 2: 3 – 0 Bakunin Favor

Top of 3: Bakunin

The only thing I really need to do is capture another console, so I have the Grrls walk up to it. And then fail to hit the button 5 times. I take a break from that to kill the Kamau paramedic. Then proceed to fail to hit the button a 6th time. I pass my turn.

Bottom of 3: VIRD

The Varuna commander has two orders left and a whole lot to do. The Croc man walks over towards my Transductor Zond and completes a classified objective. Then passes turn.

With my console and Grrls still dominating zones, I score 3, and another 1 for connecting to a console.

Final Score: 7 – 2 Bakunin Total Victory

Lessons Learned:

  • This was my first time playing with Decoy, I thought I had a good plan with the Transductor, I just didn’t see that a Kamau also had the same fire lane.
  • The Zero AHD was an MVP this game. His mines and surprise shot let the Riot Grrls walk around uninhibited.
  • Heavy Infantry are mean in Recon+, there are not as many tools to deal with them.
  • Sensor give a bonus to discover rolls. It shouldn’t have taken all the order to get rid of the mine.

Jhokalups – Field Operation Action Report – 8

Jhokalups – Field Operation Action Report – 8
Bakunin vs Steel Phalanx
150 Recon+ – Sieze the Antennas

This week was a quiet one at the local shop. For speed of play my opponent and I elected to do a Recon+. Since I hadn’t prepared anything for the Recon format I decided to let fate decide what I played. So, we had a quick skirmish between a rapid response Bakunin force and a Steel Phalanx strike force, both attempting to secure the communication antennas.

Wip Roll:

Bakunin – 5
Steel Phalanx – 19 (fail)
Decision: Bakunin
Deployment: Bakunin
Initiative: Steel Phalanx
1st Turn: Steel Phalanx
1st Deploy: Steel Phalanx

Steel Phalanx List:

 Recon+List 1004
──────────────────────────────────────────────────

9
 DACTYL Engineer Combi Rifle, Adhesive-Launcher, D-Charges / 2 Breaker Pistols, Knife. (0 | 23)
 EKDROMOS Chain Rifle, Nanopulser / Pistol, DA CCW. (0 | 20)
 AGÊMA Marksman MULTI Sniper Rifle / Pistol, Knife. (1.5 | 30)
 ALKÊ Lieutenant Spitfire, Nanopulser / Pistol, CCW. (1.5 | 25)
 THORAKITES (Forward Observer, 360º Visor) Submachine gun, Chain Rifle / Pistol, Knife. (0 | 13)
 THORAKITES (Forward Observer, 360º Visor) Submachine gun, Chain Rifle / Pistol, Knife. (0 | 13)
 MYRMIDON Chain Rifle, Nanopulser, Smoke Grenades / Pistol, AP CCW. (0 | 16)
 NETROD Electric Pulse. (0 | 4)
 NETROD Electric Pulse. (0 | 4)
3 SWC | 148 Points

Open in Infinity Army

Bakunin List:

 Random List
──────────────────────────────────────────────────

6  1
 REVEREND CUSTODIER Hacker (Hacking Device Plus) Lieutenant Combi Rifle + Pitcher / Pistol, Knife. (0.5 | 34)
 WARCOR (Aerocam) Flash Pulse / Stun Pistol, Knife. (0 | 3)
 PROWLER Spitfire, D-Charges / Pistol, CCW. (2 | 36)
 ZERO (Deployable Repeater) Combi Rifle, E/Mauler / Pistol, Knife. (0 | 19)
 ZERO (Deployable Repeater) Combi Rifle, E/Mauler / Pistol, Knife. (0 | 19)
 MODERATOR Combi Rifle / Pistol, Electric Pulse. (0 | 9)
 RIOT GRRL (Specialist Operative) Combi Rifle, Blitzen, Stun Grenades / Pistol, Knife. (0 | 30)
2.5 SWC | 150 Points

Open in Infinity Army

For this game we used some WIP buildings that I have been making for a city block table. This week we put on the roofs and added some elevators. Added in some construction barriers, dumpsters and antennas, and we were good to go.

For this week we played true line of site, if a model could draw a line through the building, it could see through it.

Deployment:

I set my prowler spitfire up on the roof corner looking over two antenna. I had my Zeros set up in secluded spots to be able to lay down mines in ARO. The moderator was set down between a building and a dumpster, looking over the back field. Lt. Custodier was on the dumpster, prone and in cover. Riot Grrl choose to be in the building with a straight shot to the closest antenna. I held the Warcor in reserve, it went on the roof with the prowler.

The two FO Thorakites hid behind one building, and Alke behind the other. The Agema marksman set up on the roof. The Myrmidon was behind the far antenna. Two netrods successfully dropped in out of sight. And a Dactyl engineer was held in reserve then placed inside a building.

Top of 1: Steel Phalanx

First the Myrmidon used it’s impetious order to advance up. Another order had it advance up more and threw smoke triggering a Zero ARO, who dropped an e/Mauler. With one further order the Myrmidon attempted to Chain Rifle down the Zero, who dodged away. While the Myrmidon took an e/Mauler to the face, and failed BTS, isolating it. I also revealed my prowler to shoot at the Myrmidon, who passed that armor roll. The Zero dodged around the corner for the Myrmidon. Next Alke advanced up and shot the Zero off the table. Covered by smoke the Agema marksman advanced up his roof with impunity. It then took a shot at my Custodier. (Since it was just me and my opponent in the shop, and neither of us know the rules super well, we couldn’t find the reference that would have let the Custodier Dodge in face to face.) Hitting twice my Custodier took 4 armor rolls (multisniper double action) and was removed from the table. With that damage done, the Steel Phalanx used an FO Thorakites to secure the farthest antenna, then passed turn.

Bottom of 1: Bakunin

Well, that could have gone better, down two models and in loss of lieutenant. Not wanting to give up I had two goals, capturing my antenna and removing the Agema from the table. The Riot Grrl used her irregular to double move into base with the antenna. Unfortunately I misjudged angles and she got shot by Alke, fortunately she toughed it out. Converting the Warcor order to be regular, I had the Riot Grrl attempt to dodge and capture. She succeeded in dodging, but failed to secure the antenna. I had my prowler to shoot at the Agema, who dodged prone. I advanced up the Zero to try and cover the middle antenna and passed turn.

Top of 2: Steel Phalanx

Having killed a Zero, Alke became impetious thanks to Fury, she advanced up and took shots at my Riot Grrl, I chose to shoot back with her Combi Rifle, because I am some kind of genius (the Blitzen has the same bands as the Spitfire, shooting with the same results as Alke or dodging on 16’s would have been a better choice…), and my Riot Grrl goes down in a hail of bullets. At this point I inform my opponent that I have no specialists left (thank you random list generator) and with no way to take antennas from him he has won the game. We call it there so that he can head out to pack for the Thanksgiving trip he has the next day.

Final Score: 1 – 0 Steel Phalanx Victory

Lessons Learned:

  • As confident as I am in my abilities, I have only played 7 (now 8) games, I should only use the random list utility for ideas, not actual lists, yet.
  • A model being shot out of or from through a Zero Visibility Zone can dodge with no modifier in Face-to-Face. This is under the Zero Visibility Zone rules. (maybe if I write it enough times I won’t forget again…)
  • Leaving the Custodier visible was a mistake, probably a game losing one. Most of her kit could be used in zone of control anyways.
  • The Riot Grrl Specialist has a Blitzen, and all Riot Grrls have Hyper Dynamics. Dodging on 16s and shooting on 16s are much better than shooting a Combi on 10’s.
  • The Prowler has a cool kit. I will be using it again I’m the future.
  • I could have swapped the Repeater e/Mauler Zeros with the FO Zero profile at no change in list points. But gaining two specialists and anti personnel mines, which would be more useful in Recon+. In a full game the repeater profile has some appeal, especially with the Custodier Lt. I think I got distracted by having a huge hacking coverage zone, and didn’t actually think about what would be useful.

Jhokalups – Field Operation Action Report – 7

Jhokalups – Field Operation Action Report – 7
Bakunin vs Imperial Service
300 ITS X – Supremacy – Limited Insertion

Hello and welcome again to an operation report from the field. This week a Bakunin expeditionary force faced up against a force of Imperial Service troops.

My opponent this week came down for some last minute Limited Insertion practice for Emerald City Incursion MK II. We rolled on the list and got Supremacy. We rolled our Wip and got the game underway.

Wip Roll

Bakunin – 15 (fail)
Imperial Service – 2

Decision: Imperial Service
Deployment: Imperial Service
Initiative: Bakunin
1st Turn: Bakunin
1st Deploy: Bakunin

Imperial Service List:

 ISS Limited Insertion
──────────────────────────────────────────────────

10
 CRANE IMPERIAL AGENT (X Visor) Spitfire, 2 Nanopulsers / Pistol, DA CCW. (2 | 54)
 CELESTIAL GUARD Hacker (Hacking Device) Combi Rifle / Pistol, Knife. (0.5 | 21)
 CELESTIAL GUARD (Kuang Shi Control Device) Combi Rifle + Light Smoke Grenade Launcher / Pistol, Knife. (0.5 | 13)
 CELESTIAL GUARD (Forward Observer) Boarding Shotgun / Pistol, Knife. (0 | 13)
 CELESTIAL GUARD (Forward Observer) Boarding Shotgun / Pistol, Knife. (0 | 13)
 PHEASANT IMPERIAL AGENT (Chain of Command) Boarding Shotgun, Stun Grenades / Pistol, DA CC Weapon. (0 | 29)
 ZHÀNYING (Sensor) Breaker Combi Rifle, Nimbus Grenades, MadTraps / Pistol, Electric Pulse. (0 | 28)
 ZHÀNYING (Sensor) Breaker Combi Rifle, Nimbus Grenades / Pistol, Electric Pulse. (0 | 26)
 HSIEN Lieutenant HMG, Nanopulser / Pistol, AP CCW. (2 | 61)
 NINJA Hacker (Assault Hacking Device) Combi Rifle / Pistol, Shock CCW, Knife. (0.5 | 40)
5.5 SWC | 298 Points

Open in Infinity Army

Bakunin List:

 Bakunin LI
──────────────────────────────────────────────────

10
 REVEREND CUSTODIER Hacker (Hacking Device Plus) Lieutenant Combi Rifle + Pitcher / Pistol, Knife. (0.5 | 34)
 REVEREND CUSTODIER Hacker (Assault Device Plus UPGRADE: Icebreaker) Boarding Shotgun / Pistol, Knife. (0.5 | 30)
 REVEREND HEALER Combi Rifle, Nanopulser / Pistol, EXP CCW. (0 | 33)
 RIOT GRRL Spitfire / Pistol, Knife. (2 | 34)
 RIOT GRRL Boarding Shotgun, Stun Grenades + TinBot B (Deflector L2) / Pistol, Knife. (0 | 30)
 RIOT GRRL Missile Launcher / Pistol, Knife. (2 | 33)
 RIOT GRRL Combi Rifle, Blitzen, Stun Grenades / Pistol, Knife. (0 | 29)
 RIOT GRRL (Specialist Operative) Combi Rifle, Blitzen, Stun Grenades / Pistol, Knife. (0 | 30)
 ZOE & PI-WELL . (0 | 47)
  ZOE (Hacking Device. UPGRADE: Stop!) Combi Rifle, D-Charges / Pistol, Knife. (0 | 28)
  PI-WELL Combi Rifle / Electric Pulse. (0 | 19)
5 SWC | 300 Points

Open in Infinity Army

This was my first time playing supremacy. This scenario was an interesting challenge, it has points that score at the end of every game round, different points that are scored at the end of the game, and a mandatory objective that, if not completed, will lose points.

Deployment:

Bakunin Deployment:

Remembering my issues from last week against USARF, I elected to do split level deployment, with units on top of the catwalks and units on the ground.

My Reverend Harris was on my left near the console. I had my AHD hacker on top of the catwalk, ready to walk in and claim it. The healer and HD+ we’re on the ground, ready to walk around towards another console.

My Riot Grrl core was on my right, with tinbot boarding shotgun and the non-specialist Combi rifle were on the catwalks. The specialist, missile launcher and spitfire on the ground. Zoe and the Xenotech we’re up high and out of sight. I had π-Well as my reserve.

Imperial Service Deployment:

My opponent also had a core and a Harris. The core was on my right behind a building and out of sight. The Harris deployed up on the catwalks on my left, watching the line to the console I was eyeing. The Pheasant Imperial Agent was attached to the Xenotech and on my left. The Hsien was the reserve and placed with the Harris.

Top of 1: Bakunin

Seeing that there were two heavy infantry on the field I wanted to see what my AHD custodier could do. I also only saw 9 models on the field, and a mysterious PHY roll. So I was concerned about the possibility of a hidden deployment ninja or something else nasty. First order had the reference link advance up a bit. Putting AHD into the building with the console and HD+ around a corner. I used HD+ to shoot a pitcher to be under the catwalk near the Harris with the Hsien. Another order had a successful face to face of ice breaker vs reset. (Here we forgot the rules of ice breaker and the Hsien passed his BTS using his 6; the Hsien should have failed and been immobilized. Oh well, live and learn…) The Hsien passed his BTS and I tried a couple other attempts to break the link with the Reverends. But it was not to be. Since the Hsien was still up I thought I would try to get two things at once with my boarding shotgun. While the Grrls moved up a ninja popped out trying to take a Grrl out of the link with some hacking. Fortunately the TinBot did its job and protected the Grrls. Once the Grrls were out of hacking range I had boarding shotgun go up and take a shot at the Hsien and a Zhanying. She missed, the breaker didn’t and she went unconscious, breaking the link. Next, I had Zoe and the Xenotech advance up the stairs a little and then put up assisted fire on to π-Well. π-Well then tried to to shoot the ninja. The ninja won the face to face with a dodge change-face, stupid TO Camo… using a coordinated order the Grrls and π-Well took down the ninja, and getting the specialist Grrl close to a console. I reformed the riot Grrl link and passed turn.

Bottom of 1: Imperial Service

The first concern of the imperial service was to ensure that the repeater was gone so that Hsien could activate with getting several hacker AROs. The core team of celestial guard advanced a little and shoot the repeater π-Well took an ARO and was knocked unconscious for his troubles. After taking out the robot and repeater, the celestial guard and the Phoenix operative decided to to take out my specialist Riot Grrl it took a few shots and it almost got blitzened,but in the end they got her. Next, the Hsien decided it was party time, and stood up to advanced down a staircase, the riot Grrl still on the catwalk took a couple shots at him with her Blitzen. The Hsien won the face to face and she took a wound, failing guts and dodging prone. Next the Hsien strategically advanced up to shoot my HD+ Custodier (also my Lt) off the table. Causing me to go into loss of LT. At this point Imperial service was out of orders and passed turn.

With models in three of the four zones and my Xenotech in one of them I scored 2 points.

Score at End of 1: 2 – 0 Bakunin Lead

Top of 2: Bakunin

Being in loss of lieutenant everything was irregular. First up I had Zoe and the Xenotech go. They both advanced and then the Xenotech placed the Multiscanner with the help of some hackers on the board giving a +3 to it’s WIP roll. Next, the custodier made a dash across the open space to a console, successfully hacking it. She unfortunately went unconscious for her efforts. Not wanting to break the Riot Grrl link I passed turn.

Bottom of 2: Imperial Service

Being behind by 4 at the start of this turn, Imperial service had some catching up to do. The Celestial core worked together with the Phoenix operative to take out the missed launcher. Luckily the Phoenix got a critical and he didn’t lose all the Celestial guards to a missile launcher template. After the missile launcher Grrl was gone, the Phoenix operative took out the Reverend healer. The core then secured the objective, which let the Grrl on the catwalk dodge change-face. Sulhe succeeded her role and stood up to threaten down below with stun grenades. Using his Hsien and Zhanying link he advanced towards my side, I had the remaining riot Grrl successfully dodge on both orders. The celestial core then ran toward the console on my right, the Riot Grrl up top failed to land a stun grenade and they hacked the console. Finally the Hsien used his Lt order to cross into the zone on my right, getting gotcha’d by Zoe for his trouble.

Having placed my Multiscanner and hacking a console, I picked up two more points. With two consoles and dominating more zones the Imperial Service got 3 points.

Score at End of 2: 4 – 3 Bakunin Lead

Top of 3: Bakunin

With Zoe and a single Riot Grrl left, I started my turn in retreat. I used one command token to have Zoe ignore the effects of retreat, and a second one to turn the Riot Grrl order regular. Using these two orders I advanced Zoe into the Zone of Control of the Imperial Service HVT, then ended the game.

After discussing with the available Warcore we determined that we would do end of round scoring. Imperial service picked up another point for dominating. Since the Imperial Service Xenotech never even activated, let alone place a multiscanner, the Imperial Service force also lost one point.

Final Score: 4 – 3 Bakunin Victory

Lessons Learned:

  • The Xenotech is a very important scenario piece. In this game the Imperial Service force lost 5 points by not even advancing it. Three for it being in a dominated zone, not getting a point for placing the Multiscanner, and losing an additional point for not placing the Multiscanner.
  • I need to learn my hacking programs. Ice breaker is a zero BTS program. Everything after the second order would have been affected since the Hsien would have failed without his BTS.
  • The Phoenix agent is a heavy infantry. I didn’t realize that until turn 2, I should have had a plan for it as well.
  • I could have done better pitcher placement. I elected for caution to guarantee placement. But shooting it a bit further would have made it much more difficult for Imperial Service forces to remove. Locking down the Hsien for fear of more hacking devices.
  • The ninja revealed in the Zone of control of π-Well, who is a repeater. I could have used the having device plus to take out ninja hacker without having π-Well fail to shoot it.
  • Retreat can really mess with missions. Imperial Service could have easily won with one more turn.

Jhokalups – Field Operation Action Report – 6

Jhokalups Field Operation Action Report 6

Bakunin vs USAriadna Ranger Force

300 ITS X – Supplies – Limited Insertion

Welcome again to another Field Ops Action Report. This week was a rematch against Sprocketgx, we called our last game early. This week we were still practicing Limited Insertion for a local event and for the Emerald City Incursion MKII (Improving our skills improves our opponents, or something like that).

Wip Roll

SprocketGx – 10
Jhokalups – 6

Sides: SprocketGX
1st Turn: Jhokalups
1st Deploy: Jhokalups

SprocketGX USARF list:

 LI USARF
──────────────────────────────────────────────────

9  1  1
 UNKNOWN RANGER (Specialist Operative) Molotok / Heavy Pistol, T2 CCW, Knife. (1.5 | 47)
 BLACKJACK T2 Sniper, Submachine Gun, Chest Mines / Heavy Pistol, CC Weapon. (1 | 36)
 MARAUDER Lieutenant Rifle, Heavy Flamethrower / Heavy Pistol, Knife. (0 | 21)
 MARAUDER (Multispectral Visor L1) Sniper / Heavy Pistol, Knife. (0.5 | 29)
 MARAUDER (Multispectral Visor L1) Heavy Rocket Launcher / Assault Pistol, Knife. (1.5 | 26)
 MARAUDER Paramedic (MediKit) Rifle, Heavy Flamethrower / Heavy Pistol, Knife. (0 | 23)
 MARAUDER Molotok / Heavy Pistol, Knife. (1.5 | 28)
 DEVIL DOG Chain Rifle, Smoke Grenades + 1 K-9 Antipode / AP Heavy Pistol, AP CCW. (0 | 30)
  K-9 ANTIPODE AP CCW. (7)
 VAN ZANT AP Rifle / Heavy Pistol, AP CCW. (0 | 38)
 ROSIE Light Rocket Launcher, Light Shotgun, D-Charges / Pistol, Knife. (0 | 22)
6 SWC | 300 Points

Open in Infinity Army

Jhokalups Bakunin List:

 Bakunin LI
──────────────────────────────────────────────────

10
 REVEREND CUSTODIER Hacker (Hacking Device Plus) Lieutenant Combi Rifle + Pitcher / Pistol, Knife. (0.5 | 34)
 REVEREND CUSTODIER Hacker (Assault Device Plus UPGRADE: Icebreaker) Boarding Shotgun / Pistol, Knife. (0.5 | 30)
 REVEREND HEALER Combi Rifle, Nanopulser / Pistol, EXP CCW. (0 | 33)
 RIOT GRRL Spitfire / Pistol, Knife. (2 | 34)
 RIOT GRRL Boarding Shotgun, Stun Grenades + TinBot B (Deflector L2) / Pistol, Knife. (0 | 30)
 RIOT GRRL Missile Launcher / Pistol, Knife. (2 | 33)
 RIOT GRRL Combi Rifle, Blitzen, Stun Grenades / Pistol, Knife. (0 | 29)
 RIOT GRRL (Specialist Operative) Combi Rifle, Blitzen, Stun Grenades / Pistol, Knife. (0 | 30)
 ZOE & PI-WELL . (0 | 47)
  ZOE (Hacking Device. UPGRADE: Stop!) Combi Rifle, D-Charges / Pistol, Knife. (0 | 28)
  PI-WELL Combi Rifle / Electric Pulse. (0 | 19)
5 SWC | 300 Points

Open in Infinity Army

Sprocket won the WIP roll and wanted to go first, then he looked at the table. Since there was clearly a better side, he chose to take it. So, I wound up choosing to go first as Sprocket moved his stuff to the superior side.

Deployment:

I was also had the privilege of deploying first. I hid the Grrls link on, around and inside a silo on my right. Zoe decided that was a good place to hide as well. My Reverend Harris was on a catwalk to my left and I held π-Well as my reserve.

Sprocket put 4 of the five marauders up on the catwalks looking over the central objective and the objective on my right, the last was just below The blackjack took a sniper nest on my far left in the deployment zone. Rosie was behind cover to take a look at the central objective. The unknown ranger was in cover looking over the objective on my left.

Top of 1: Bakunin

To start things off I knew I needed to clear out the Heavy Rocket Marauder. The Reverend link crawled and then put up white noise near π-Well. Then that link activated again to put assisted fire on him. π-Well then activated and used the white noise to shock the Paramedic Marauder off the table. Then the HRL Marauder was shocked off the table. Another order put Rosie into dogged. A fourth dodged the sniper out of my ability to shoot. I spent the rest of my orders positioning the riot Grrls up the board.

Bottom of 1: USARF

With the unknown ranger as the last specialist, Sprocket needs to focus on protecting it. The Devil Dog takes it’s impetuous move, jumping down into the middle of the board. Then an irregular order puts the Devil Dog in a good spot to start laying down the pain onto the Reverend link.

Next Van Zant drops in and uses another order to come up and shoot Zoe off the field. After the second regular order where all the Reverends successfully dodge, I notice that Pi-Well has line of sight to the Devil Dog, and could be AROing. So the next shot he takes Pi-Well shoots back and puts a wound on the Devil Dog. A few orders later and the Reverend Healer goes down but is unconscious.

Top of 2: Bakunin

My goals for this turn were to deal with the Devil Dog, Blackjack and get my specialists in a position to retrieve some boxes. I start by moving Pi-Well and having him take a shot at the dog. The dog succeeds in setting up smoke. The Custodier can now put up shock support on Pi-Well. Who fires an exchange with Van Zant and shocks him off the table. The Riot Grrls are brought further up the field, I am looking at getting the heavy infantry close to his HVT for some classifieds. The Missile Launcher Grrl also takes a shot at the Blackjack and successfully puts him into Battle Ravaged. I use my last regular order to put the HD+ Custodier into Cybermask.

Bottom of 2: USARF

Sprocket Cancels the Devils Dogs Extreme Impetuous Order. He stands up a Marauder Sniper and shoots Pi-Well in the back. I misunderstand my ARO options and fail a dodge, Pi-Well goes unconscious. With Pi-Well unable to re-act the Devil Dog declares an Idle while in base with the Unconscious healer. The AHD Custodier Declares a dodge, and the Devil Dog steals the Healer, completing a classified objective. The Unknown Ranger repositions up to a wall closer to the objective. And the Marauder link reposition to cover some stairs, walkways and objectives.

Top of 3: Bakunin

I am down to just a few specialists. The Riot Grrl Missile Launcher trys again on the blackjack and winds up dieing. I relink the remaining Grrls and try to get use the Specialists Blitzen to shut down blackjack. I am 1 inch into the unfavorable range band, so I miss my two shots, that Grrl may have also taken a wound. I reposition the link again and have the other Riot Grrl with a Blitzen take a shot at Blackjack, I get one hit and Sprocket crushes the Arm rolls with a pair of 17’s. With just a few orders left I need to focus on objectives. I spend an order to divide the Grrls up, sending the spitfire forward to shoot at the Unknown ranger while sending another Grrl off towards the HVT. When the Unknown Ranger fails to go down, I send the specialist and spitfire forward. I claim a classified with the Boarding shotgun riot grrl and the HVT. Unfortunately I don’t have enough orders to get the Specialist Grrl in contact with the objective. I pass the turn.

Bottom of 3: USARF

Once again the Extreme Impetuous order is canceled on the Devil dog. The marauder link activates and lays down fire on the Riot Grrl Specialist and Spitfire, they both succeed their dodges. Next up the Unknown ranger starts putting shots into the Spitfire and the Specialist, they ARO back and both take wounds. The trick is repeated and they both go down.

Sprocket is free to have the Unknown Ranger run up and snag the Objective, which he succeeds the roll at. And that’s the end of the game.

Final Score: 7 – 1 USARF Victory

Lessons Learned:

  • I need to mark my bases to make front arcs clear, I missed some opportunities because it wasn’t obvious to me where my models were facing.
  • I need to pay attention to all the field and not just the models that are activating. I missed several opportunities to have Pi-Well ARO against the Devil Dog.
  • Pi-Well is amazing! But he is also a Forward Observer, which means he has access to Flash Pulse. Had I remembered Flash Pulse and that Pi-Well could have ARO’d the dogs when they first jumped up, I could have likely stopped that avenue of attack in it’s tracks. On my active turn I could have also used it to shutdown any ARO opportunities that the Devil Dog would have had.
  • I need to remember my LT order. I had a plan to coordinate a jump for the AHD Custodier and Pi-Well to be on the ground and running towards boxes. I used the order to instead Cybermask my HD+ custodier. As my LT she could have used that order and let Pi-Well and the other Custodier be on the ground without any consequence.
  • When the game first started Sprocket had wanted to go first, but then switched to choosing deployment. I did a lot of my deployment as if I were going to go second. Many of my troops were not in a good position for what they could do. Particularly the Riot Grrls and at least one member of the Reverend link.
  • The HD+ profile had a pitcher. My first orders moved that pitcher further and further from where I needed it. Had I paid attention to the pitcher I could have gotten the HD+ custodier close enough to drop the pitcher by Blackjack, the the AHD could have used Icebreaker to shut down one of the only hackable heavy infantry in Ariadna.
  • The table itself was a bit of an issue. We were set up on a section of a long table, so it was difficult to get to the sides of the table. This made moving under the gang planks awkward at best. I definitely messed up my movement and ARO opportunities because of my ability to see what was going on.


Jhokalups – Field Operation Action Report – 5

Jhokalups Frontline Operation Action Report 5

StarCo v Force de Réponse Rapide Merovingienne

150 Recon+ – Exfiltrate

This week I had the pleasure of facing off against our local Warcor, TheDiceAbide. Since I was so late to game night we decided for Recon+ instead of ITS practice. A roll on the Recon+ table selected Exfiltrate. Which I have been told it’s a combination of Unmasking and Rescue. With some new buildings I have been working on setup we rolled Wip.

Roll:

FRRM 6

StarCo 7

1st turn Nathan

1st deploy Nathan

Sides Adam

Called at the end of 1, RG Spitfire killed everything in active and ARO.

Final Score 2-0 StarCo Victory

Adam’s list:

 Recon+ FRRM
──────────────────────────────────────────────────
7  1

 MÉTRO Paramedic (Medikit) Rifle / Pistol, Knife. (0 | 10)
 MÉTRO Rifle, Light Grenade Launcher / Pistol, Knife. (0.5 | 12)
 PARA-COMMANDO (Forward Observer) Rifle / Pistol, Knife. (0 | 21)
 BRIGADIER BRUANT Lieutenant Molotok, D-Charges / Pistol, Knife. (1 | 28)
 BRISCARD (Forward Observer) Marksman Rifle / Assault Pistol, Knife. (0 | 25)
 BRISCARD Paramedic (Medikit) Marksman Rifle / Assault Pistol, Knife. (0 | 26)
 BRISCARD Heavy Rocket Launcher / Assault Pistol, Knife. (1.5 | 23)
 WARCOR (Aerocam) Flash Pulse / Stun Pistol, Knife. (0 | 3)
3 SWC | 148 Points

Open in Infinity Army

My List:

 For funsies
──────────────────────────────────────────────────

5  3  1
 ALGUACIL Lieutenant Combi Rifle / Pistol, Knife. (1 | 10)
 EMILY Breaker Combi Rifle, Nanopulser / Assault Pistol, Knife. (0 | 30)
 RIOT GRRL Spitfire / Pistol, Knife. (2 | 34)
 RIOT GRRL (Specialist Operative) Combi Rifle, Blitzen, Stun Grenades / Pistol, Knife. (0 | 30)
 CSU (Specialist Operative) Rifle + Light Shotgun, Nanopulser / Pistol, Knife. (0 | 12)
 IRMANDINHO Chain Rifle, D-Charges, Smoke Grenades / Pistol, AP CCW. (0 | 8)
 BANDIT (Forward Observer) Light Shotgun, Adhesive Launcher / Pistol, DA CCW. (0 | 23)
 WARCOR (Aerocam) Flash Pulse / Stun Pistol, Knife. (0 | 3)
3 SWC | 150 Points

Open in Infinity Army

Deployment:

TheDiceAbide chose table sides. He told me his choice was motivated by not wanting to move his stuff to the other side of the table.

Deploying I hid my Riot Grrl Core with Emily behind a building on my right, the Alguacil LT joined them. My Irmandinho was on the left lying down behind some cover. The CSU was more central with the Warcor. I held my bandit in reserve. I put my civilians in places I felt would be easy to get them back to my side.

FRRM deployed his link centered around a little forest thing, except for the heavy rocket launcher, which was staring down the longest fire lane. His metros were hiding in cover and total cover. The last thing I saw deployed was a Warcor.

I deployed my Bandit reserve just outside the exclusion zone. The FRRM reserve was a camo marker (Bruant Lt) in the forest.

Top of 1 – StarCo

To start things off my Irmandinho used his impetuous order to start going through the building to my left. He we discussed how to rule the buildings and used a “not through two” rule for line of sight through the doors. Next up I had five orders to get stuff done with. I used one to bring the Em+RG link into the building on my right. Using interior features to cover their approach to the firelane door. After looking through some doors we agreed on the sequence of models that would get sight on the door corner. Then I used an order an carefully placed the Spitfire Riot Grrl to see the Briscard Medic and gun it down. Next the RG-Spitfire took down the warcor. I realized that the Metro was prone behind, and the next model to become visible was the Briscard Heavy Rocket Launcher. I remember my mistake from my first game, and decide to move Emily and the Specialist Riot Grrl back a bit before taking on the HRL. I then get a clever idea to try and use my CSU to tag the HRL from near a civilian to negate blast mode. Two orders (one of which was a converted irregular) and one bad estimation of distance later… and my CSU is a pile of ash. At this point I pass turn. Electing not to move the Bandit

Bottom of 1 – FRRM

Starting off with a diminished link and a loss of orders TDA elected to try and force some hard ARO choices. Using a coordinated order (breaking the link) he brought the Briscards, a metro and a camo marker up. I elect to shoot the Briscard, winning the face to face and knocking it out. Another coordinated order brings the HRL and camo marker up to shoot at my Riot Grrl. This time I shoot at the HRL, taking a standard roll from Bruant. The HRL goes down and the Riot Grrl Suffers a wound. TDA elects to drop the Para-Commando behind my link. It lands right in front of my Alguacil, who takes it down with his Combi Rifle. Bruant makes one more attempt at the Riot Grrl, and goes down in a hail of Bullets. The Metro makes a speculative fire with a Light Grenade Launcher, but it fails to place.

With the two weakest models of his list left, we decided to call the game at the end of his turn.

Swapping my classified for Secure the HVT gets me some points.

Final Score: 2 – 0 StarCo Victory

Lessons Learned:

  • I continue to struggle to get the bandit to do work for me. This game I didn’t spend a single order on it. I could have used it’s irregular to get closer to one of my Civilians.
  • I placed my civilians poorly for Exfiltrate. Looking at the deployment pictures. I should have put them all in a row in the building on my left. They would have been out of line of fire from the back field and I would have had easy access to get them out safely.
  • The Riot Grrl Spitfire is really strong in Recon+, in StarCo being able to form a 3 person core makes her truly dominating.
  • I killed my opponent too well. Between my turn and his I cleared all the meaningful pieces off the table. In a tournament setting this would have left me with one more turn to actually try and secure some objectives. Which is a little difficult with only 5 regular orders.
  • If a game is to be recorded for a tournament or league, you should play out the turns. Objective Points are important. More important than the body count that a Riot Grrl can rack up.